> ## Documentation Index
> Fetch the complete documentation index at: https://lightdash-docs-many-to-many.mintlify.site/llms.txt
> Use this file to discover all available pages before exploring further.
# How to embed content
> Lightdash allows you to embed your dashboards using expirable URLs and tokens (embed URLs from now on). This is a great way to enable self-serve analytics in your own application and platform by leveraging the insights you've got in Lightdash and making them available to your own users.
Embedding is available to all Lightdash Cloud users, [get in touch](https://lightdash.typeform.com/to/BujU5wg5) to have this feature enabled in your account.
## Quick start to embed dashboards
### Create an embed secret
First, you need to generate a secret per project. This secret is like a password that will help you encrypt the URLs so we know the access is valid.
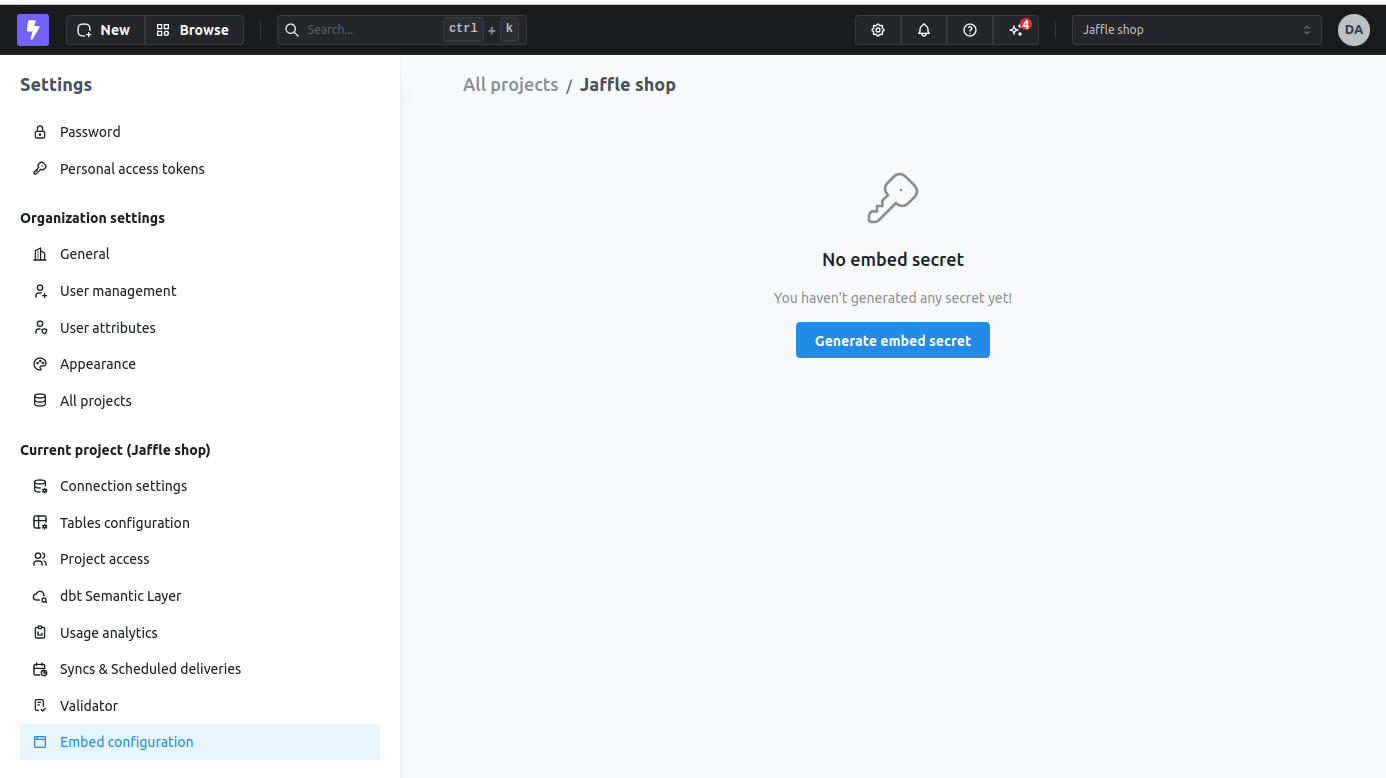 You can regenerate the secret by clicking on the `Generate new secret` button. If you do this, people with an old URL will automatically lose access to any previously shared embed URL.
### Allowed dashboards
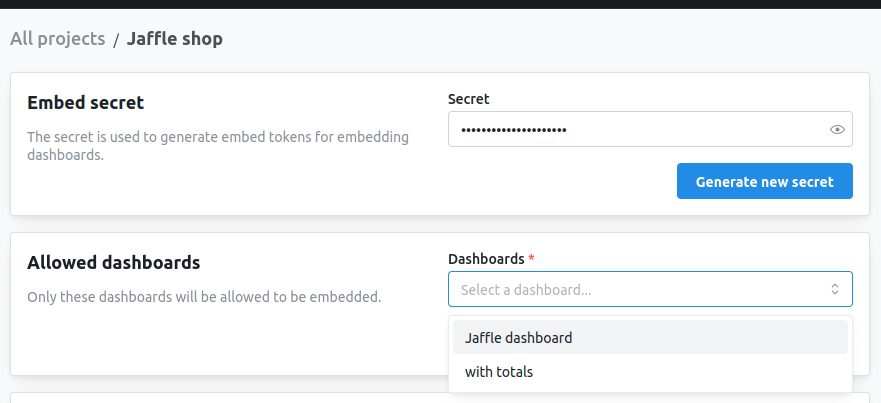
Only selected dashboards can be accessed via embed URLs
You can regenerate the secret by clicking on the `Generate new secret` button. If you do this, people with an old URL will automatically lose access to any previously shared embed URL.
### Allowed dashboards
Only selected dashboards can be accessed via embed URLs
 ### Preview
Under preview you can generate a one-off shareable embed URL for a single dashboard.
### Preview
Under preview you can generate a one-off shareable embed URL for a single dashboard.
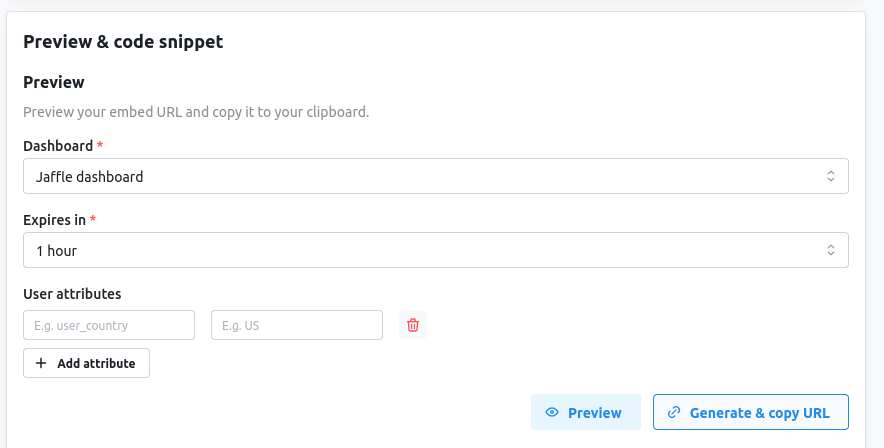 Click on `preview` to see the embed content and click on `Generate & copy URL` to generate an embed URL for this dashboard
### Developer flow and code snippet
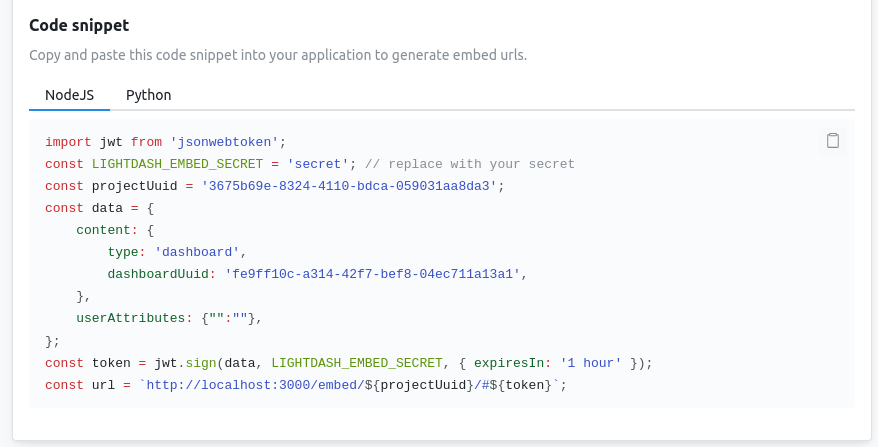
Although you can generate URLs directly from Lightdash with a long expiration it is recommended to generate your own JWT tokens in your backend with a short expiration using your `secret`to make sure people can't be using embed URLs outside your app.
To make this easier to integrate, we included some code snippets you can copy and use in your app to generate a valid embed URL
Click on `preview` to see the embed content and click on `Generate & copy URL` to generate an embed URL for this dashboard
### Developer flow and code snippet
Although you can generate URLs directly from Lightdash with a long expiration it is recommended to generate your own JWT tokens in your backend with a short expiration using your `secret`to make sure people can't be using embed URLs outside your app.
To make this easier to integrate, we included some code snippets you can copy and use in your app to generate a valid embed URL
 For more information on embed settings, see the [embedding reference doc](/references/embedding)
## Do I need a Lightdash account to be able to view embedded content?
No, embedded Lightdash content is available to view by anyone (not just folks with a Lightdash login).
So, for example, you could embed a dashboard in your product, and anyone who has access to your product would have access to that dashboard. No need to login to Lightdash.
We make sure that the links are secure and have a set expiry time that you pick.
## I want to have my embedded dashboard show different values for different users in my app.
Imagine a scenario where I have a dashboard embedded in my application showing an overview of orders. Ideally, when a user looks at this dashboard, they should only see the orders for their shop (not all of the other shops using my application). You can do this with embedded dashboards using user attributes. Here's how to do it:
### Create a user attribute in Lightdash
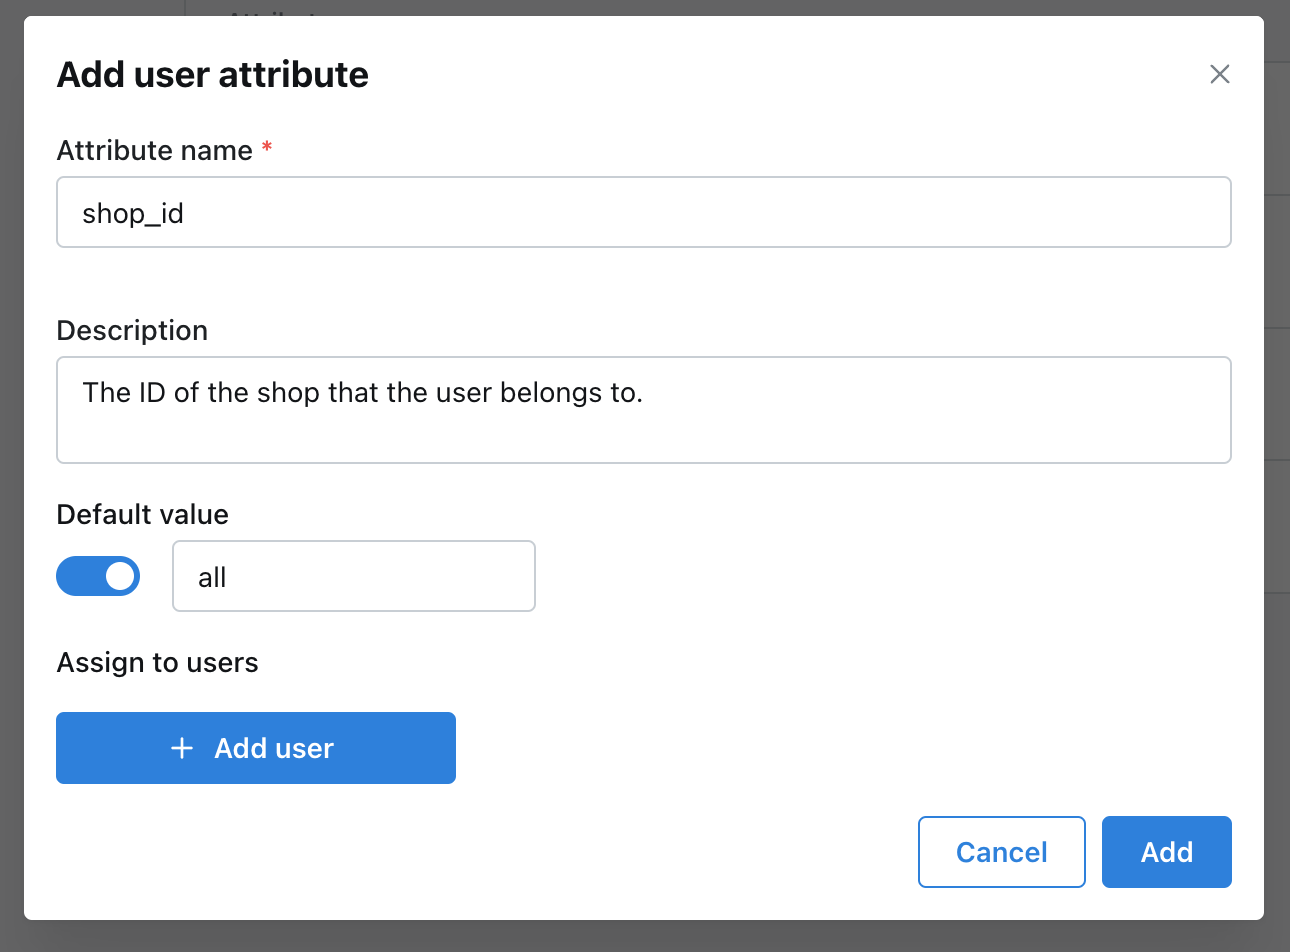
First, we need to create a [user attribute](/references/user-attributes) in Lightdash that we can use to assign our users to a specific shop. I create an attribute called `shop_id` and I set the default value to `all`.
For more information on embed settings, see the [embedding reference doc](/references/embedding)
## Do I need a Lightdash account to be able to view embedded content?
No, embedded Lightdash content is available to view by anyone (not just folks with a Lightdash login).
So, for example, you could embed a dashboard in your product, and anyone who has access to your product would have access to that dashboard. No need to login to Lightdash.
We make sure that the links are secure and have a set expiry time that you pick.
## I want to have my embedded dashboard show different values for different users in my app.
Imagine a scenario where I have a dashboard embedded in my application showing an overview of orders. Ideally, when a user looks at this dashboard, they should only see the orders for their shop (not all of the other shops using my application). You can do this with embedded dashboards using user attributes. Here's how to do it:
### Create a user attribute in Lightdash
First, we need to create a [user attribute](/references/user-attributes) in Lightdash that we can use to assign our users to a specific shop. I create an attribute called `shop_id` and I set the default value to `all`.
 ### Filter the tables used in your dashboard with `sql_filter`
We need to filter the access to all of the tables we use in our dashboard using this attribute. For example, in my `Order Summary` dashboard, I use the `orders` and the `shops` tables to build all of the charts. So, in these two tables, I'm going to add a [row-level filter](#../references/user-attributes#1-row-filtering-with-sql%5Ffilter) using my `shop_id` attribute, like:
```yaml
models:
- name: orders
meta:
sql_filter: ${lightdash.attributes.shop_id} = 'all' OR ${TABLE}.shop_id = ${lightdash.attributes.shop_id}
```
### Add the user attribute to your dashboard embed
Now that we have our user attribute set up and filtering our data properly, we want to head back to our dashboard embedding configuration.
There are two ways to use user attributes in your embedded dashboard:
**Option 1: assign a constant value for your attribute**
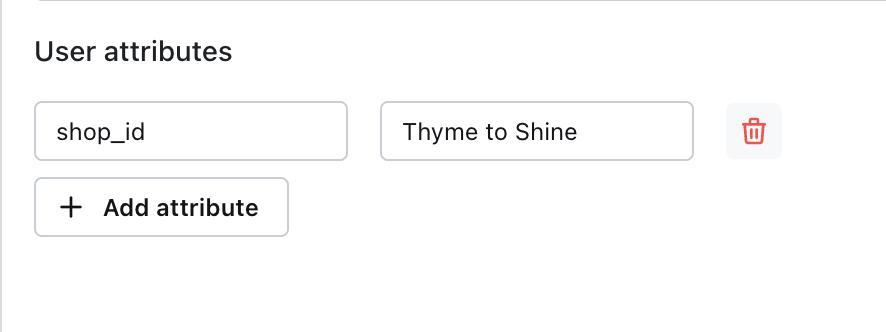
You can assign your dashboard a single, constant value for your attribute by adding it in the `user attributes` section of your embedded dashboard setup.
For example, if I wanted the embed link to only show data for `shop_id = Thyme to Shine`, then I would add a user attribute `shop_id` with the value `Thyme to Shine`.
### Filter the tables used in your dashboard with `sql_filter`
We need to filter the access to all of the tables we use in our dashboard using this attribute. For example, in my `Order Summary` dashboard, I use the `orders` and the `shops` tables to build all of the charts. So, in these two tables, I'm going to add a [row-level filter](#../references/user-attributes#1-row-filtering-with-sql%5Ffilter) using my `shop_id` attribute, like:
```yaml
models:
- name: orders
meta:
sql_filter: ${lightdash.attributes.shop_id} = 'all' OR ${TABLE}.shop_id = ${lightdash.attributes.shop_id}
```
### Add the user attribute to your dashboard embed
Now that we have our user attribute set up and filtering our data properly, we want to head back to our dashboard embedding configuration.
There are two ways to use user attributes in your embedded dashboard:
**Option 1: assign a constant value for your attribute**
You can assign your dashboard a single, constant value for your attribute by adding it in the `user attributes` section of your embedded dashboard setup.
For example, if I wanted the embed link to only show data for `shop_id = Thyme to Shine`, then I would add a user attribute `shop_id` with the value `Thyme to Shine`.
 **Option 2: assign a variable value for your attribute**
You can adjust the value of the user attribute based on a variable coming from your app so, for example, the user attribute for `shop_id` in the Lightdash embedded dashboard would change depending on which `shop_id` the user belonged to in my app.
To do this, I would pass Lightdash an external value for `shop_id` in the embed code snippet. This could look something like:
```yaml
import jwt from 'jsonwebtoken';
const LIGHTDASH_EMBED_SECRET = 'secret'; // replace with your secret
const projectUuid = '21eef0b9-5bae-40f3-851e-9554588e71a6';
const userShopId = await getUserShopIdFromDatabase();
const data = {
content: {
type: 'dashboard',
dashboardUuid: 'a392ed6d-4c53-4102-89b7-1c57a87df391',
},
userAttributes: { shop_id: userShopId },
};
const token = jwt.sign(data, LIGHTDASH_EMBED_SECRET, { expiresIn: '1 hour' });
const url = `https://analytics.lightdash.cloud/embed/${projectUuid}/#${token}`;
```
And voila! you now have an embedded dashboard that shows different values for different users in your app.
**Option 2: assign a variable value for your attribute**
You can adjust the value of the user attribute based on a variable coming from your app so, for example, the user attribute for `shop_id` in the Lightdash embedded dashboard would change depending on which `shop_id` the user belonged to in my app.
To do this, I would pass Lightdash an external value for `shop_id` in the embed code snippet. This could look something like:
```yaml
import jwt from 'jsonwebtoken';
const LIGHTDASH_EMBED_SECRET = 'secret'; // replace with your secret
const projectUuid = '21eef0b9-5bae-40f3-851e-9554588e71a6';
const userShopId = await getUserShopIdFromDatabase();
const data = {
content: {
type: 'dashboard',
dashboardUuid: 'a392ed6d-4c53-4102-89b7-1c57a87df391',
},
userAttributes: { shop_id: userShopId },
};
const token = jwt.sign(data, LIGHTDASH_EMBED_SECRET, { expiresIn: '1 hour' });
const url = `https://analytics.lightdash.cloud/embed/${projectUuid}/#${token}`;
```
And voila! you now have an embedded dashboard that shows different values for different users in your app.