> ## Documentation Index
> Fetch the complete documentation index at: https://lightdash-docs-many-to-many.mintlify.site/llms.txt
> Use this file to discover all available pages before exploring further.
# Lightdash MCP
{" "}
{" "}
The [Model Context Protocol (MCP)](https://modelcontextprotocol.io/) enables AI assistants (e.g. ChatGPT, Claude) and custom agents to directly interact with your Lightdash data. This integration allows MCP clients to explore your data models, search for metrics and dimensions, and provide data-driven insights - all through natural conversation. You can use MCP with existing AI assistants or integrate it into your own custom agents and automated workflows. MCP uses secure OAuth authentication and respects all your existing access controls, ensuring data remains protected.
With MCP, your AI assistant becomes a data analyst that can:
* Browse and understand your data models
* Find relevant metrics and dimensions
* Switch between different projects seamlessly
* Respect your data governance and access controls
MCP respects all your existing Lightdash permissions and user attributes. MCP
clients can only access the data that your user account has permission to
view.
## Get started
Setting up MCP is quick and straightforward. You can connect your AI assistant to your Lightdash instance in just a few minutes.
### Prerequisites
* A Lightdash Cloud Pro or Enterprise account with MCP enabled
* An MCP-compatible AI assistant (e.g., Claude.ai, Claude Desktop, ChatGPT)
### Installation
#### Claude.ai (Web & Desktop Apps)
Set up MCP in the [Claude.ai](https://claude.ai) web app, and it will automatically sync to your Claude Desktop app after restart.
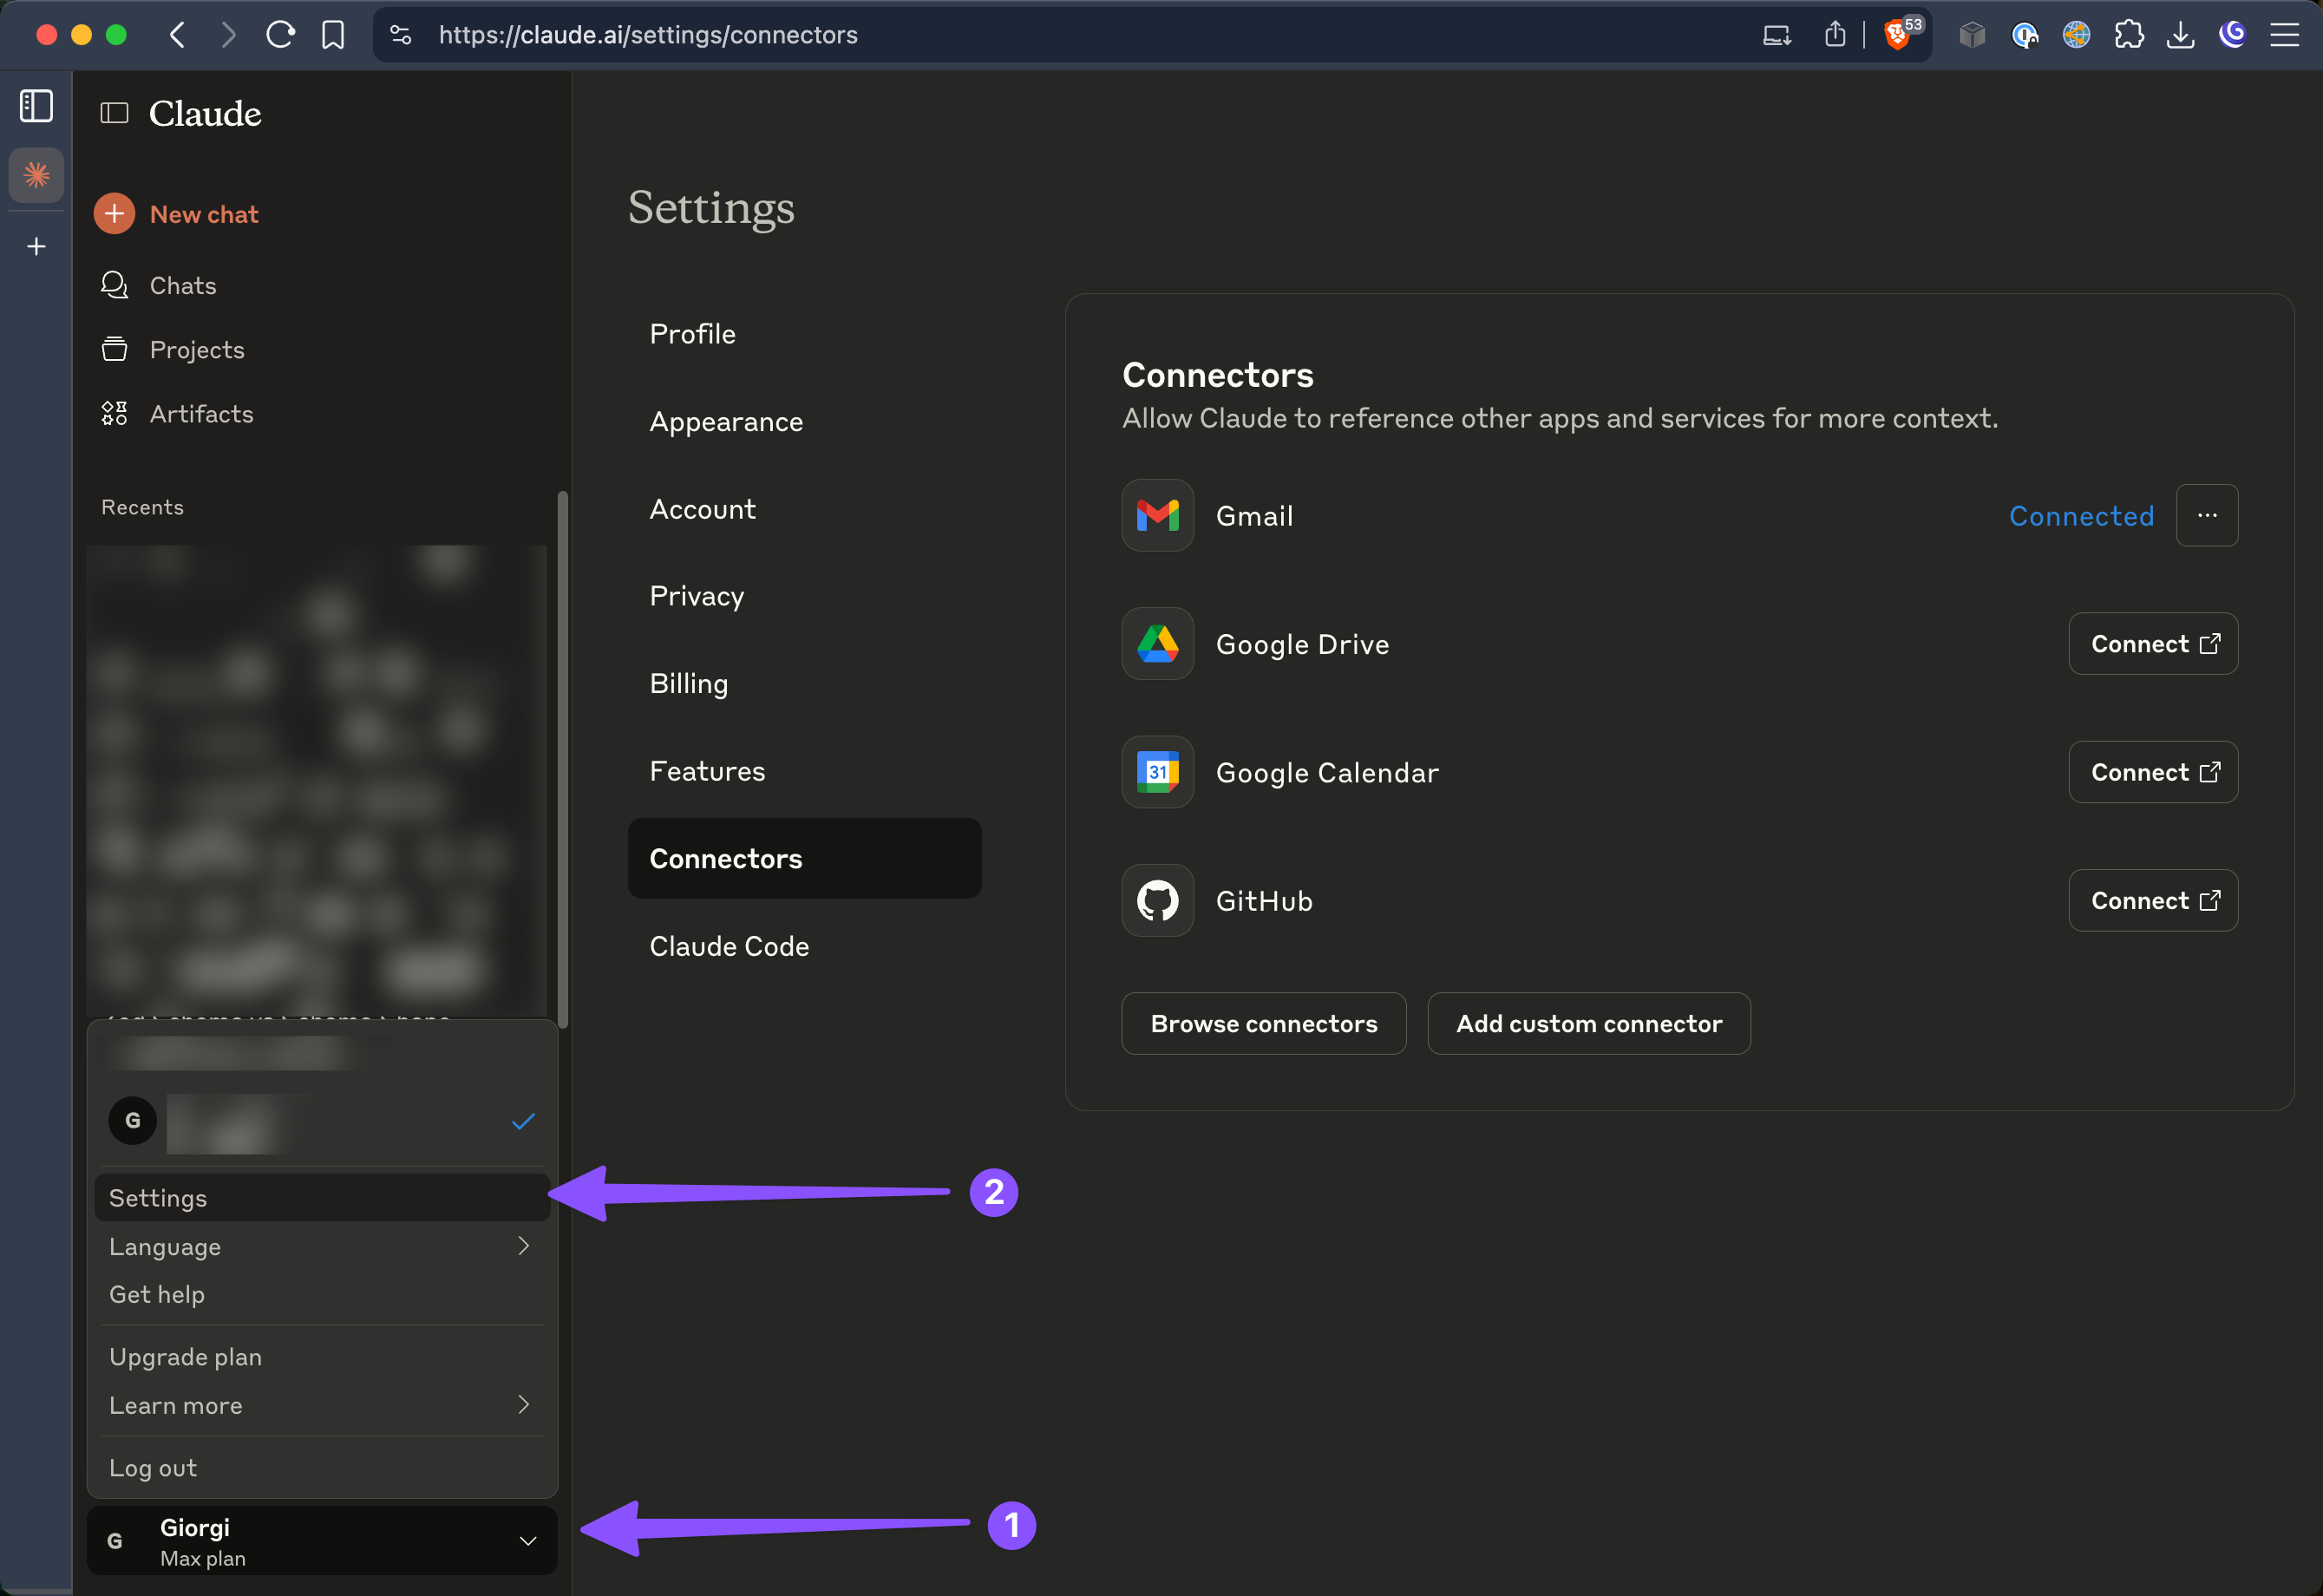
1. **Access Settings in Claude.ai**
Navigate to your profile menu (bottom-left corner) and select Settings.
 2. **Add Custom Connector**
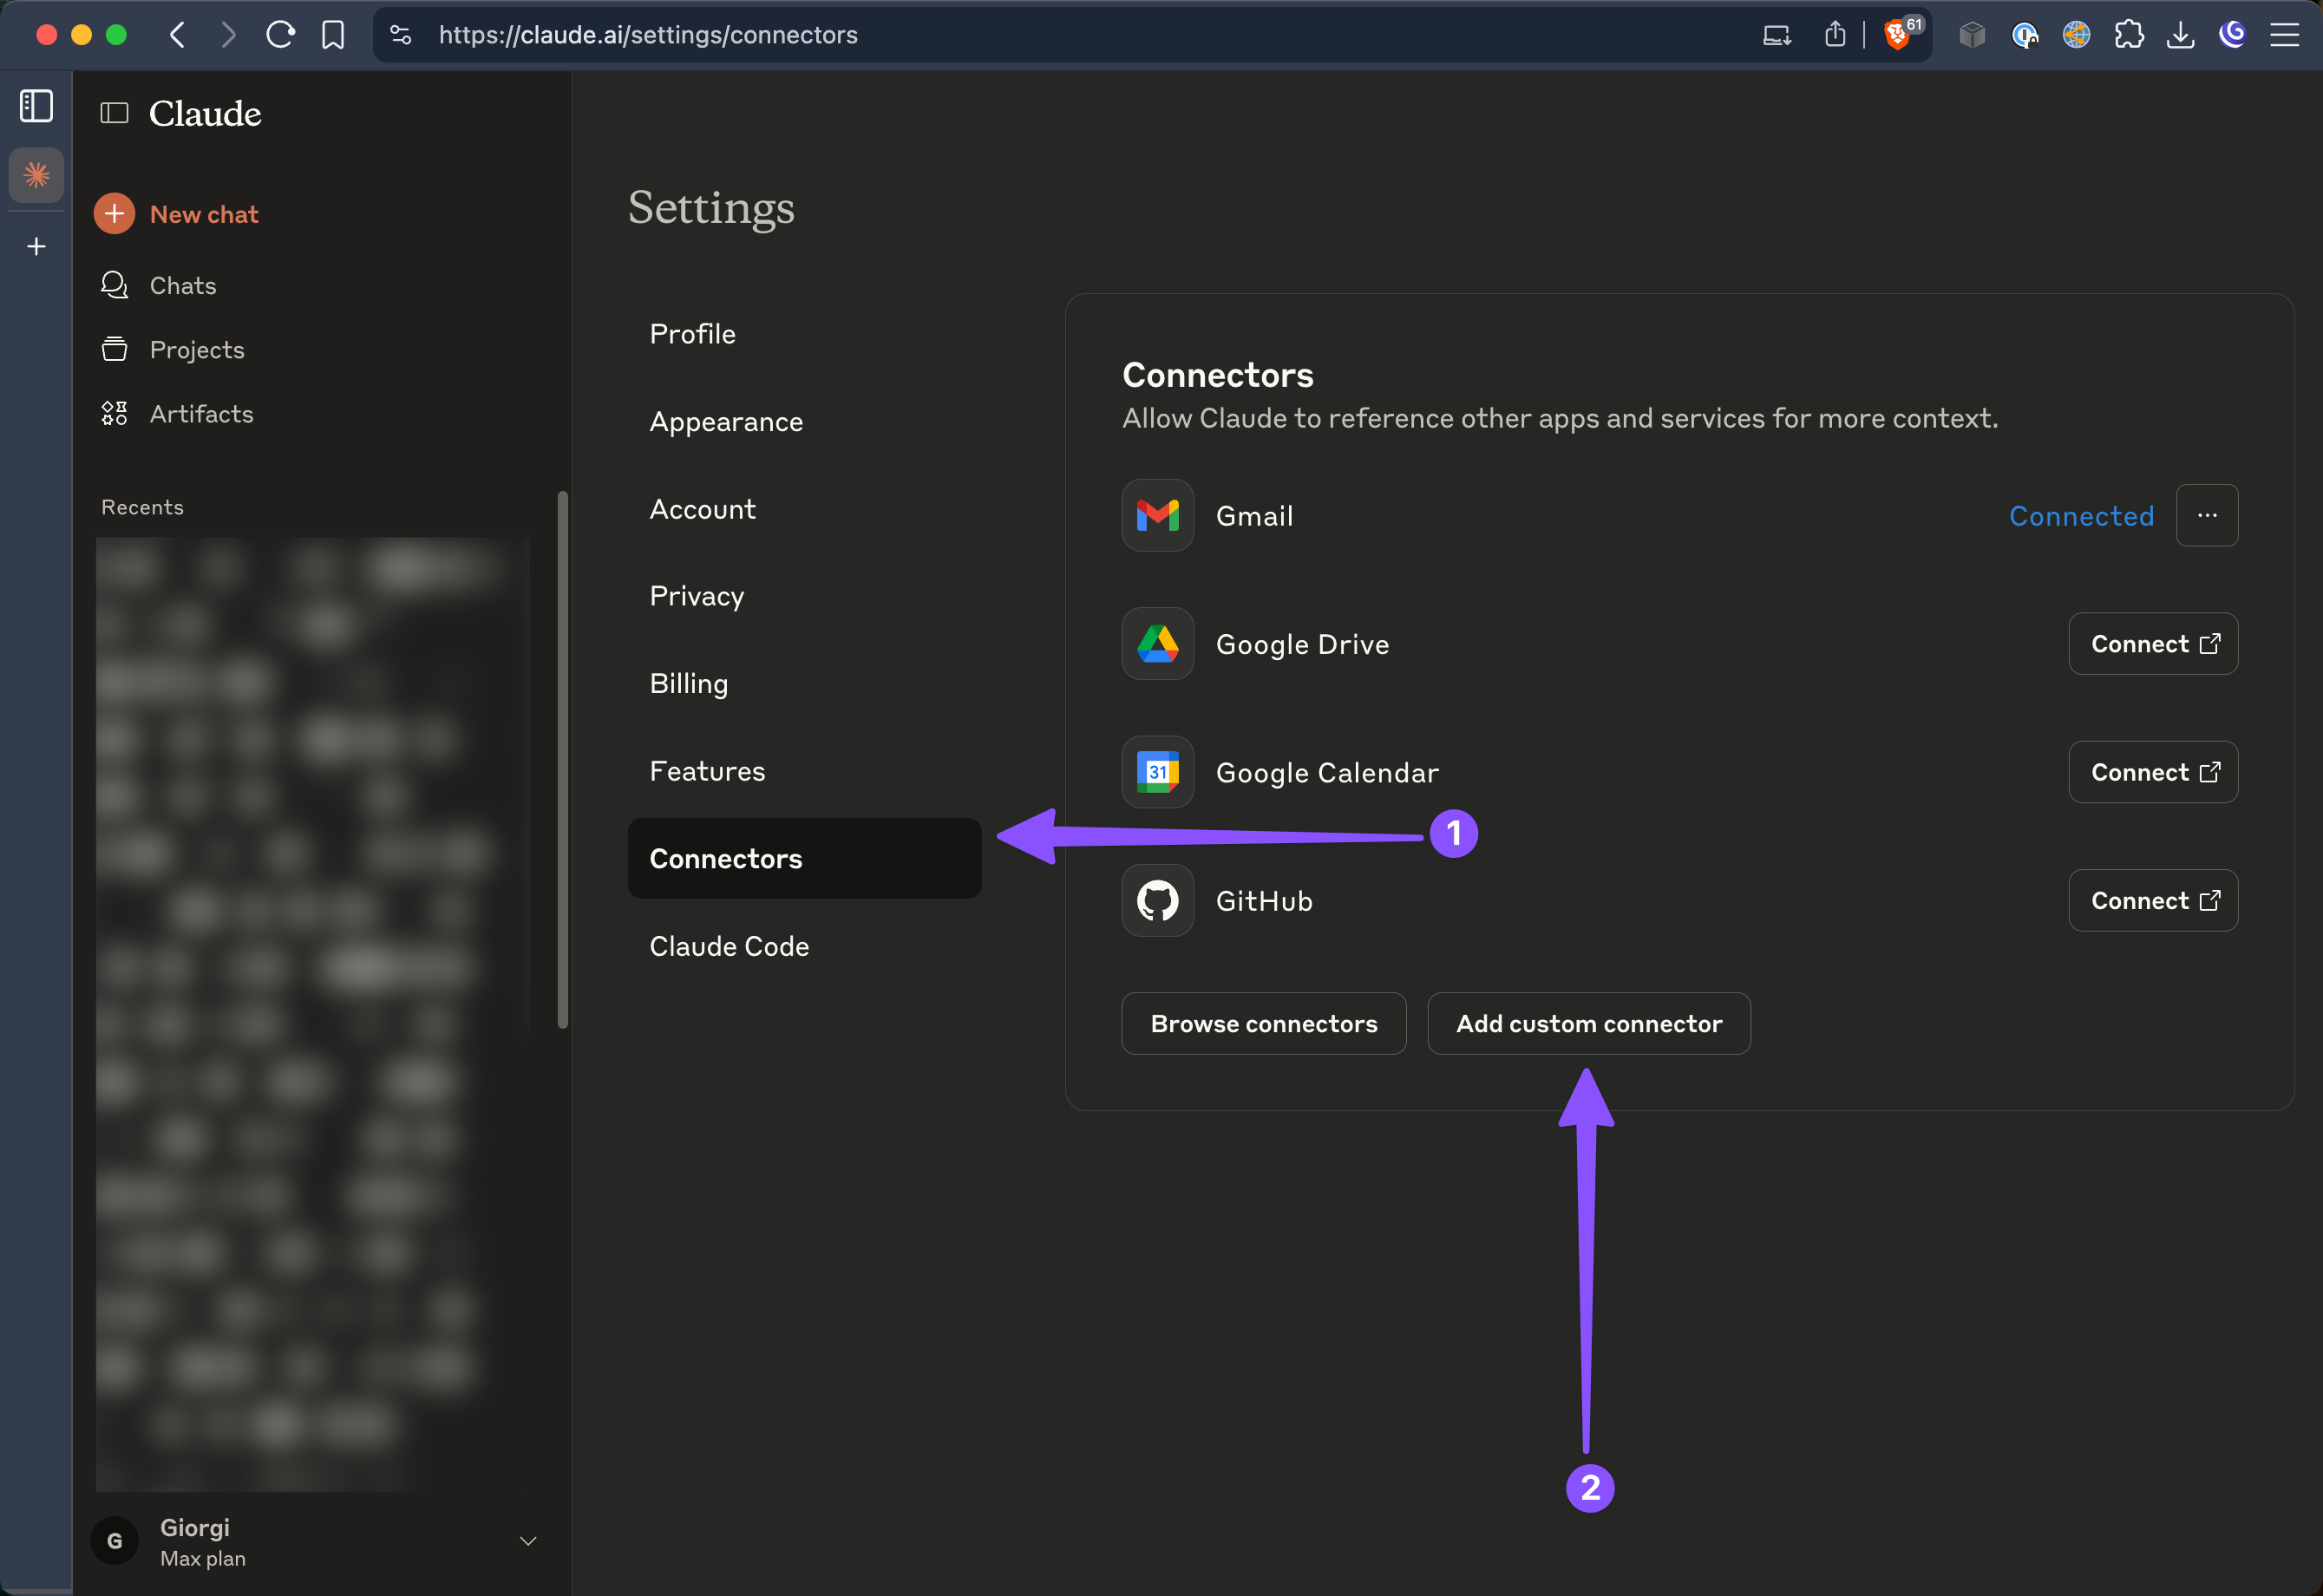
In the Settings menu, select "Connectors" from the sidebar, then click "Add custom connector".
2. **Add Custom Connector**
In the Settings menu, select "Connectors" from the sidebar, then click "Add custom connector".
 3. **Configure Connection**
Fill in the connection details with your Lightdash instance information.
3. **Configure Connection**
Fill in the connection details with your Lightdash instance information.
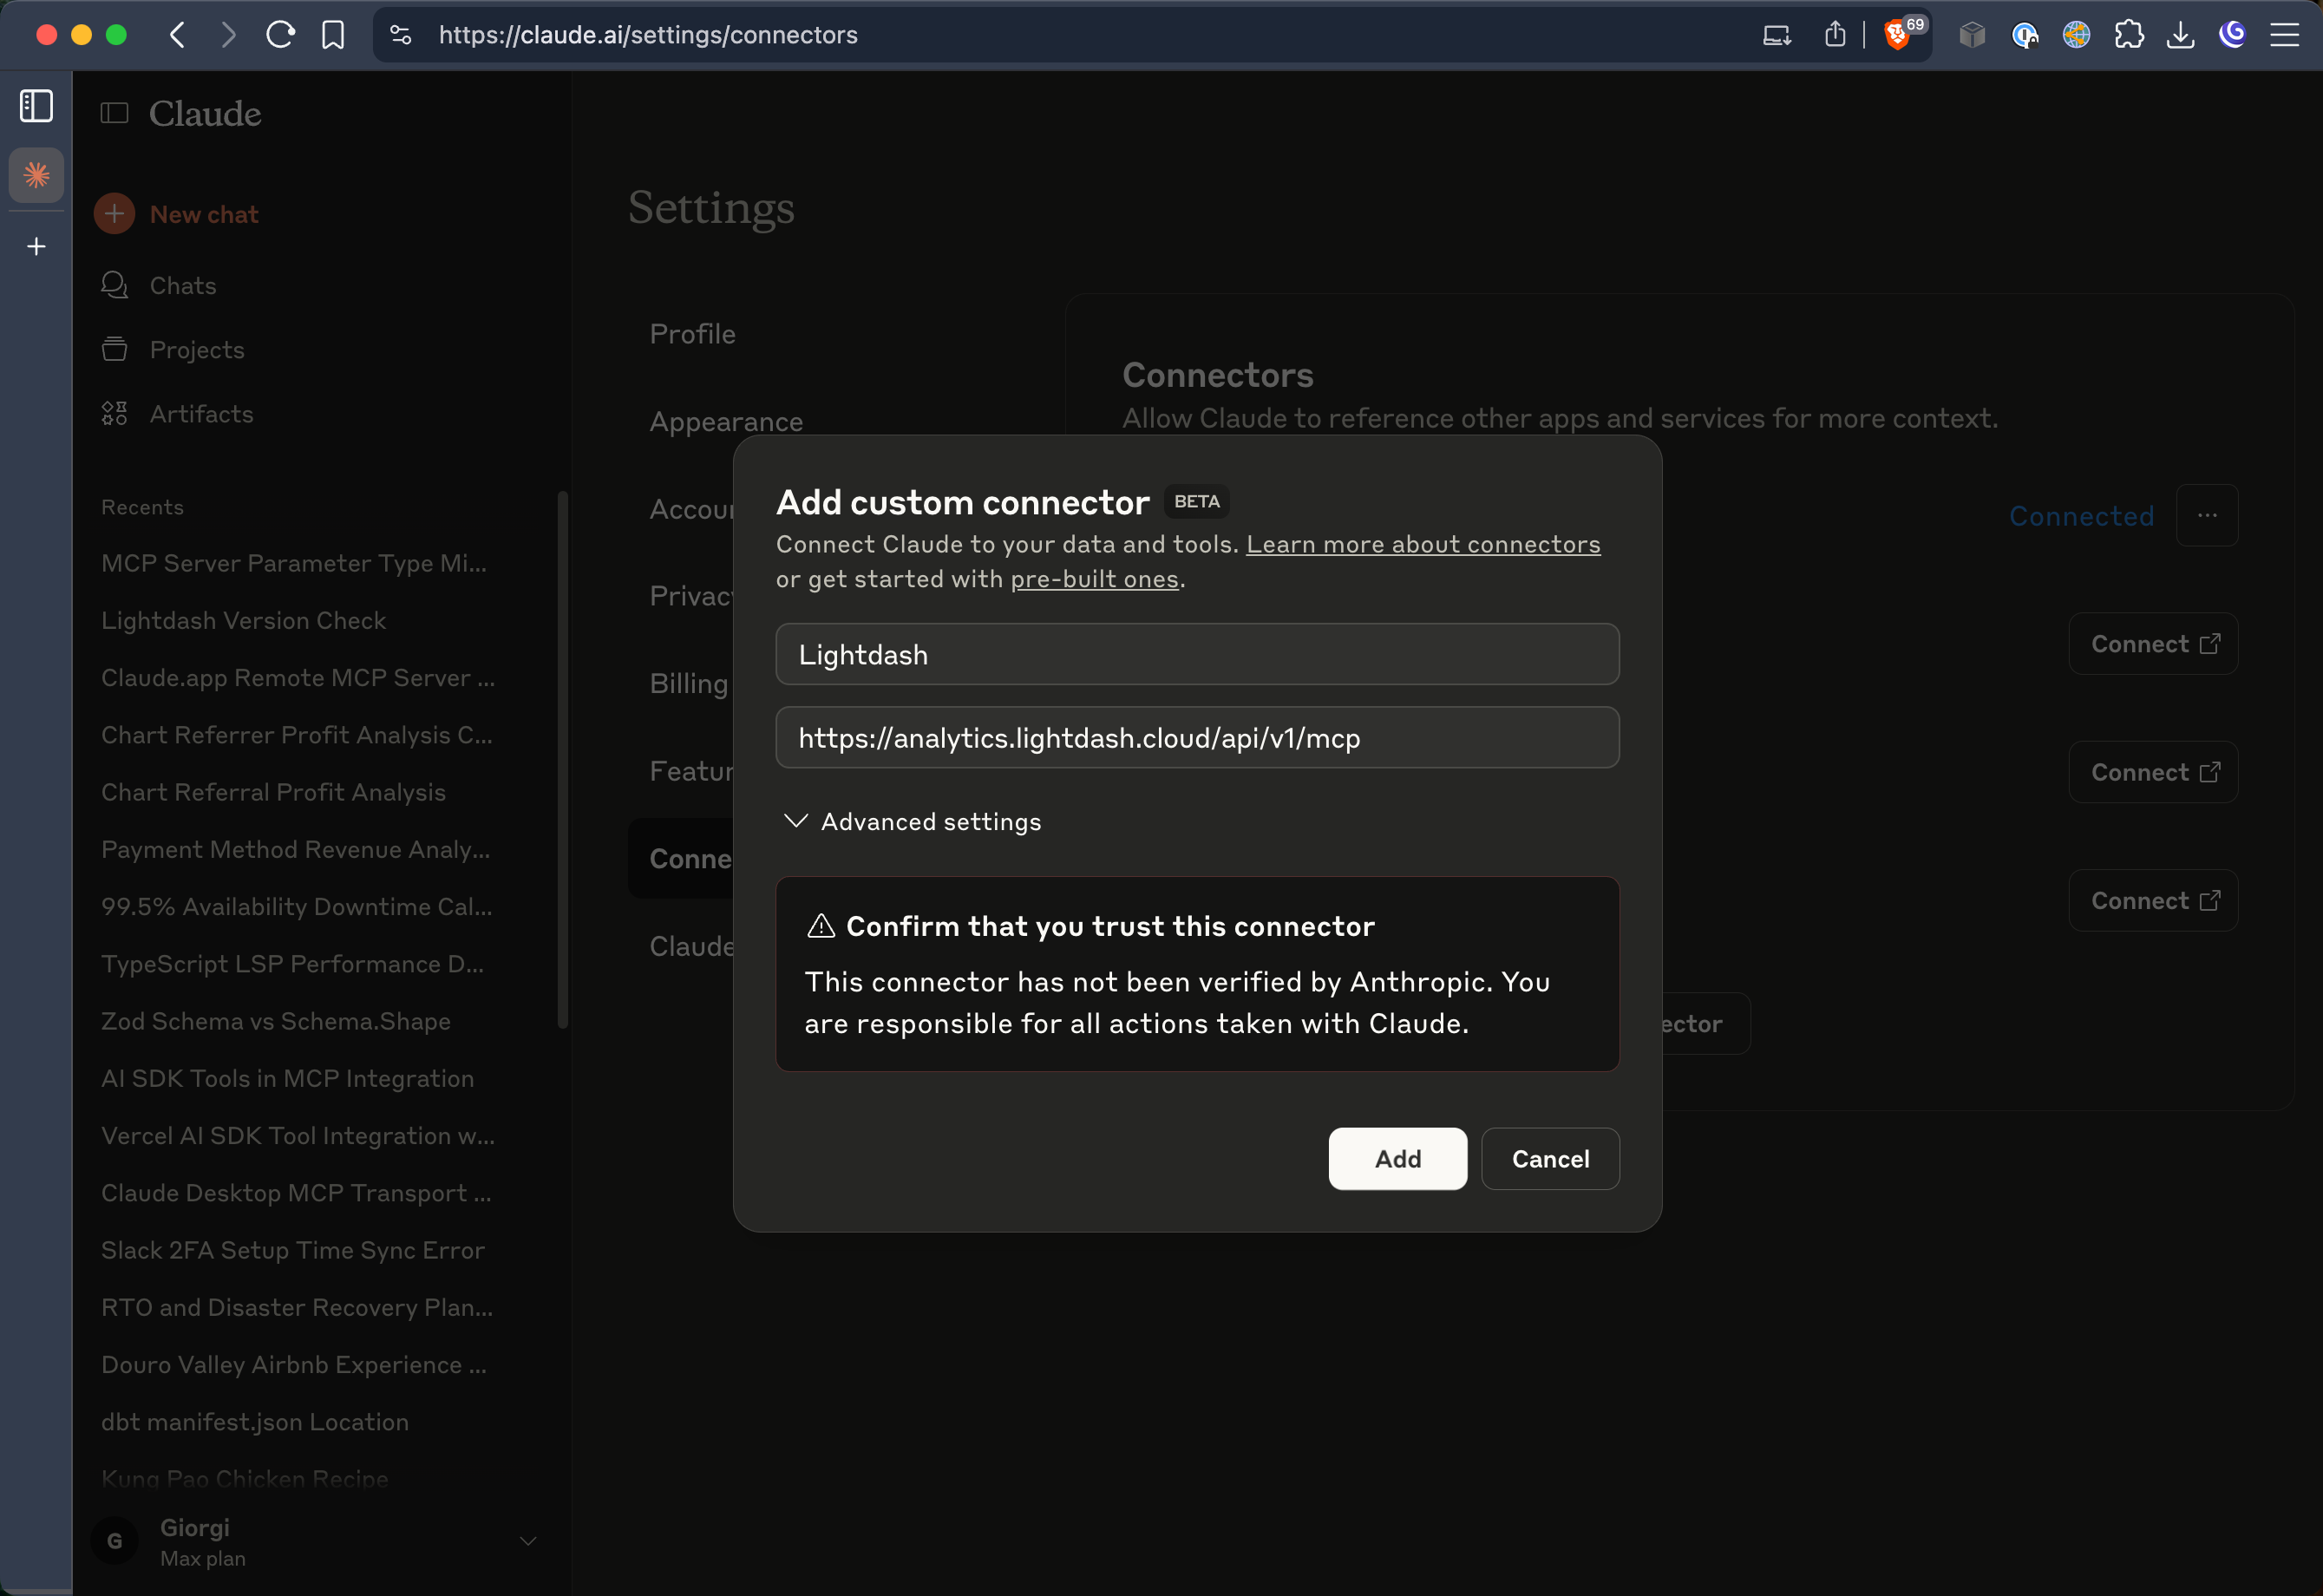 * **Name:** Lightdash (or any name you prefer)
* **URL:** `https://.lightdash.cloud/api/v1/mcp`
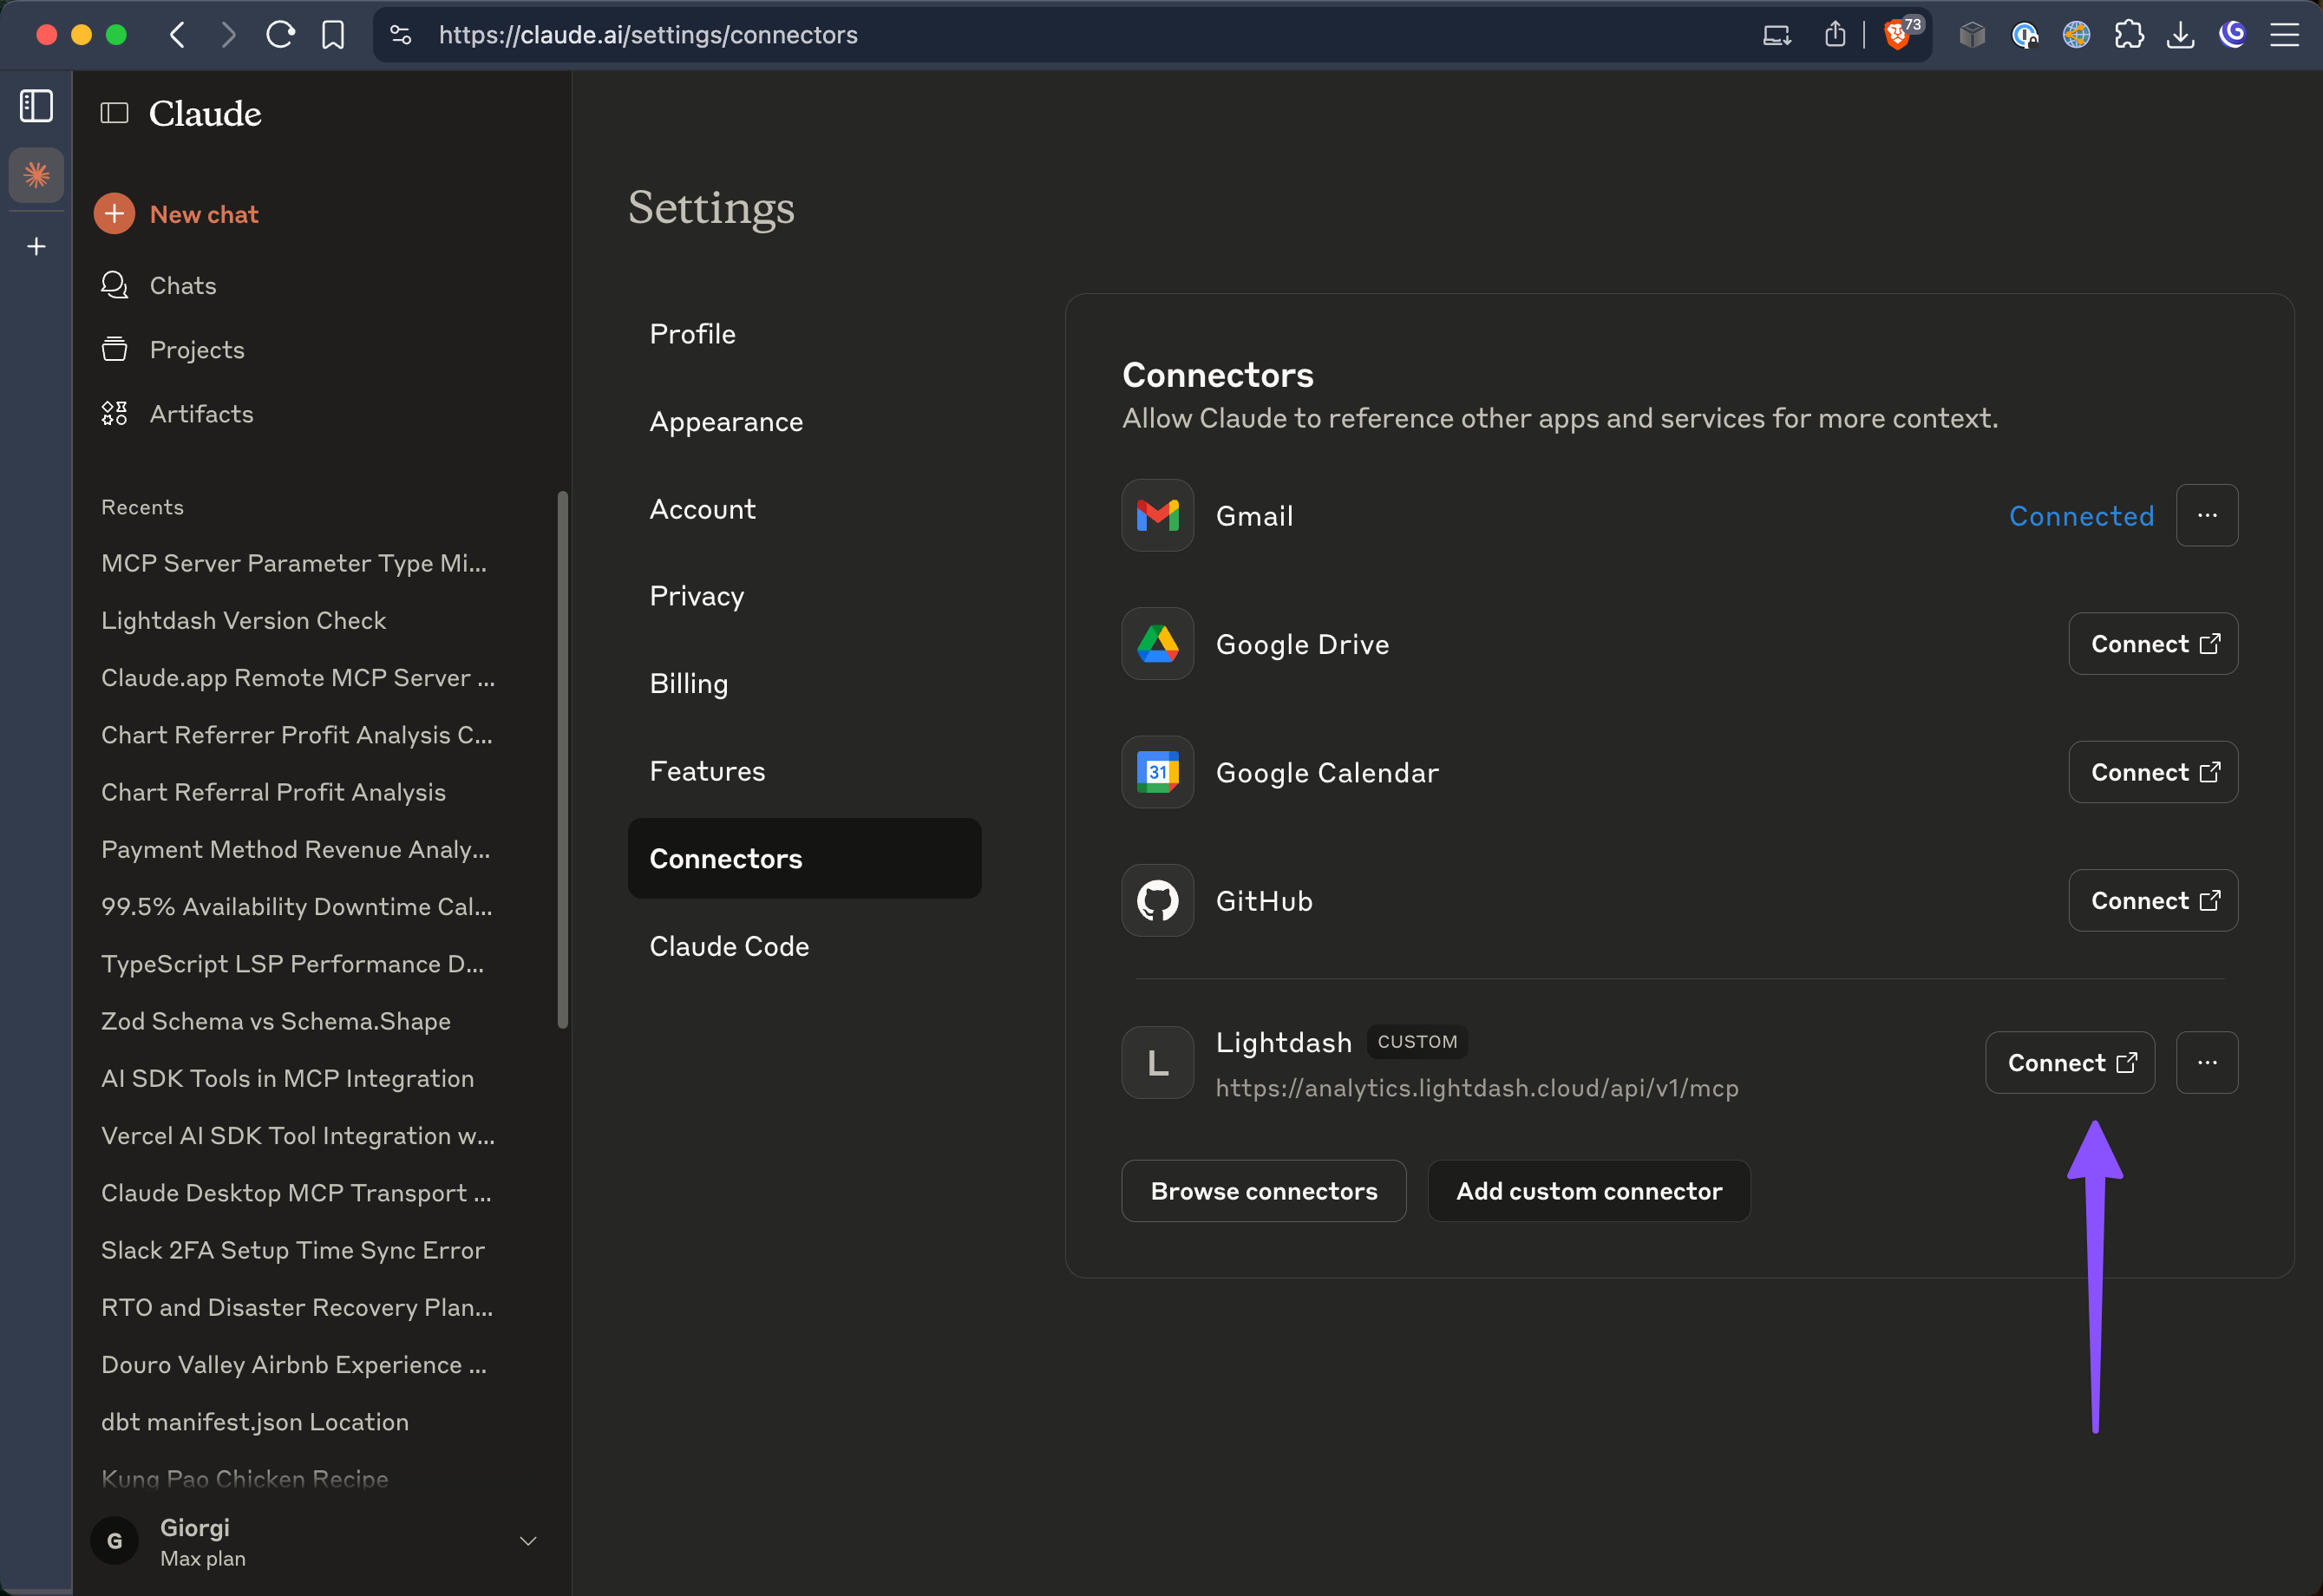
4. **Connect and Authenticate**
Click the "Connect" button to initiate the authentication process.
* **Name:** Lightdash (or any name you prefer)
* **URL:** `https://.lightdash.cloud/api/v1/mcp`
4. **Connect and Authenticate**
Click the "Connect" button to initiate the authentication process.
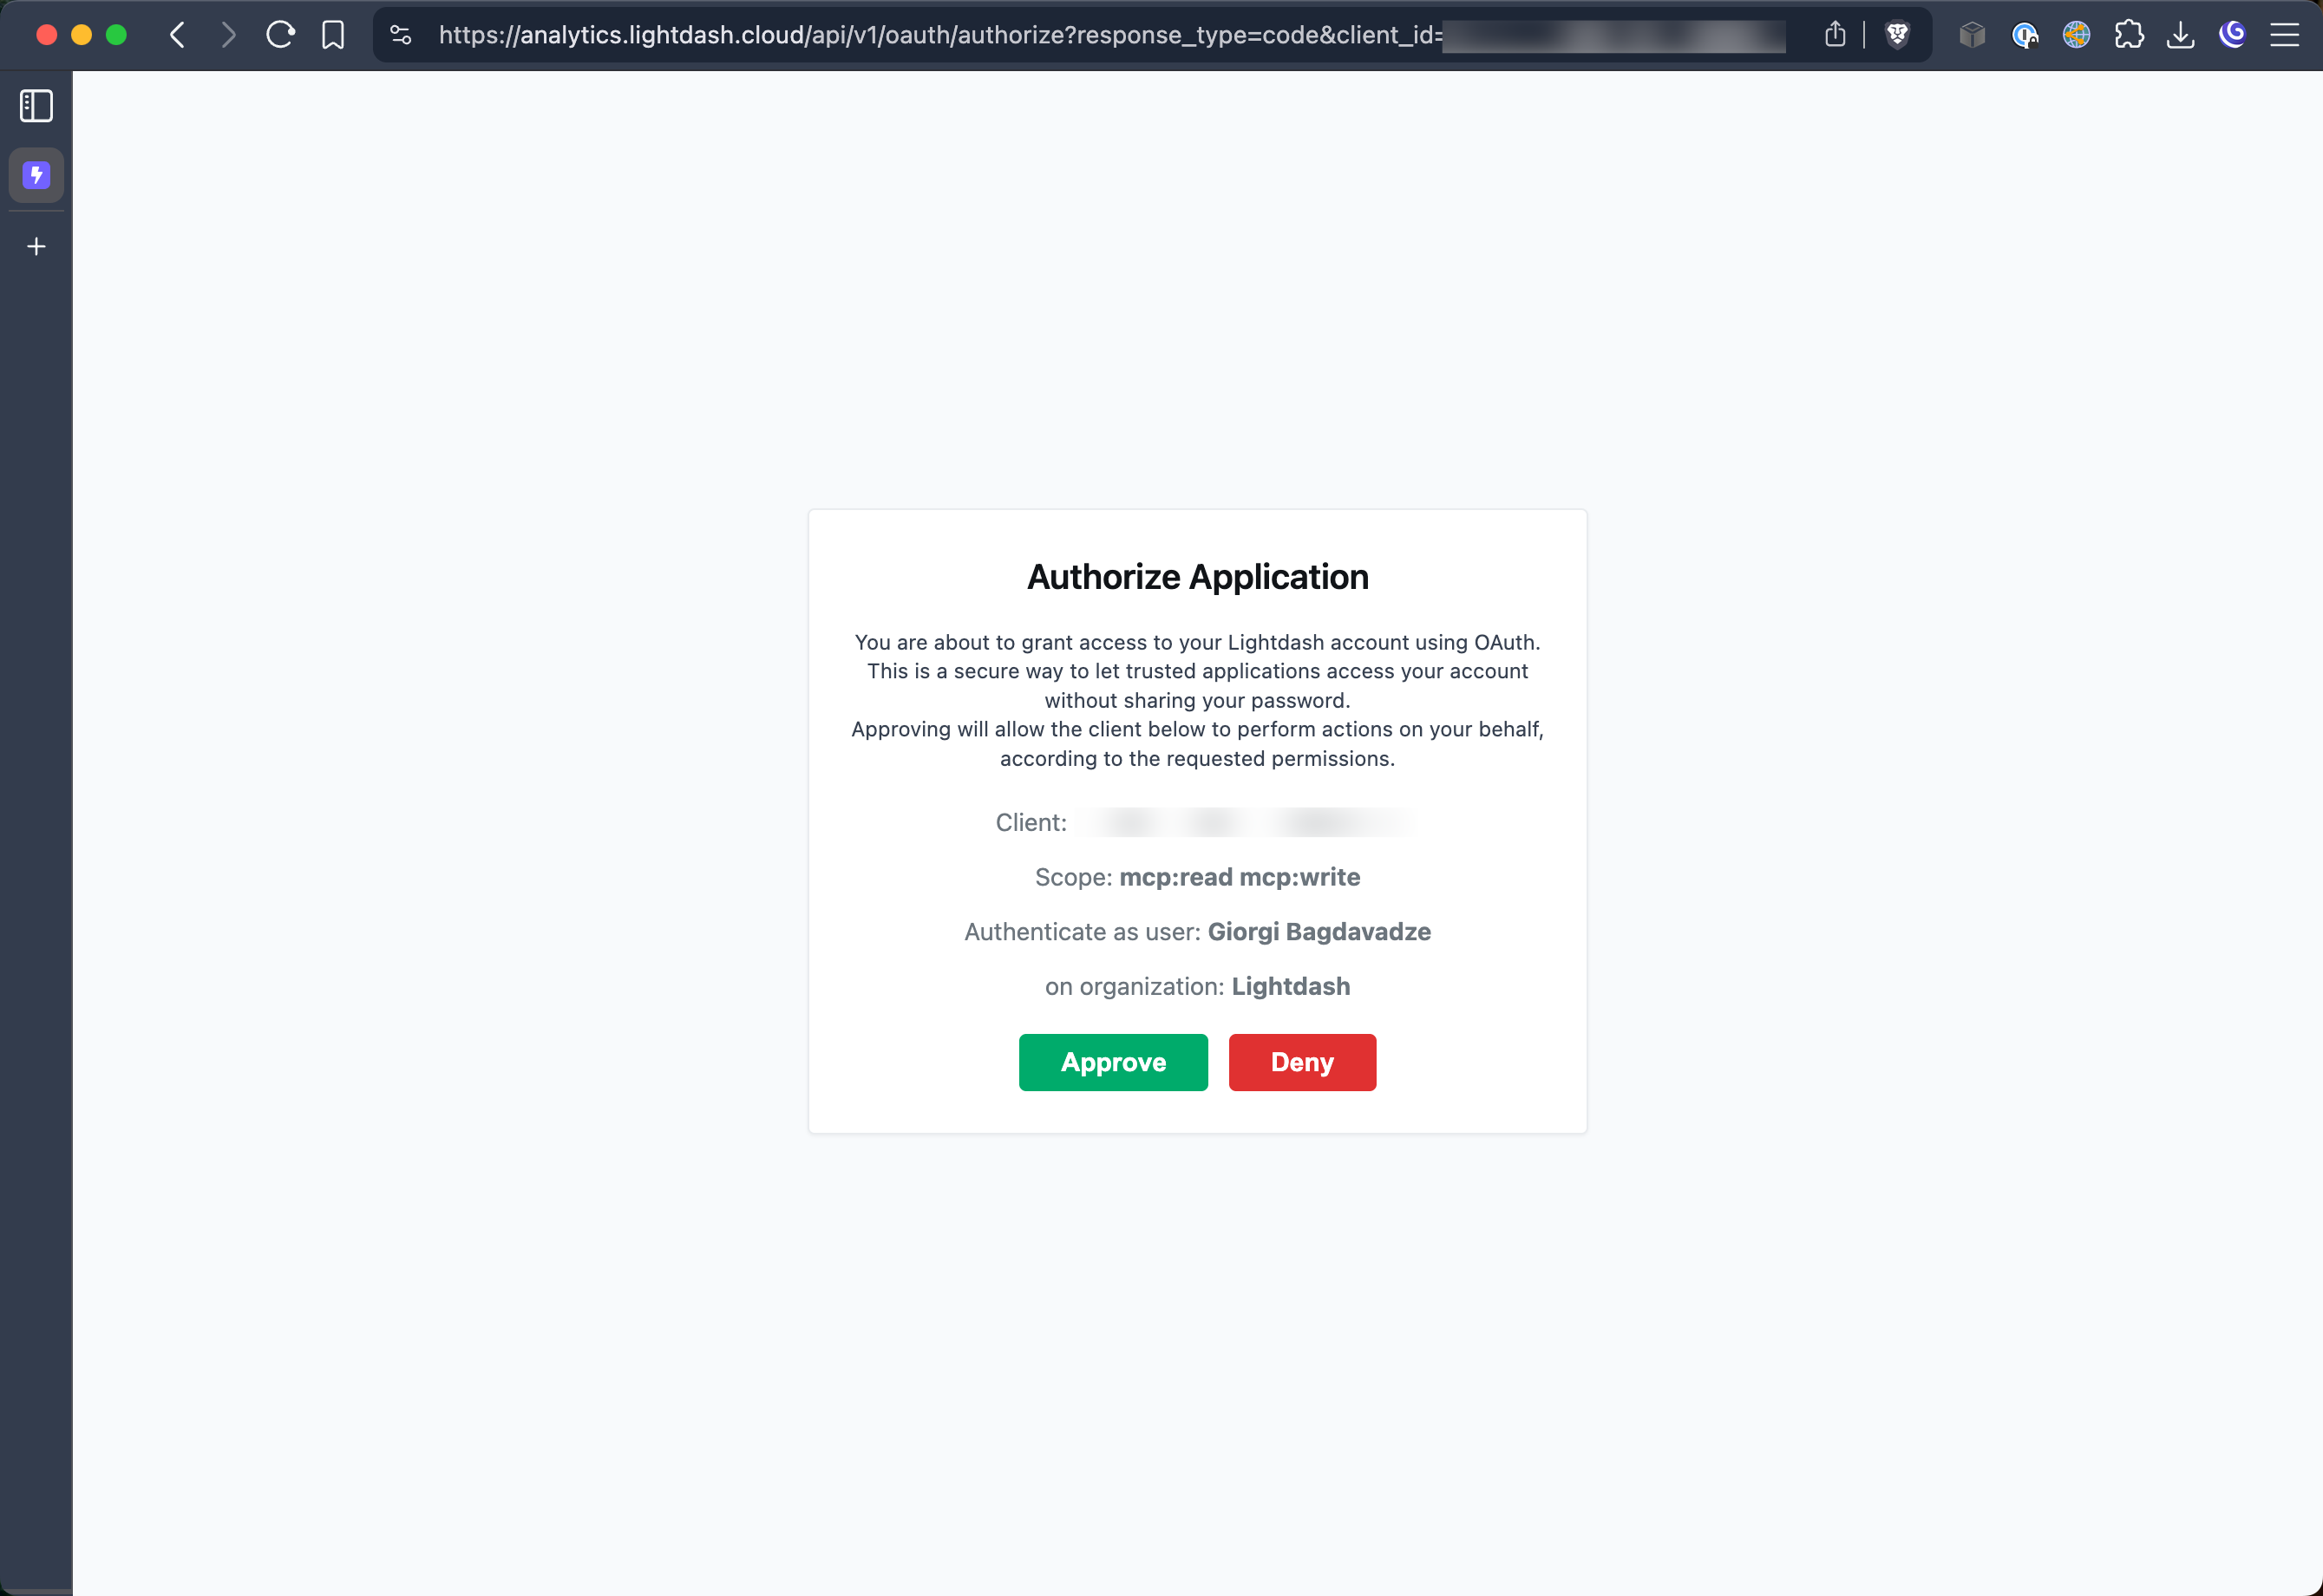
 5. **Complete OAuth Flow**
Log in to your Lightdash account and approve the connection when prompted.
5. **Complete OAuth Flow**
Log in to your Lightdash account and approve the connection when prompted.
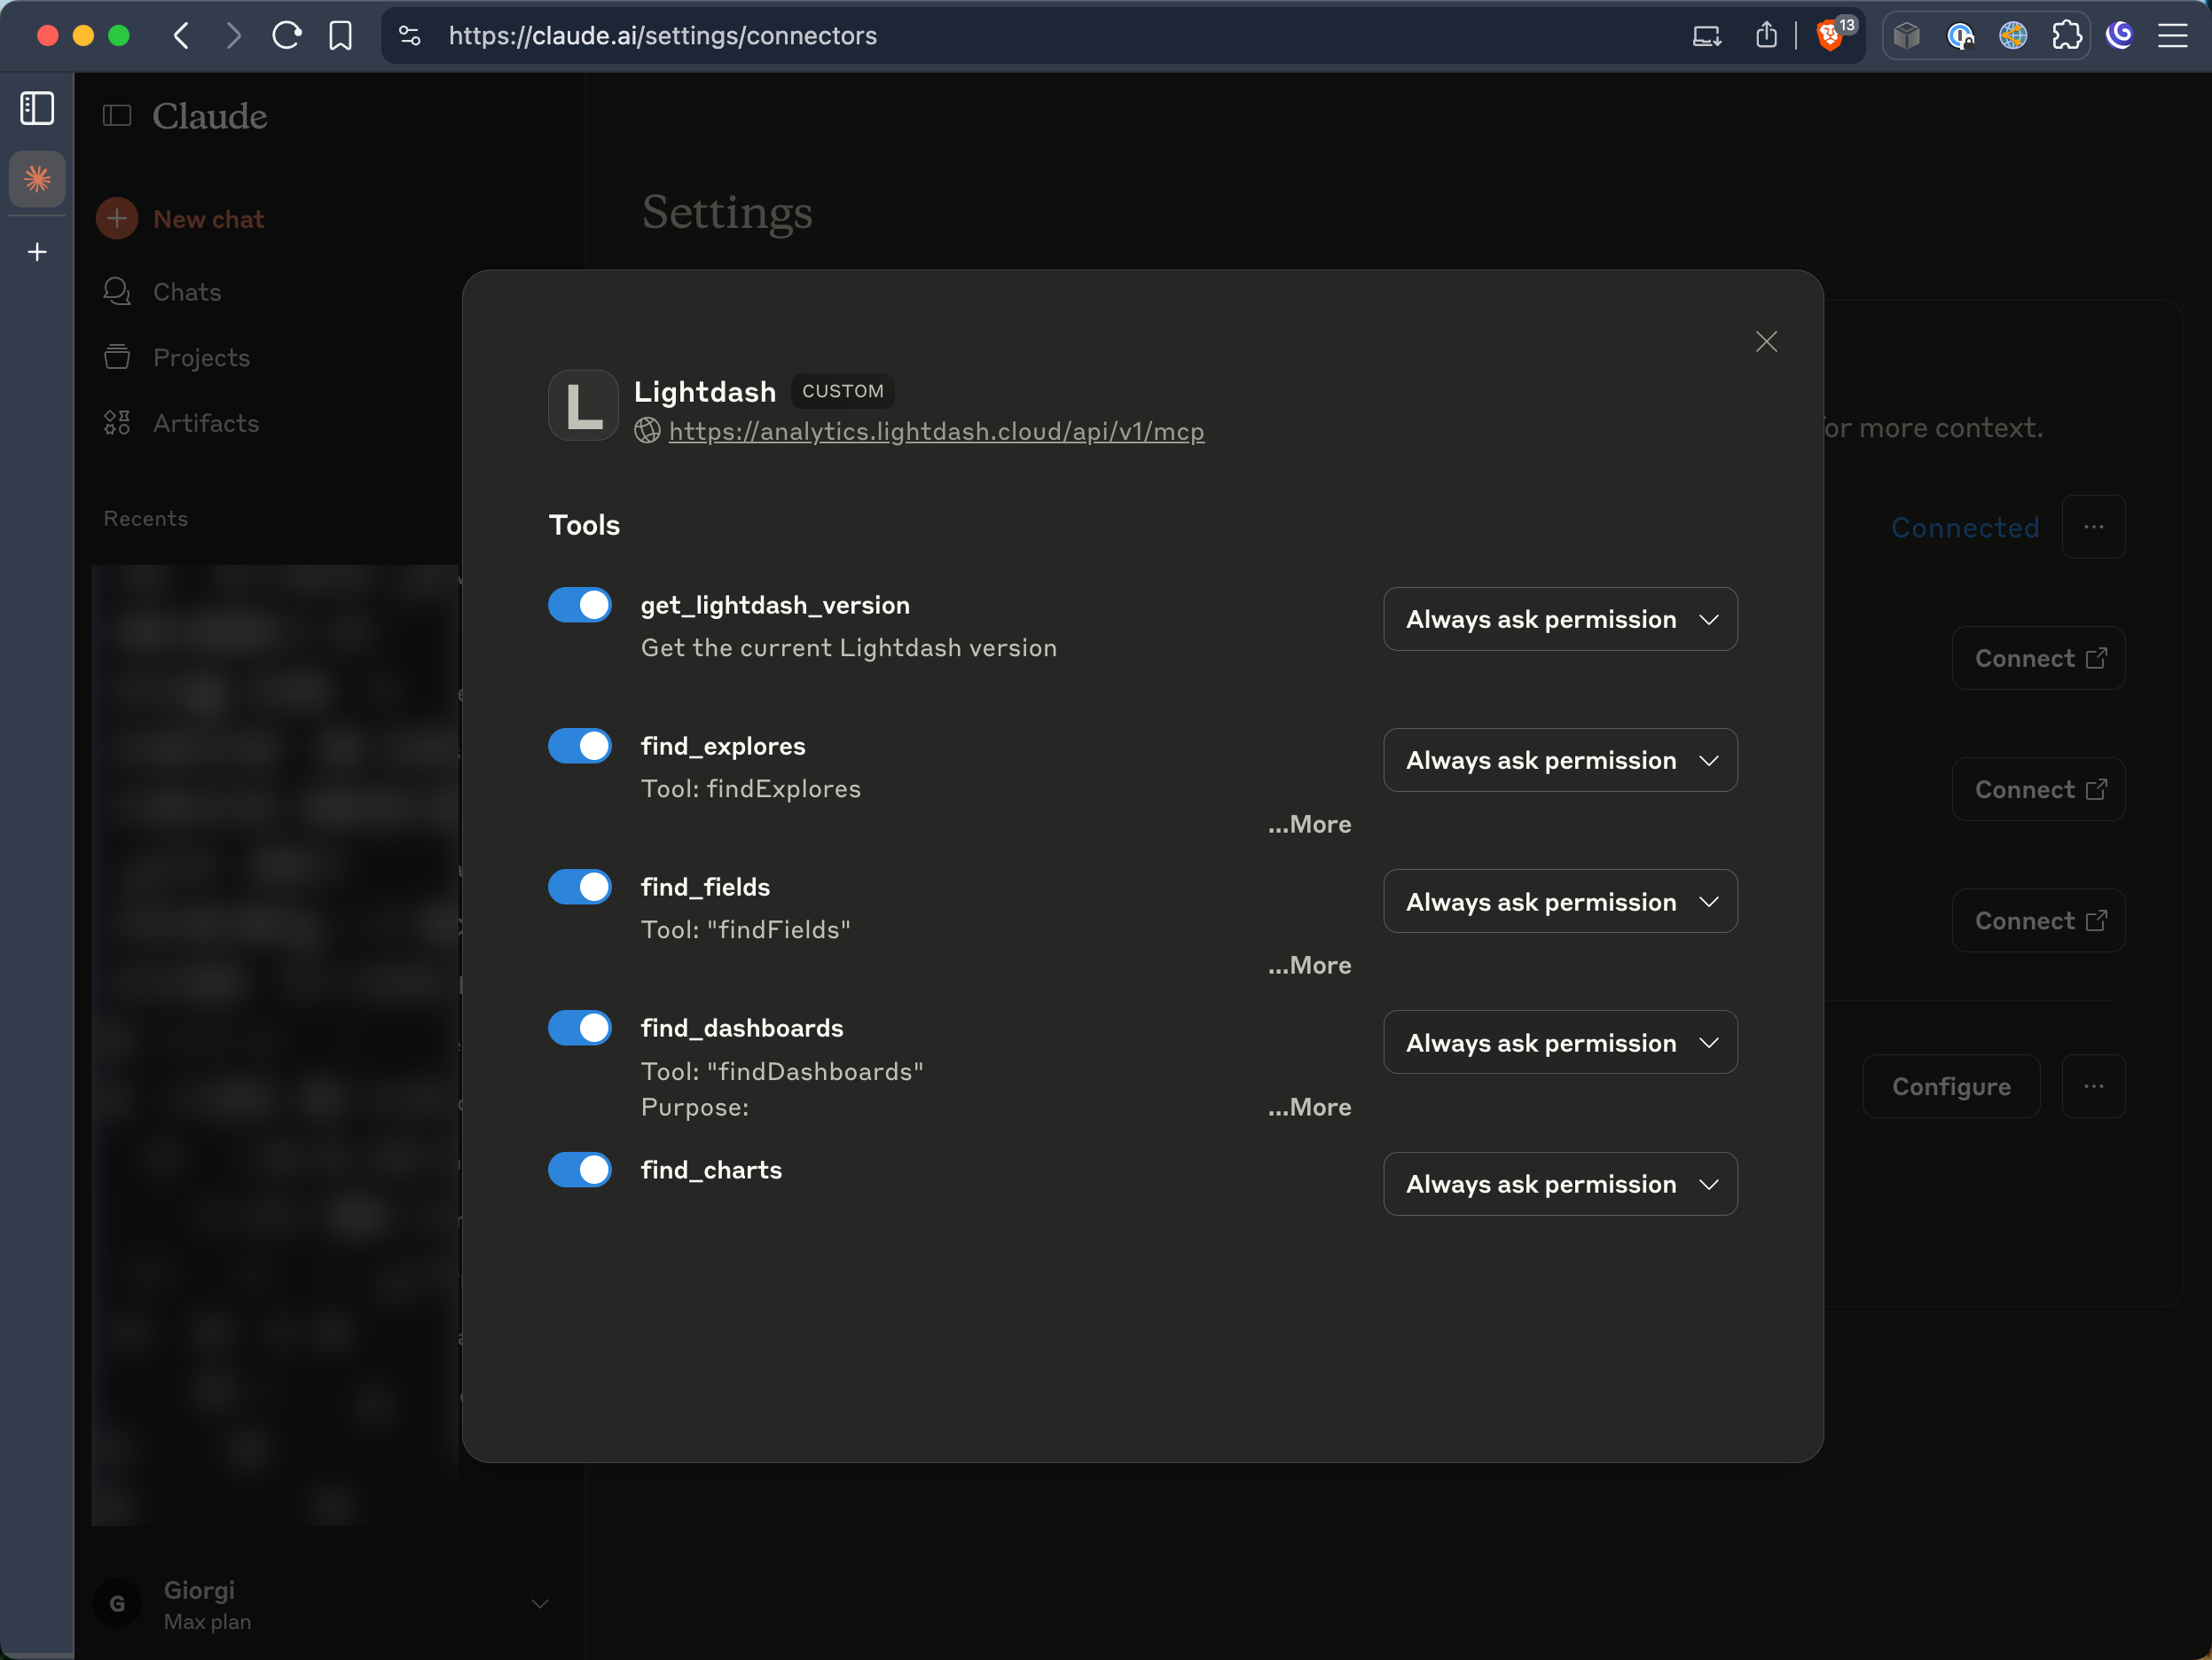
 6. **Configure Permissions (Optional)**
Optionally configure which MCP tools Claude can access and set any additional permissions.
6. **Configure Permissions (Optional)**
Optionally configure which MCP tools Claude can access and set any additional permissions.
 #### ChatGPT (Web App)
ChatGPT support for MCP is coming soon! Stay tuned for updates.
{/* Commented out until ChatGPT MCP support is officially released
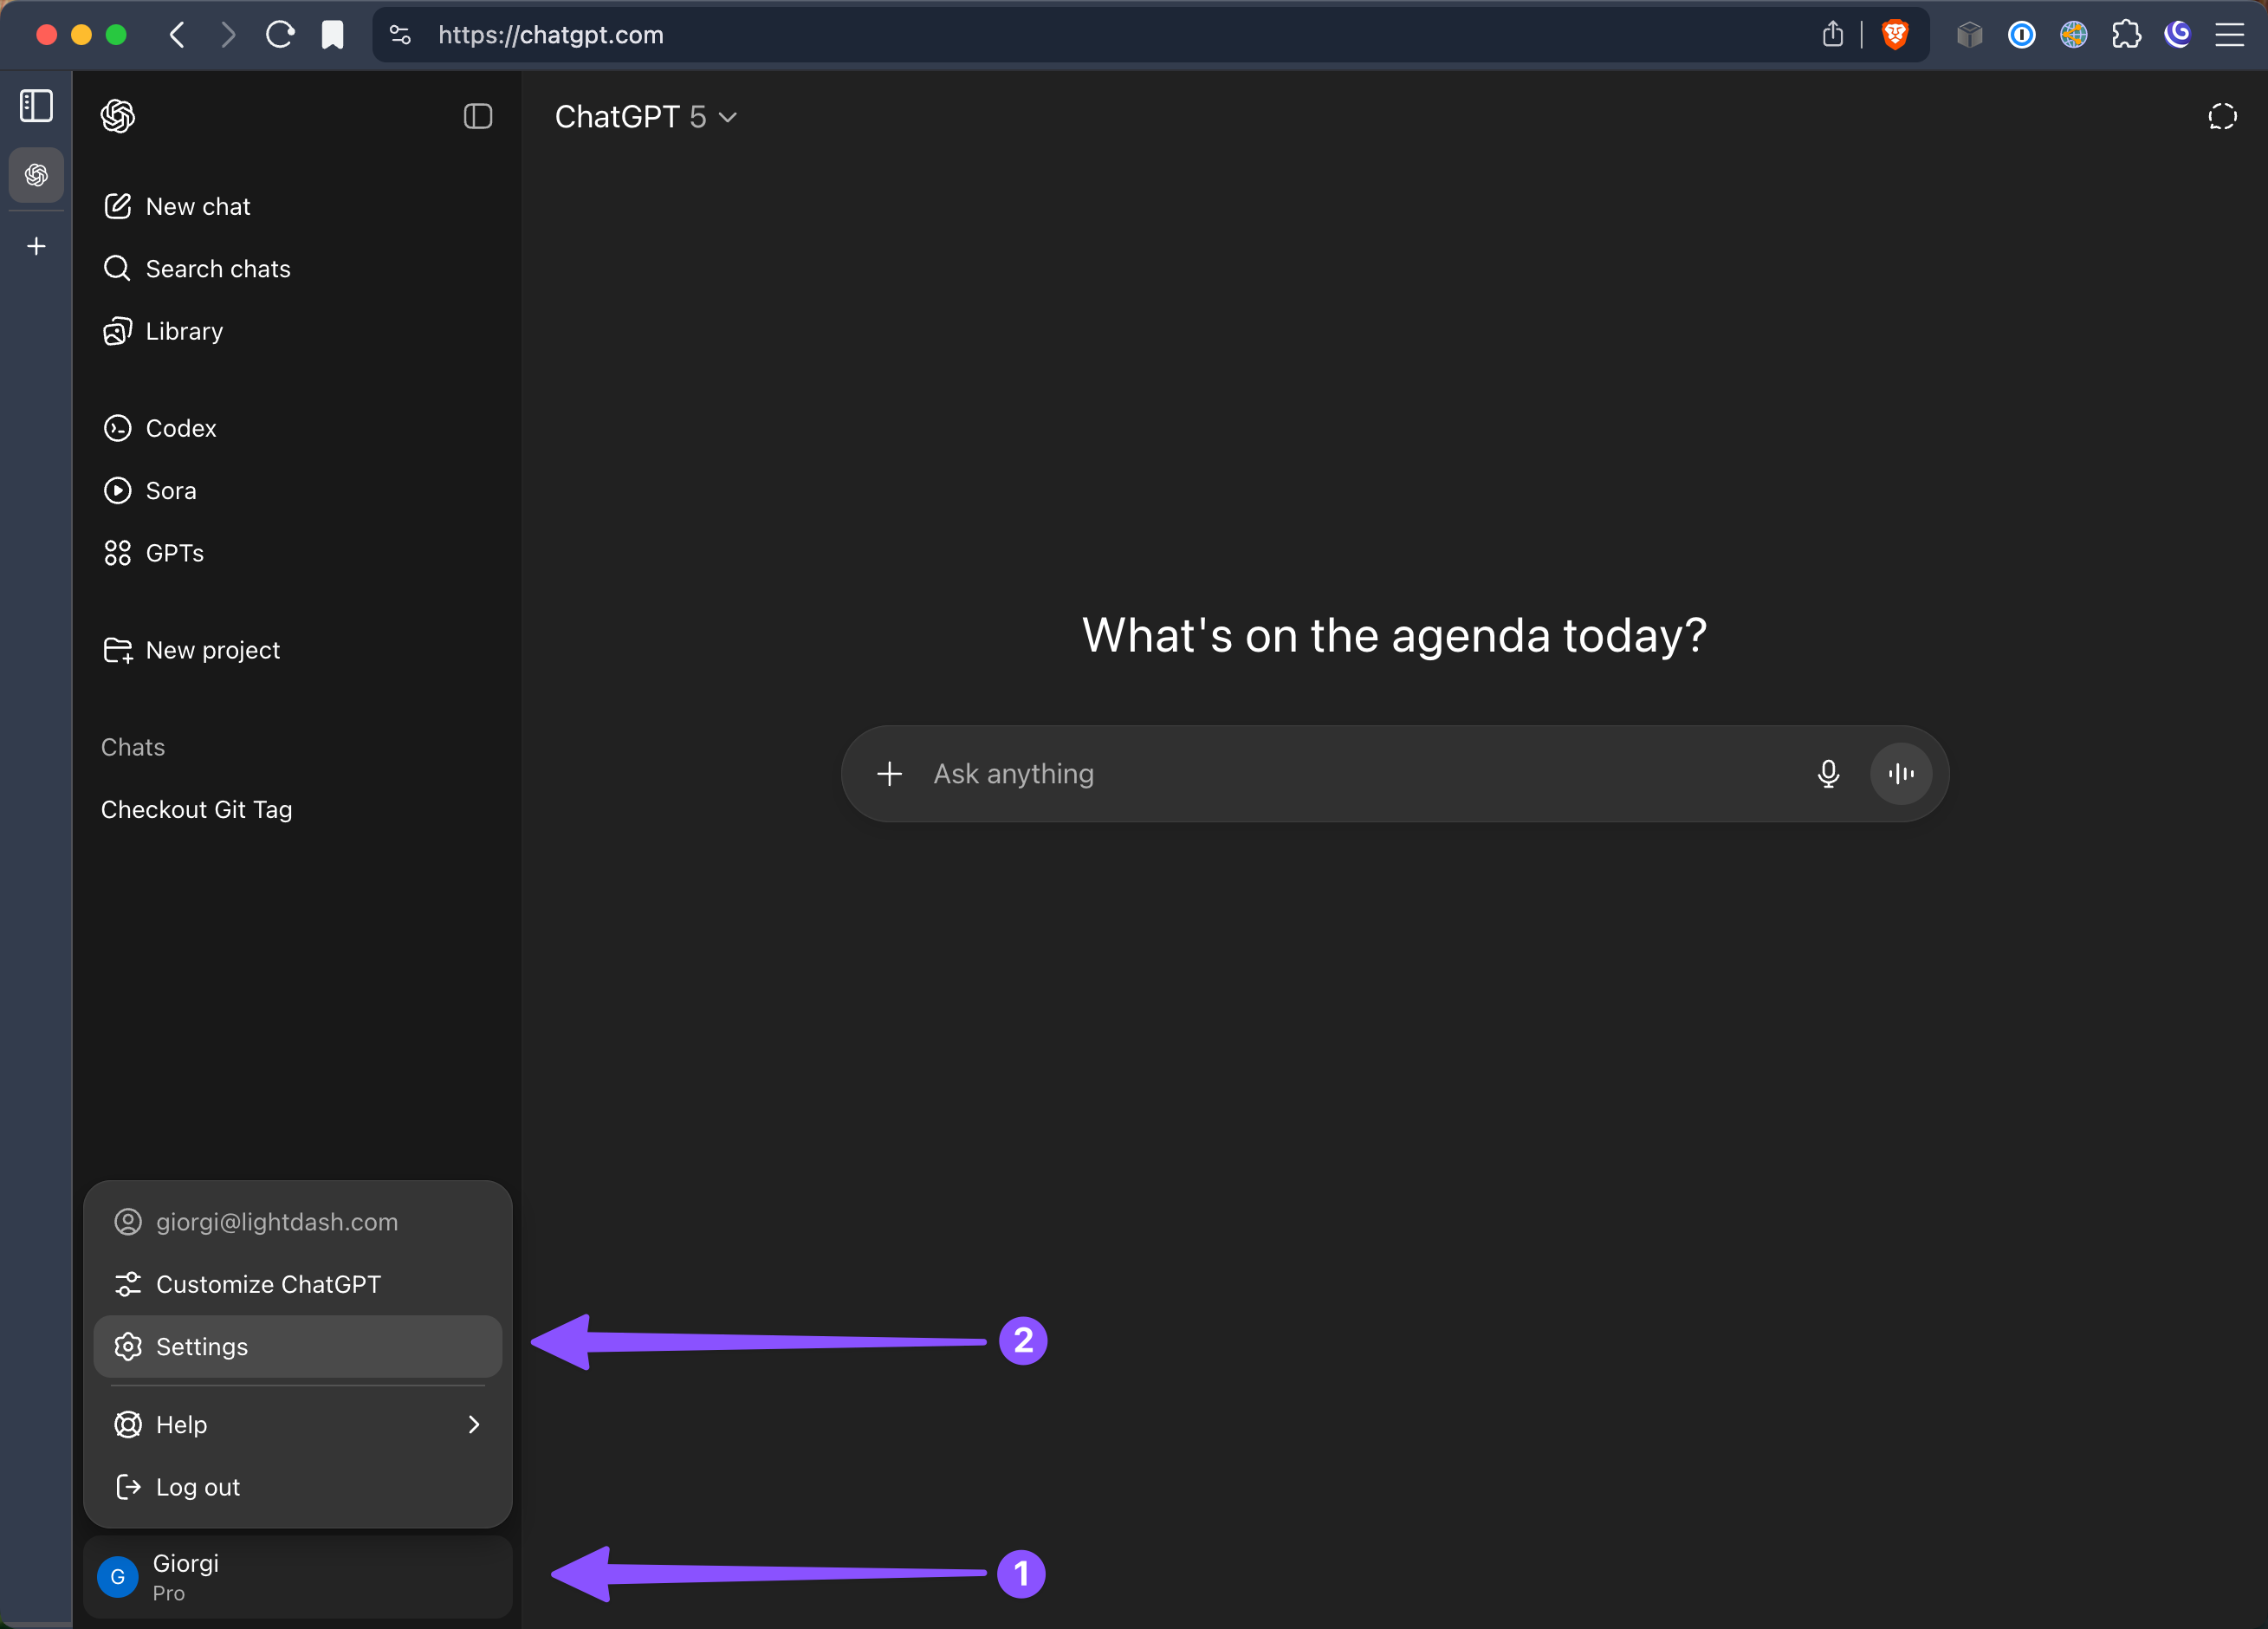
1. **Access Settings in ChatGPT**
#### ChatGPT (Web App)
ChatGPT support for MCP is coming soon! Stay tuned for updates.
{/* Commented out until ChatGPT MCP support is officially released
1. **Access Settings in ChatGPT**
 2. **Create Custom Connector**
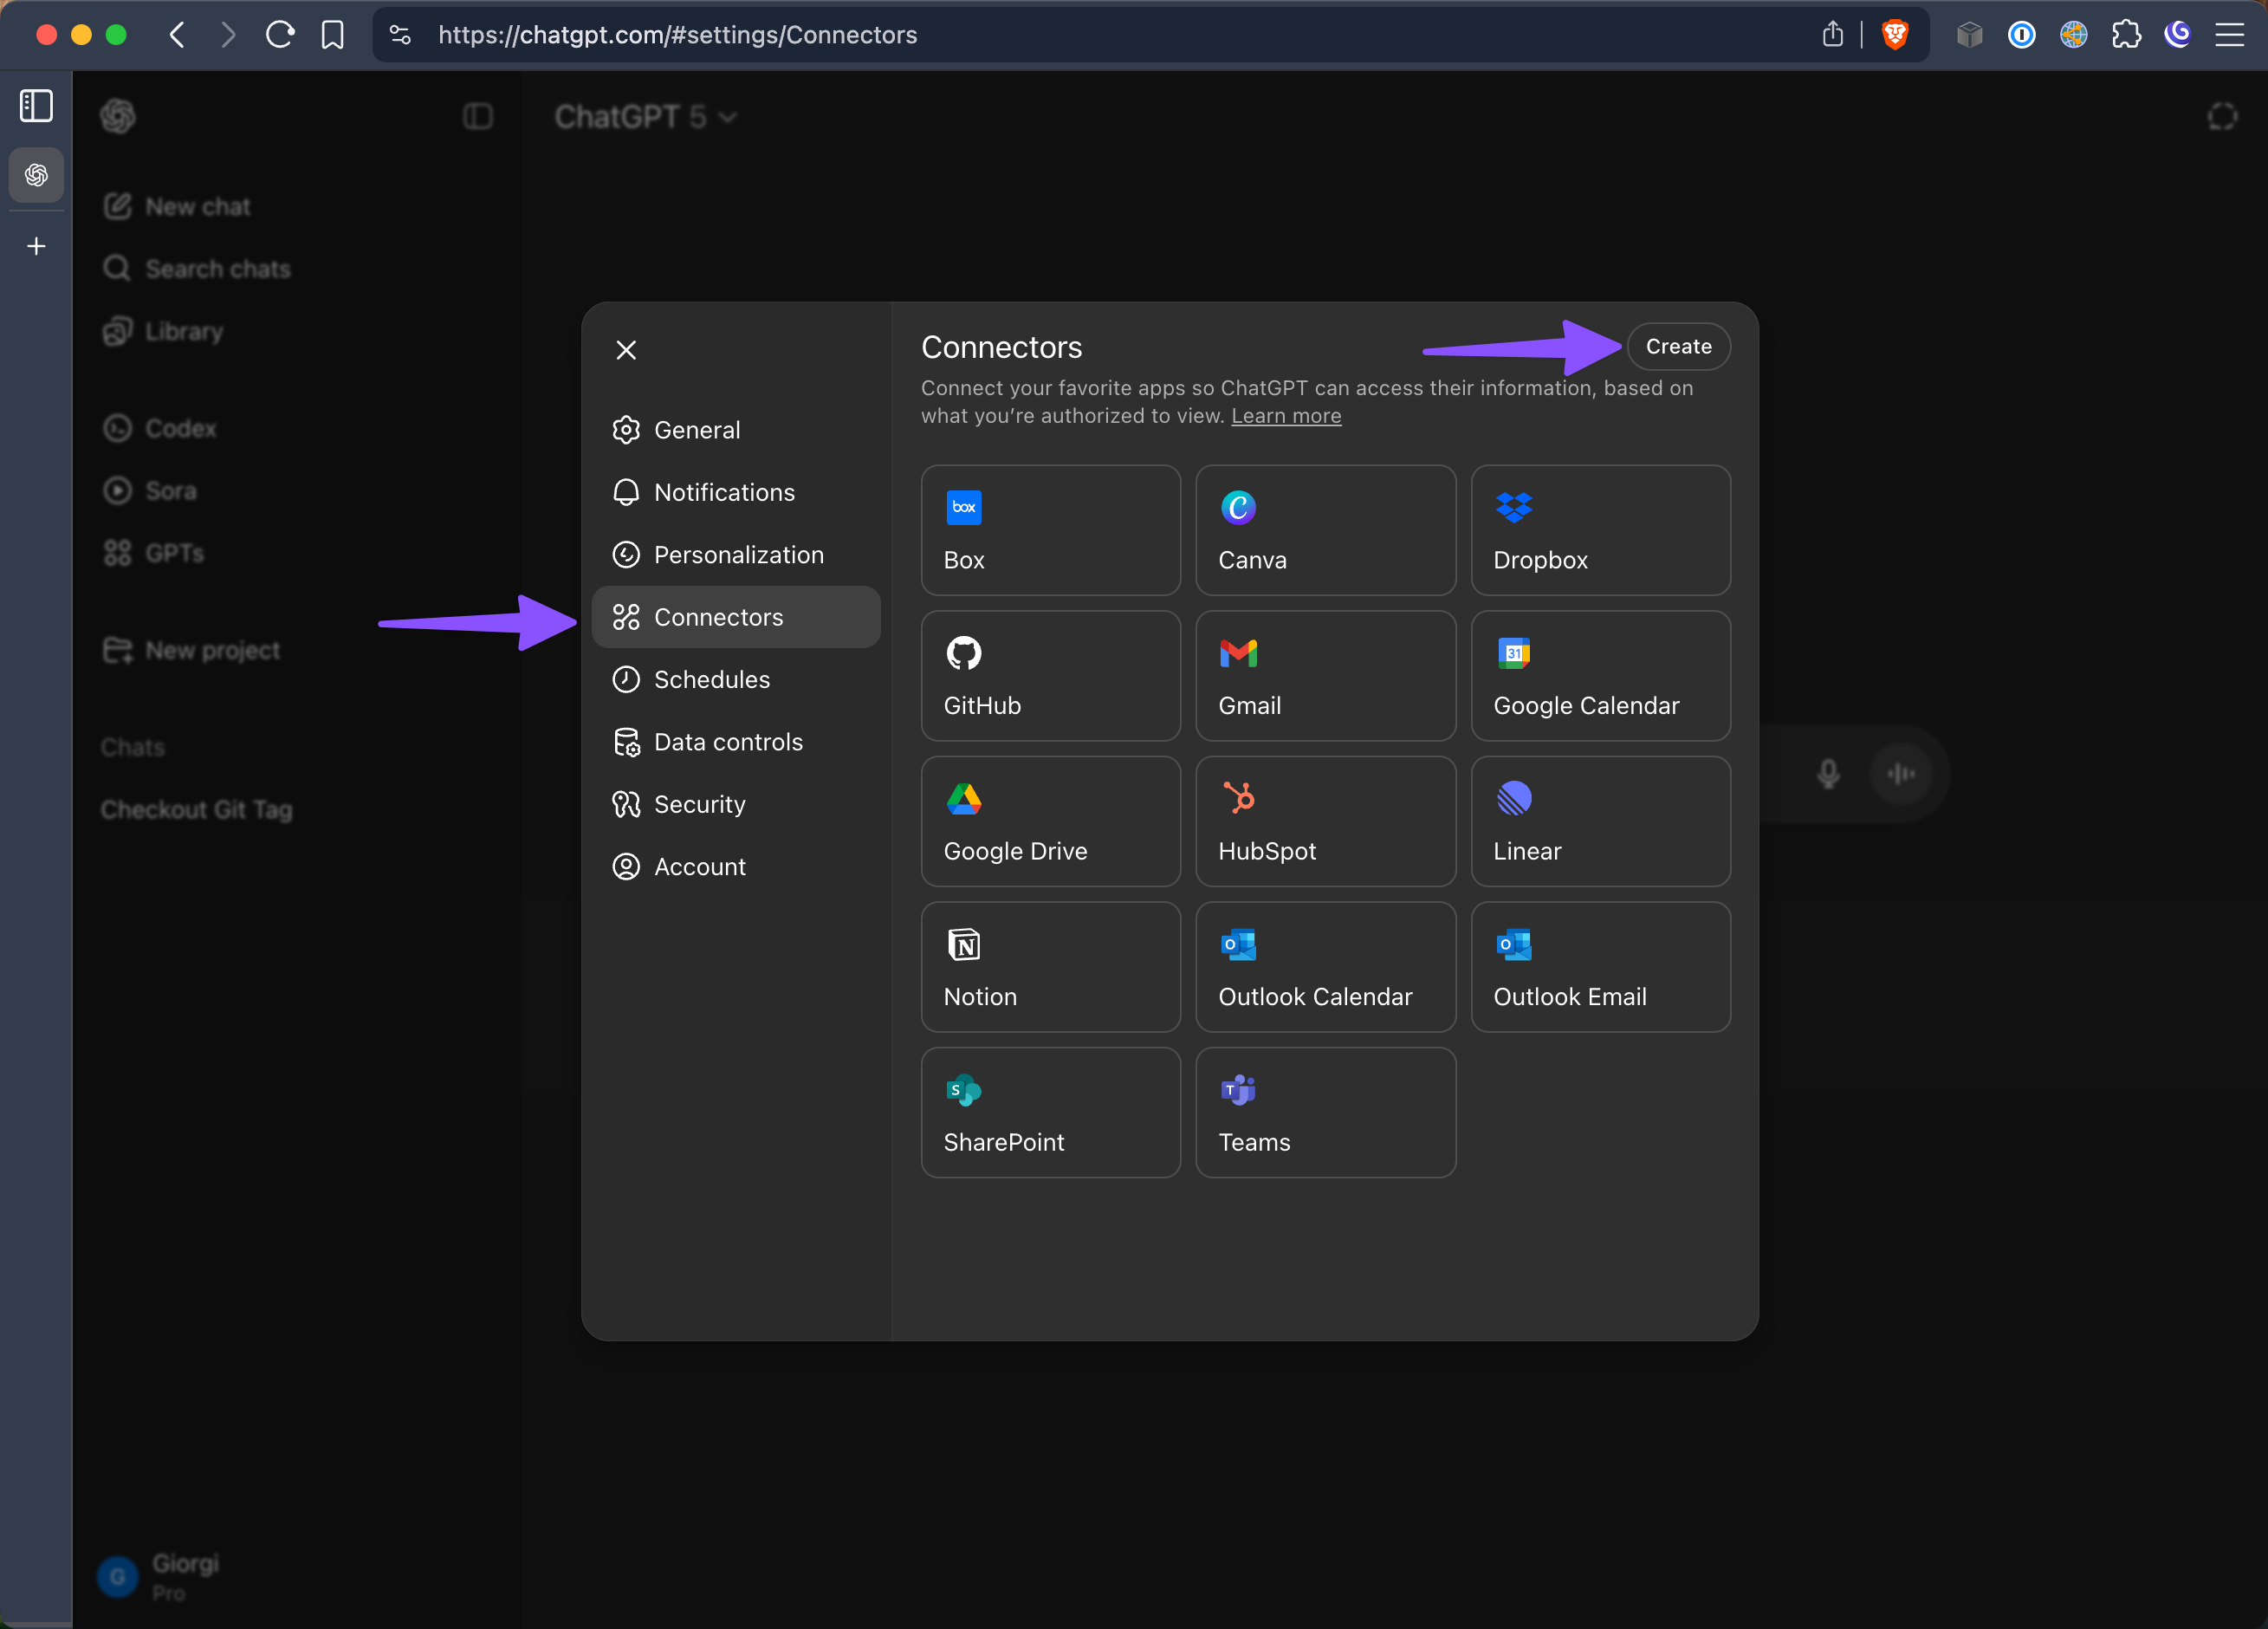 3. **Configure Connection**
 - **Name:** Lightdash (or any name you prefer)
- **Description:** Connect to Lightdash data analytics
- **URL:** `https://.lightdash.cloud/api/v1/mcp`
- **Authentication:** Select OAuth
4. **Complete OAuth Flow**
- **Name:** Lightdash (or any name you prefer)
- **Description:** Connect to Lightdash data analytics
- **URL:** `https://.lightdash.cloud/api/v1/mcp`
- **Authentication:** Select OAuth
4. **Complete OAuth Flow**
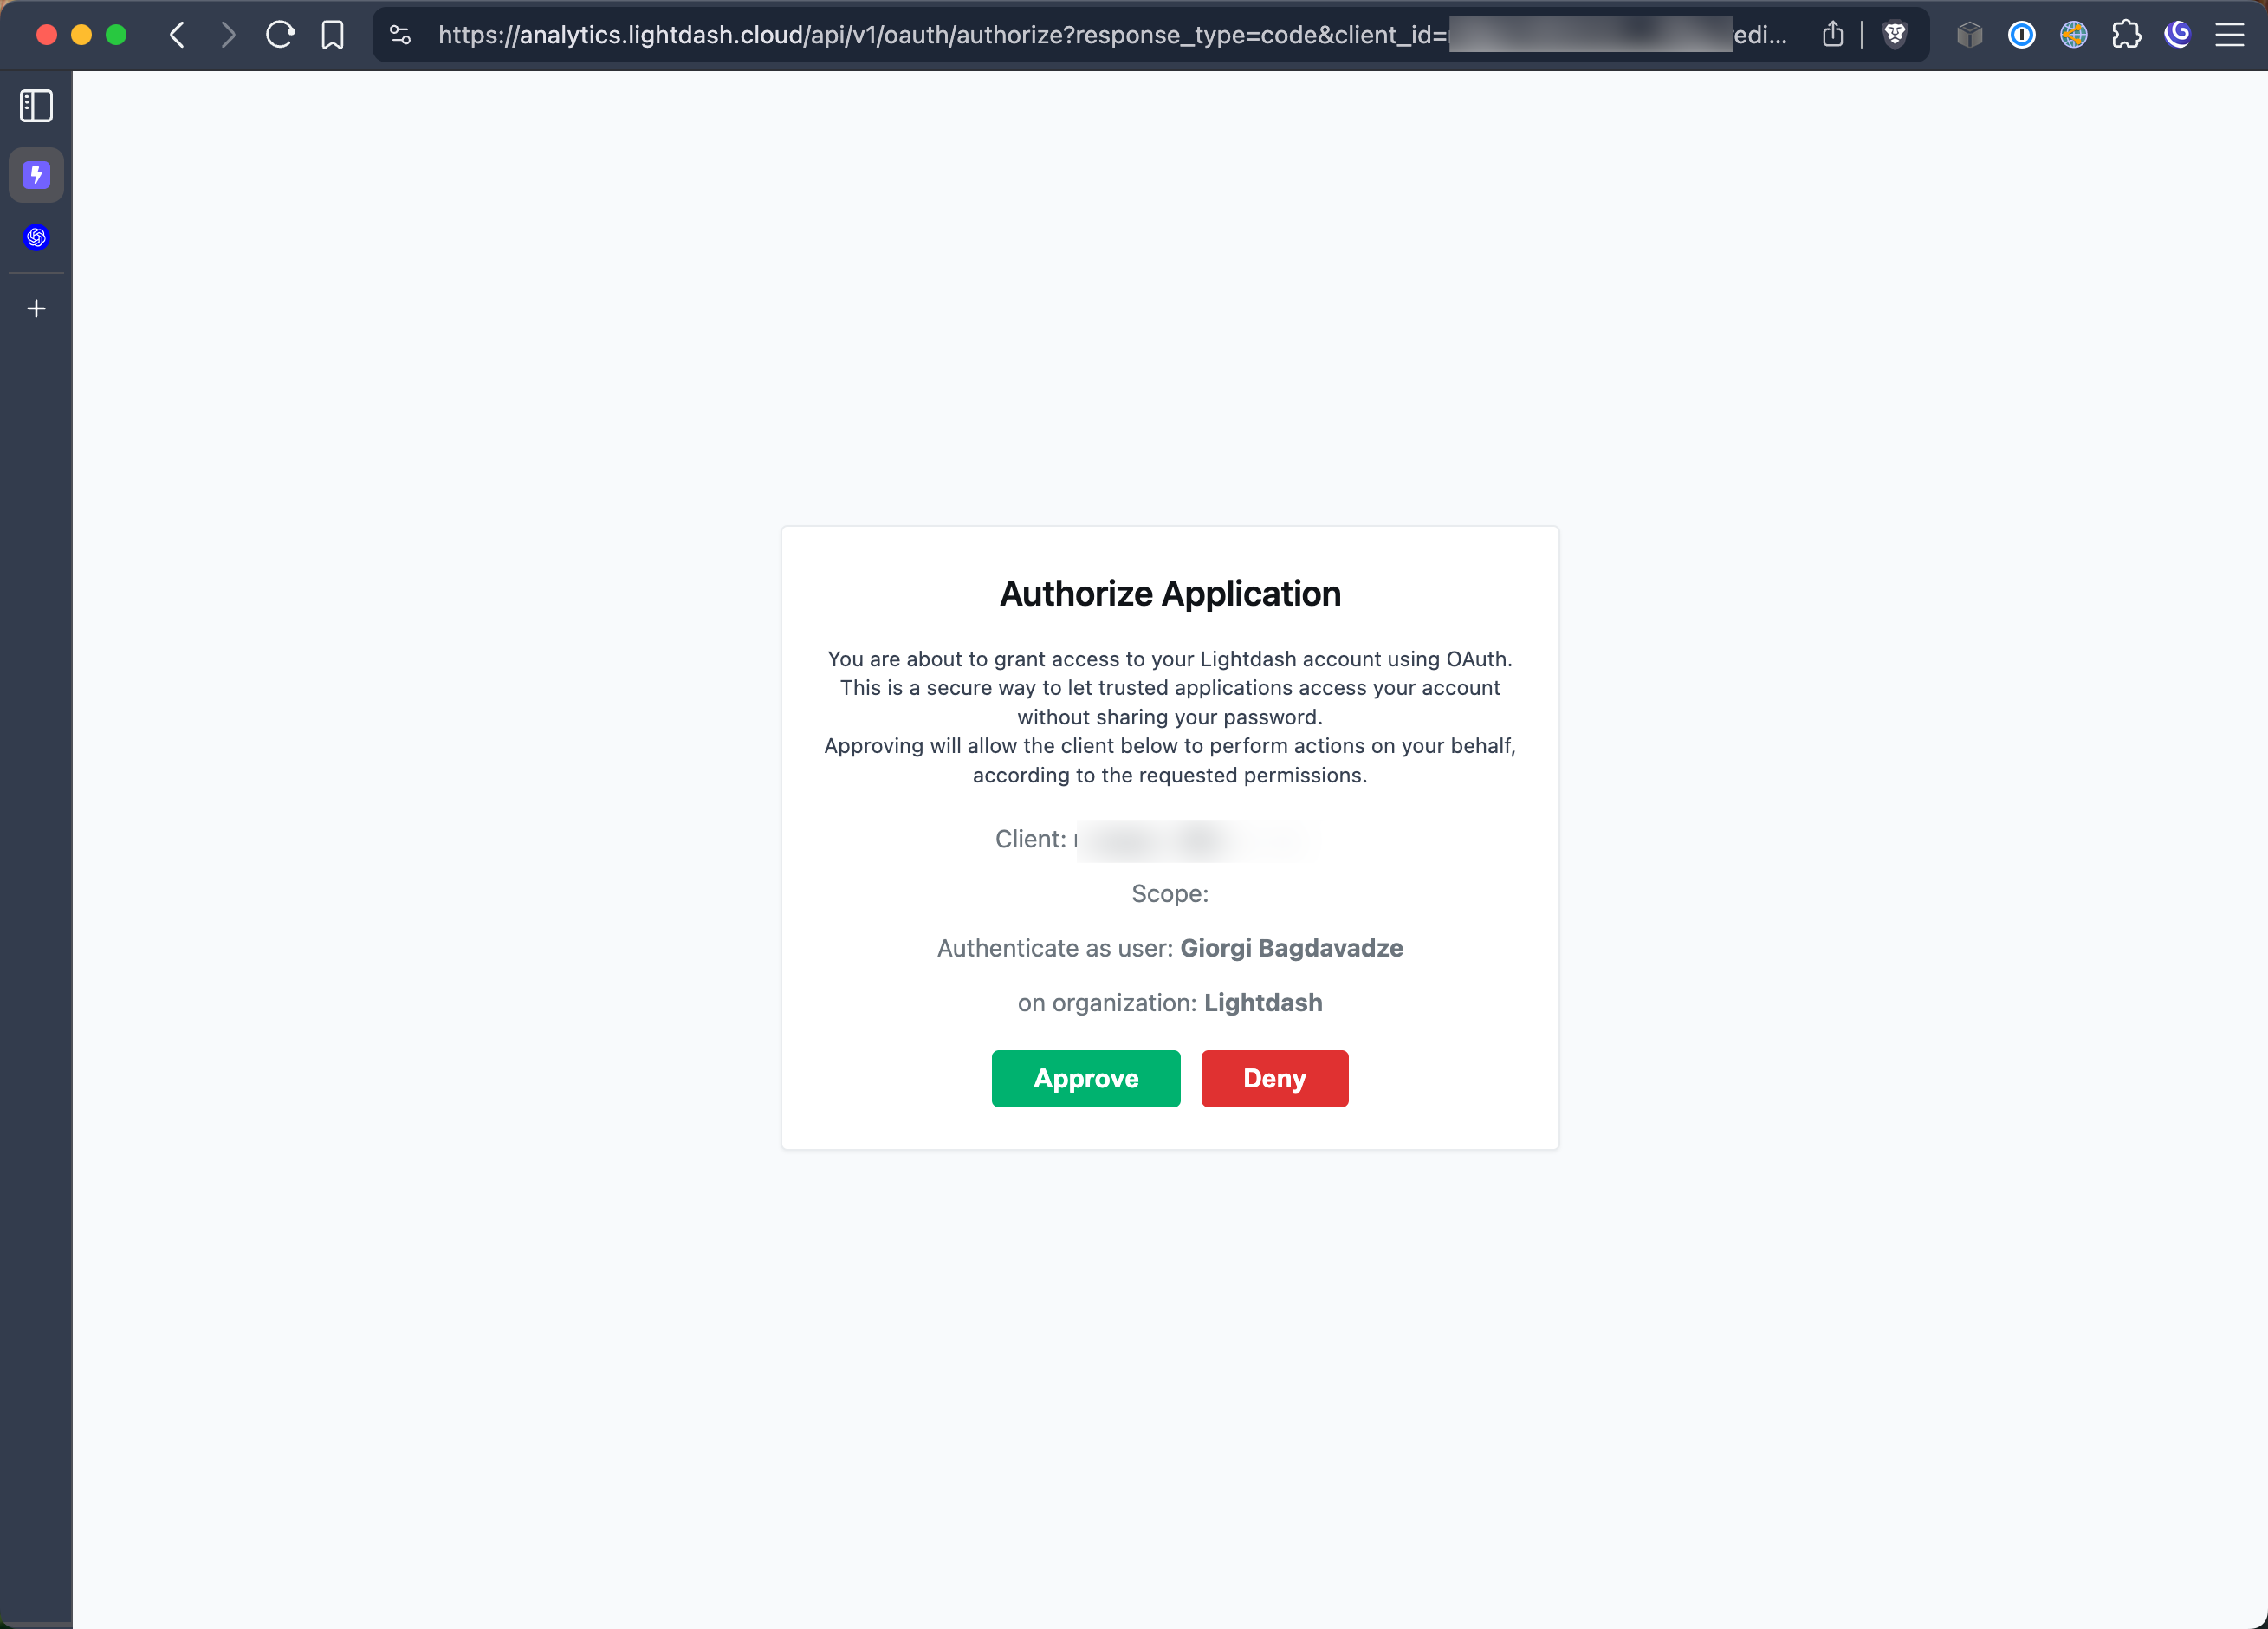 */}
#### Claude Code CLI
For developers using Claude Code CLI:
```bash
claude mcp add lightdash https://.lightdash.cloud/api/v1/mcp -t http
```
Replace `` with your actual Lightdash instance name.
1. **Use the /mcp command in Claude Code**
*/}
#### Claude Code CLI
For developers using Claude Code CLI:
```bash
claude mcp add lightdash https://.lightdash.cloud/api/v1/mcp -t http
```
Replace `` with your actual Lightdash instance name.
1. **Use the /mcp command in Claude Code**
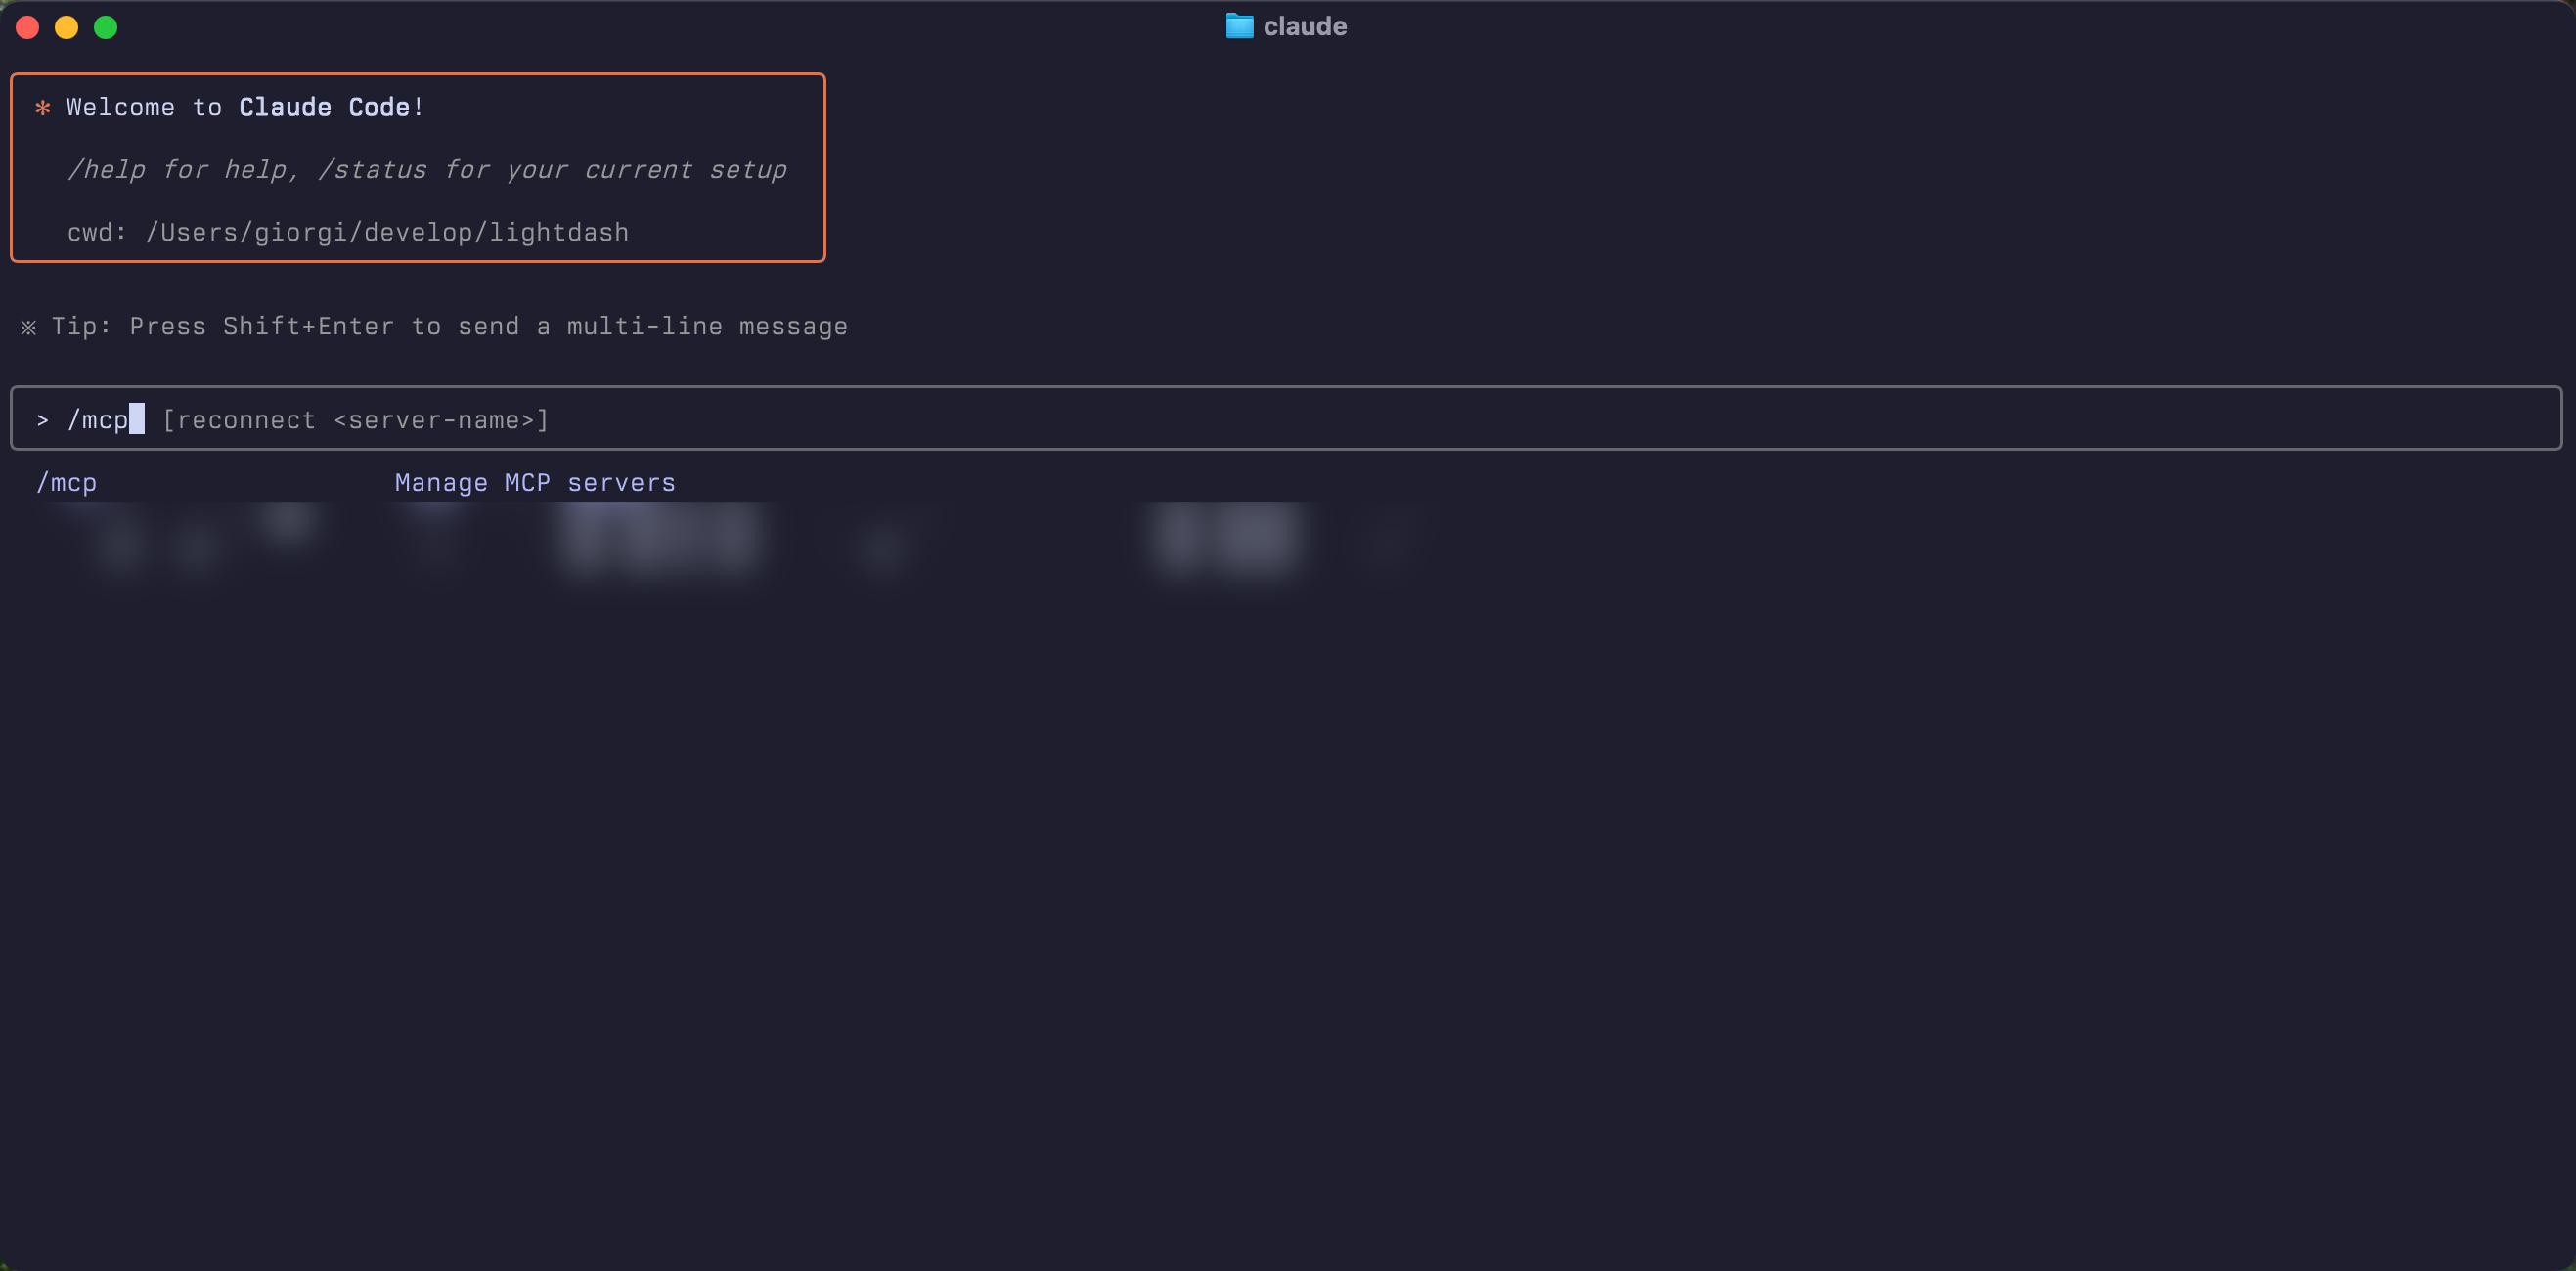 2. **Select Lightdash from the list**
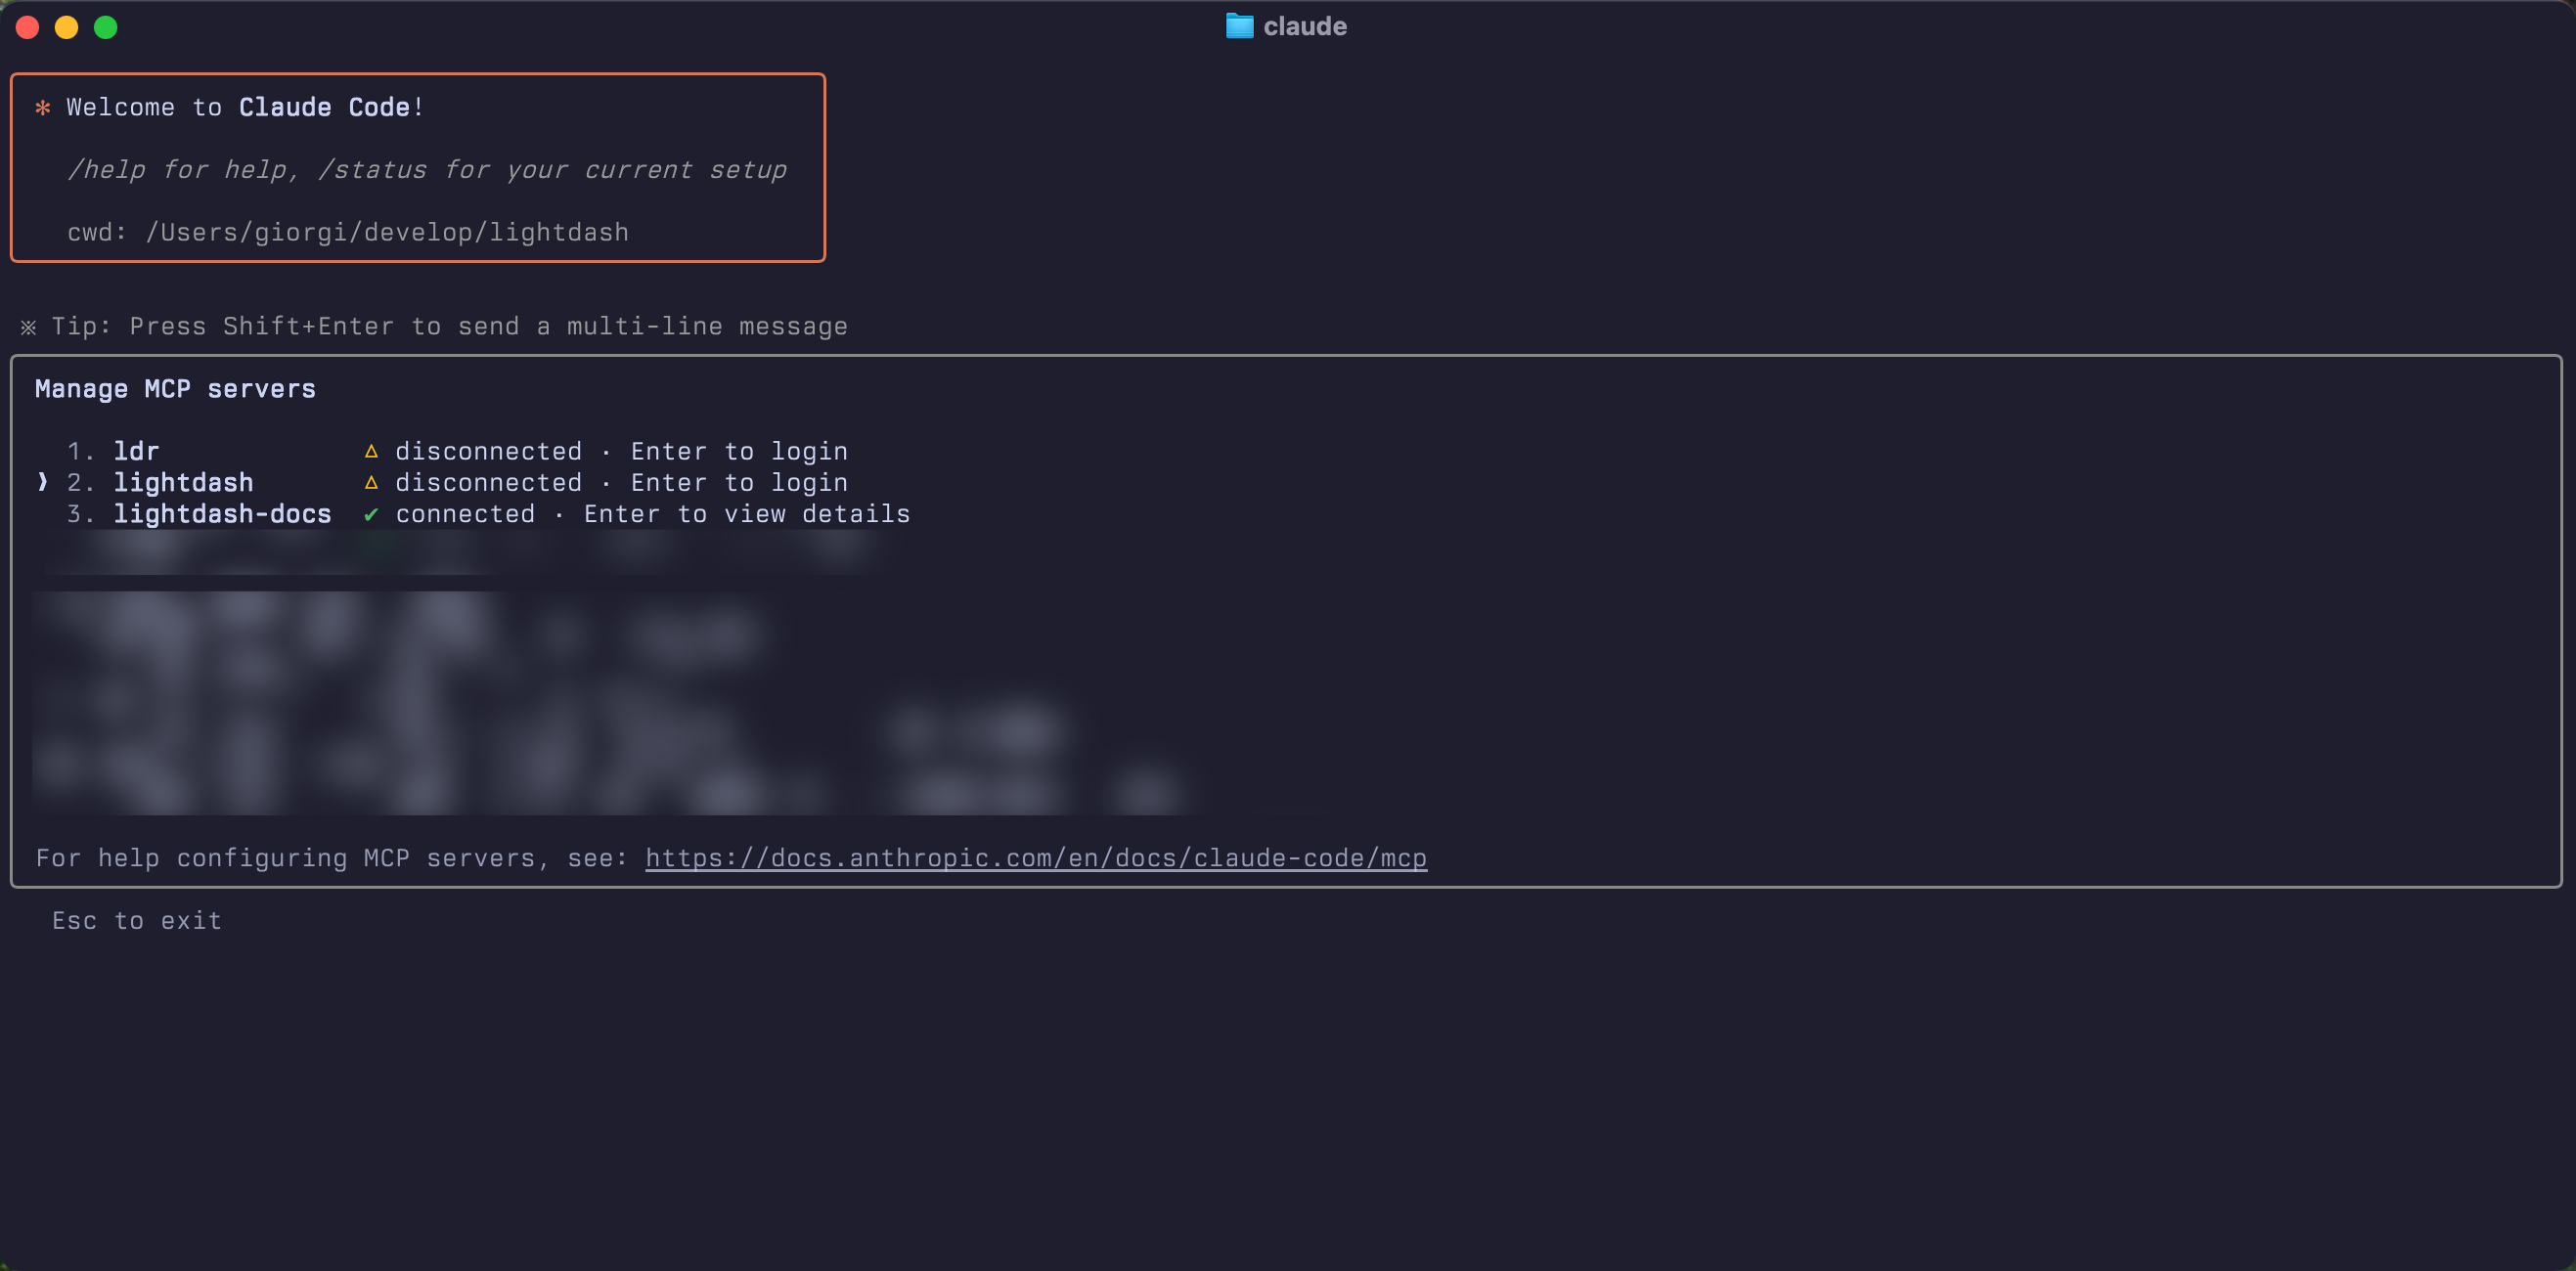 3. **Authenticate with Lightdash**
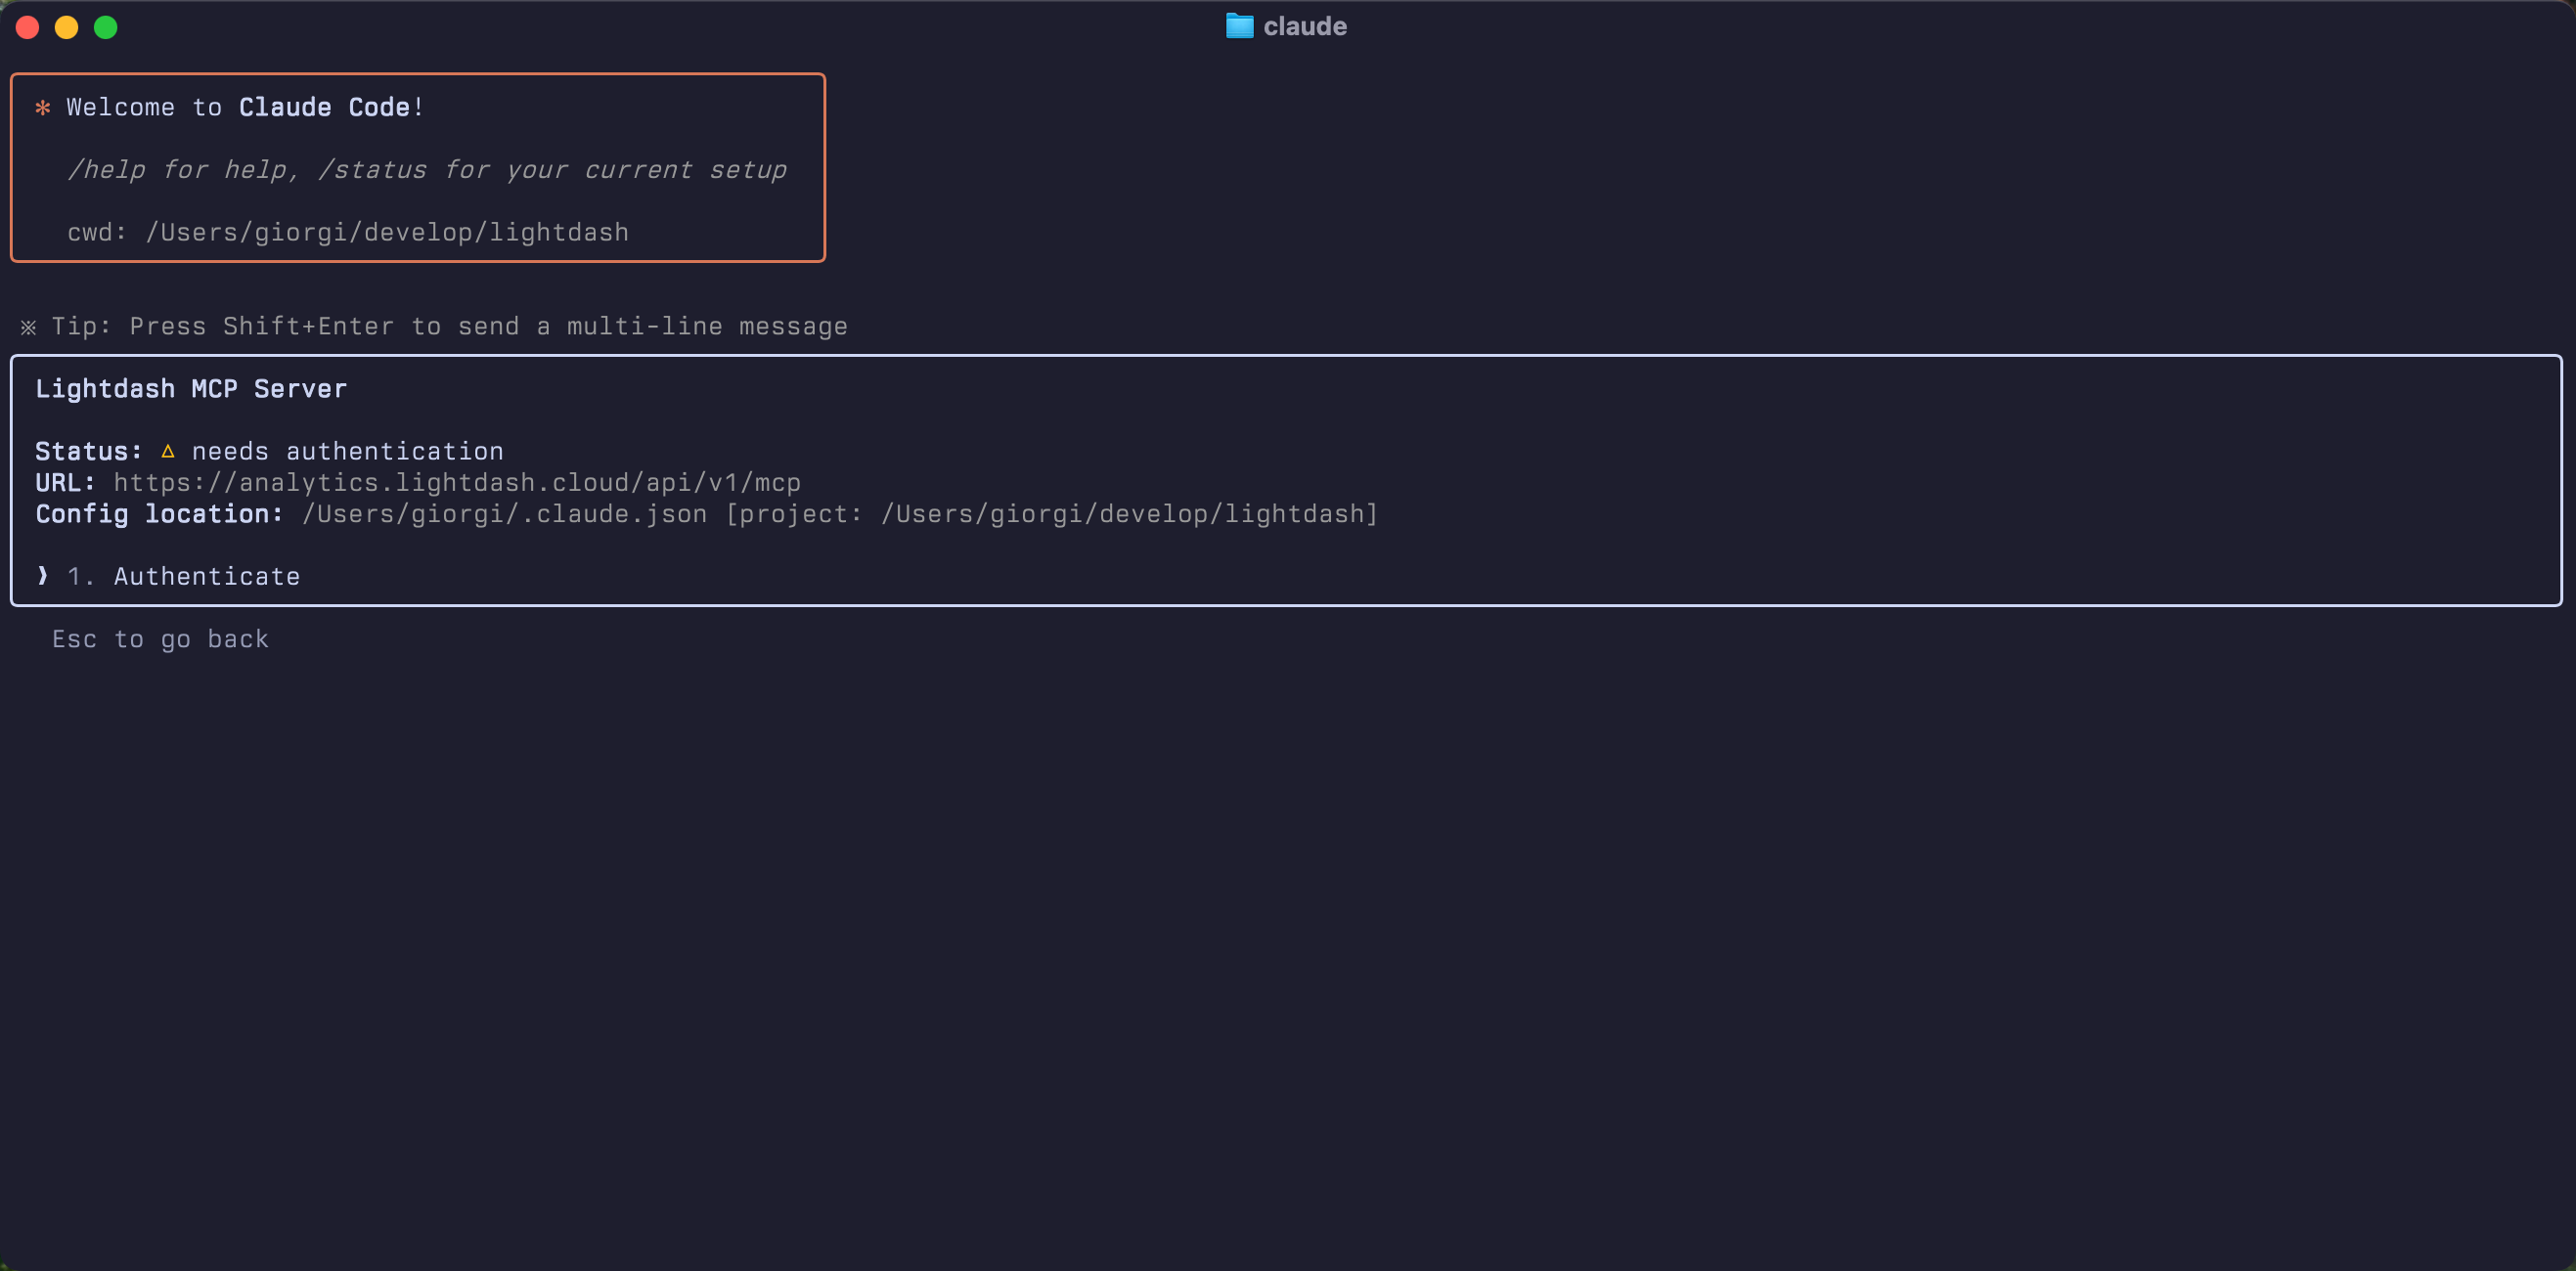 4. **Complete OAuth Flow**
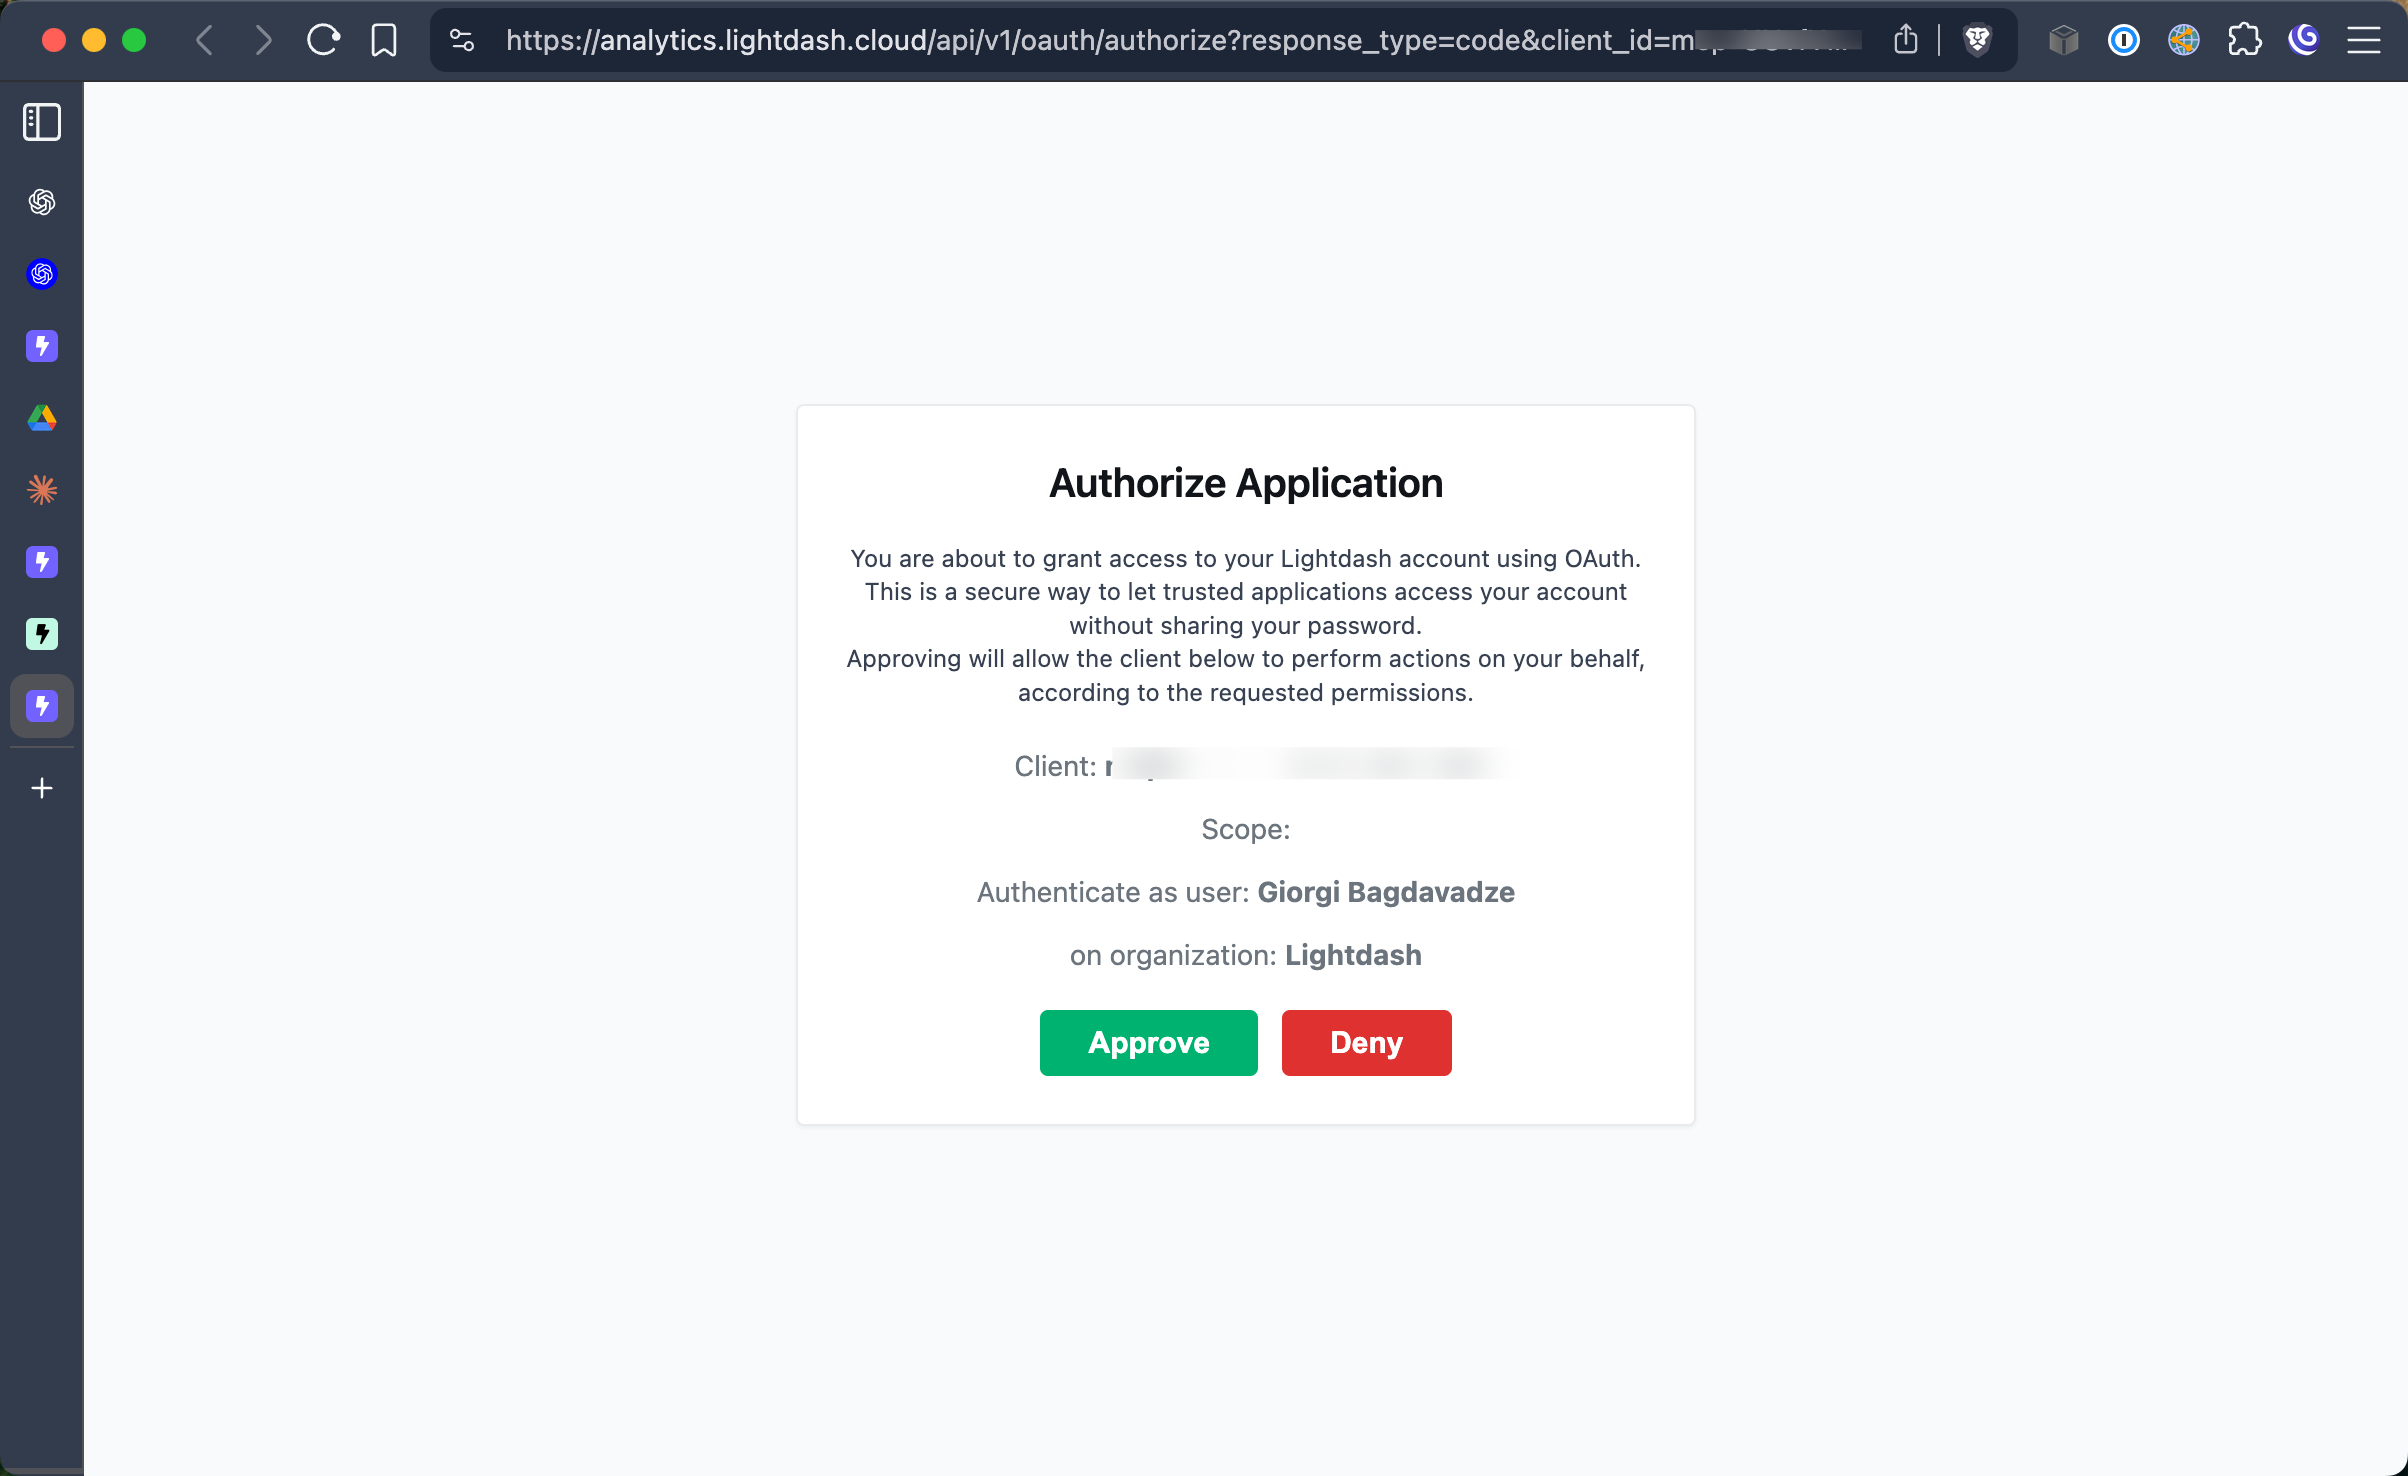 5. **Start using MCP**
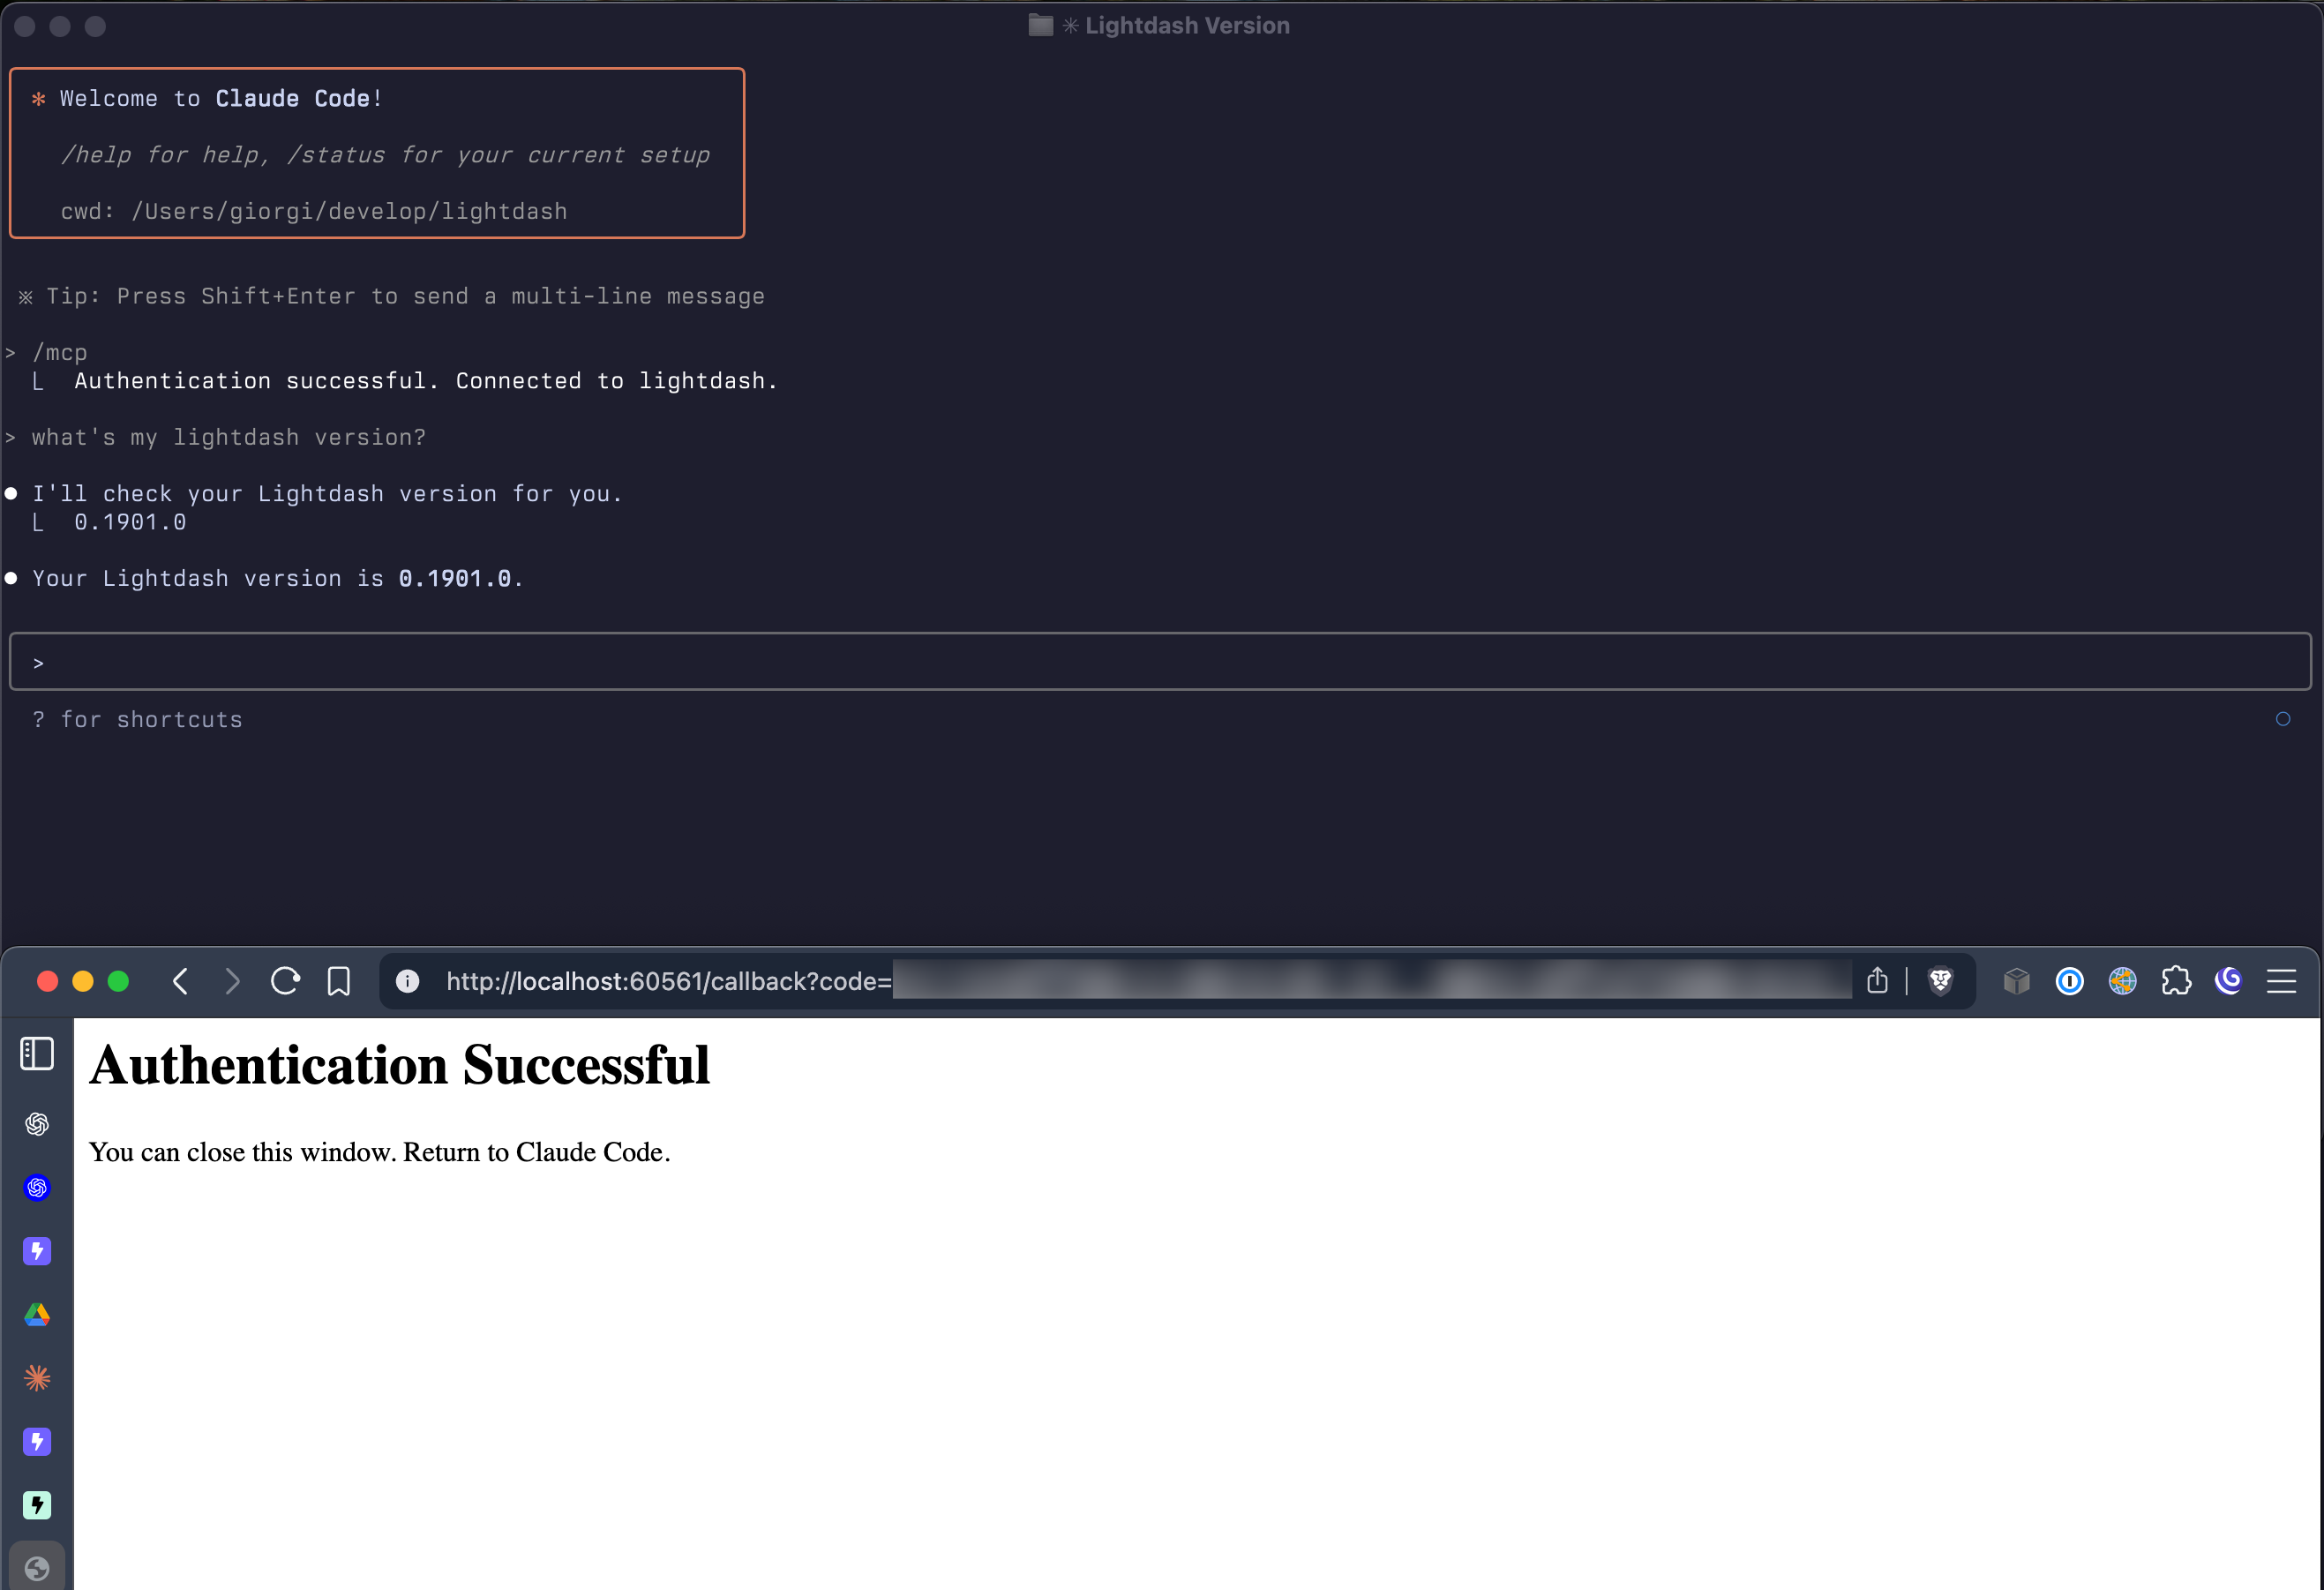 After authentication, you can start asking questions about your Lightdash data directly in Claude Code!
#### Custom Integration (For Developers)
If you're building your own agents or automated workflows, you can integrate directly with Lightdash MCP:
* **Transport**: Lightdash MCP exposes a StreamableHTTP transport endpoint at `https://.lightdash.cloud/api/v1/mcp`
* **Debugging**: Use `@modelcontextprotocol/inspector` to inspect and debug the MCP connection
* **Authentication**: Requires OAuth 2.0 flow for secure authentication
* **Documentation**: See the [MCP specification](https://modelcontextprotocol.io/docs) for implementation details
{/*
```bash
npx @modelcontextprotocol/inspector https://.lightdash.cloud/api/v1/mcp
```
This will open an interactive inspector where you can explore available tools and test them directly.
*/}
{/* TODO: Add screenshots of the MCP inspector interface */}
## Configuring your AI assistant
Since MCP provides raw tools without built-in intelligence, your AI assistant needs proper instructions to use Lightdash MCP effectively. We recommend adding custom instructions to guide the AI in using the tools correctly.
After authentication, you can start asking questions about your Lightdash data directly in Claude Code!
#### Custom Integration (For Developers)
If you're building your own agents or automated workflows, you can integrate directly with Lightdash MCP:
* **Transport**: Lightdash MCP exposes a StreamableHTTP transport endpoint at `https://.lightdash.cloud/api/v1/mcp`
* **Debugging**: Use `@modelcontextprotocol/inspector` to inspect and debug the MCP connection
* **Authentication**: Requires OAuth 2.0 flow for secure authentication
* **Documentation**: See the [MCP specification](https://modelcontextprotocol.io/docs) for implementation details
{/*
```bash
npx @modelcontextprotocol/inspector https://.lightdash.cloud/api/v1/mcp
```
This will open an interactive inspector where you can explore available tools and test them directly.
*/}
{/* TODO: Add screenshots of the MCP inspector interface */}
## Configuring your AI assistant
Since MCP provides raw tools without built-in intelligence, your AI assistant needs proper instructions to use Lightdash MCP effectively. We recommend adding custom instructions to guide the AI in using the tools correctly.
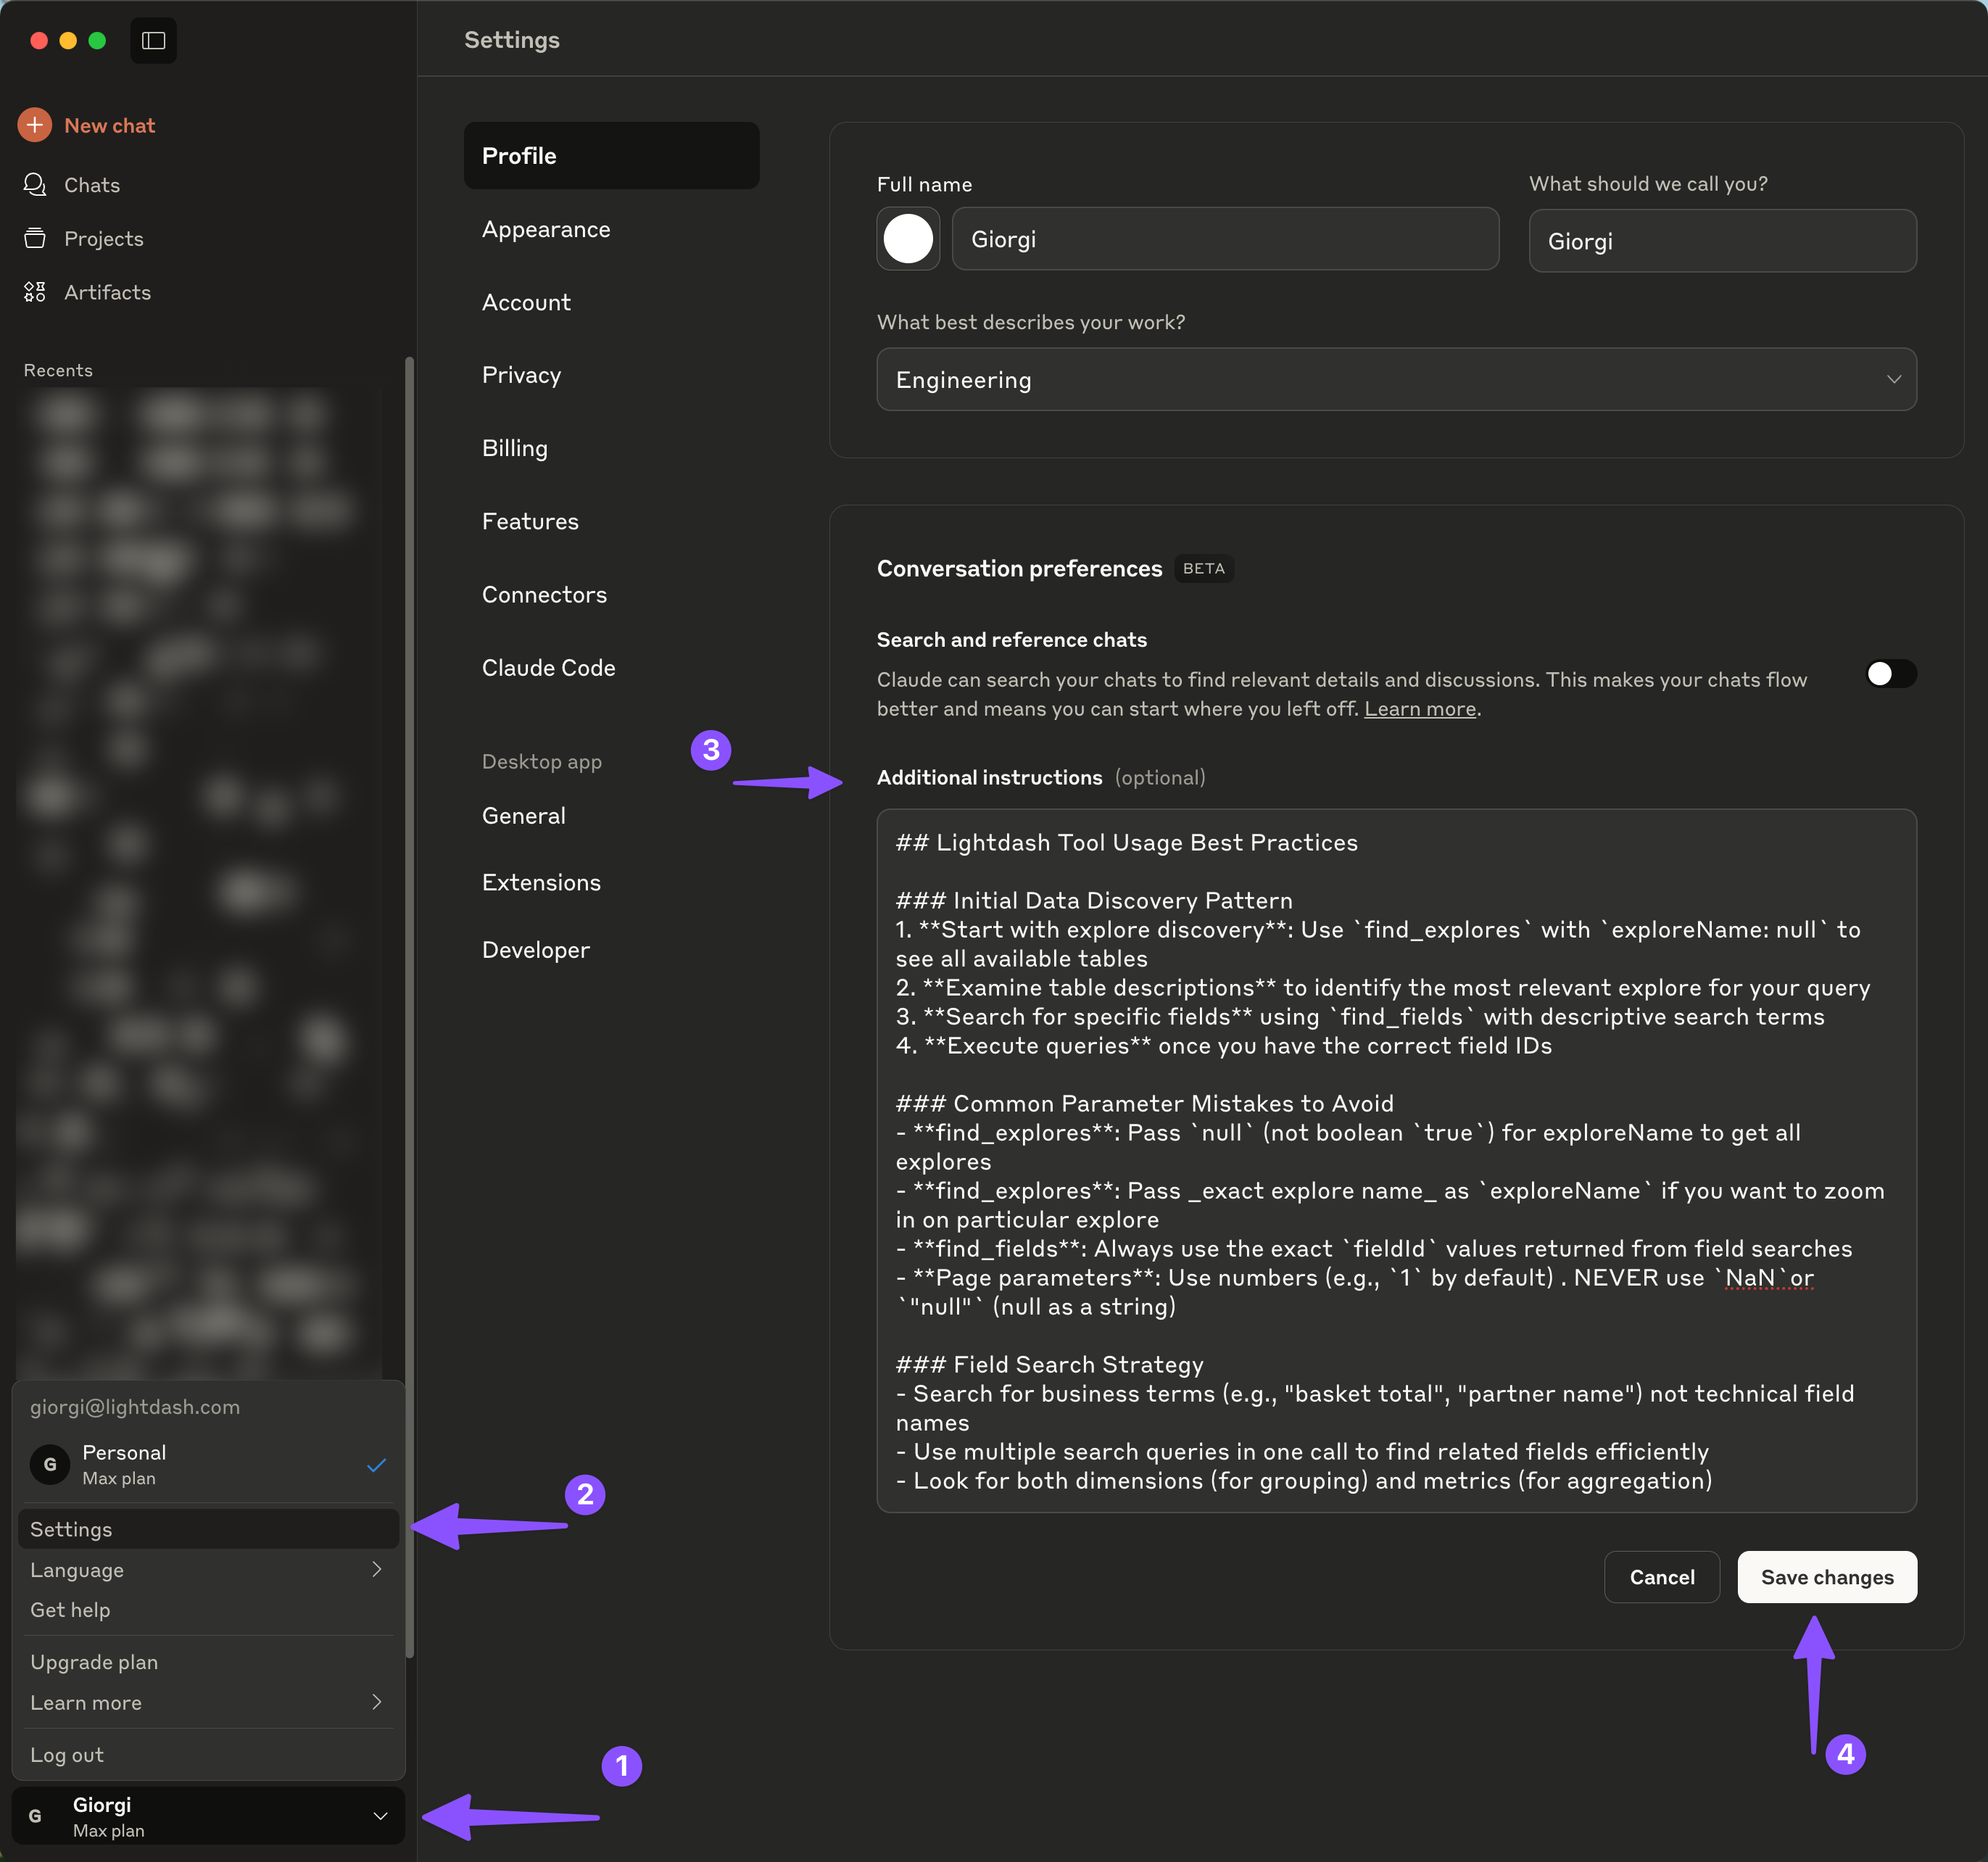 Here's a suggested template for optimizing Lightdash MCP usage. Feel free to modify these instructions based on your specific needs and use cases:
```
## Lightdash Tool Usage Best Practices
### Initial Data Discovery Pattern
1. **Start with explore discovery**: Use `find_explores` with `exploreName: null` to see all available tables
2. **Examine table descriptions** to identify the most relevant explore for your query
3. **Search for specific fields** using `find_fields` with descriptive search terms
4. **Execute queries** once you have the correct field IDs
### Common Parameter Mistakes to Avoid
- **find_explores**: Pass `null` (not boolean `true`) for exploreName to get all explores
- **find_explores**: Pass _exact explore name_ as `exploreName` if you want to zoom in on particular explore
- **find_fields**: Always use the exact `fieldId` values returned from field searches
- **Page parameters**: Use numbers (e.g., `1` by default) . NEVER use `NaN`or `"null"` (null as a string)
### Field Search Strategy
- Search for business terms (e.g., "basket total", "partner name") not technical field names
- Use multiple search queries in one call to find related fields efficiently
- Look for both dimensions (for grouping) and metrics (for aggregation)
```
For Claude Code CLI users, you can add these instructions to your project's `CLAUDE.md` file instead of configuring them in the web interface.
## What it can do
### Core capabilities
MCP provides AI assistants with powerful tools to interact with your Lightdash data:
#### System information
* **Get Lightdash version** - Check the current version of your Lightdash instance
#### Project management
* **List projects** - View all accessible projects in your organization
* **Set active project** - Switch context between different projects (required before accessing any data)
* **Get current project** - Check which project is currently active
**Important:** An active project must be set before MCP can retrieve any data. Your AI assistant will typically handle this automatically by listing available projects and asking you to select one if none is currently active.
#### Data exploration tools
* **Find explores** - Browse available data models (explores) and understand their structure
* **Find fields** - Search for specific metrics and dimensions across your data models
* **Find dashboards** - Locate existing dashboards by name or content
* **Find charts** - Search through saved charts and visualizations
### Example conversations
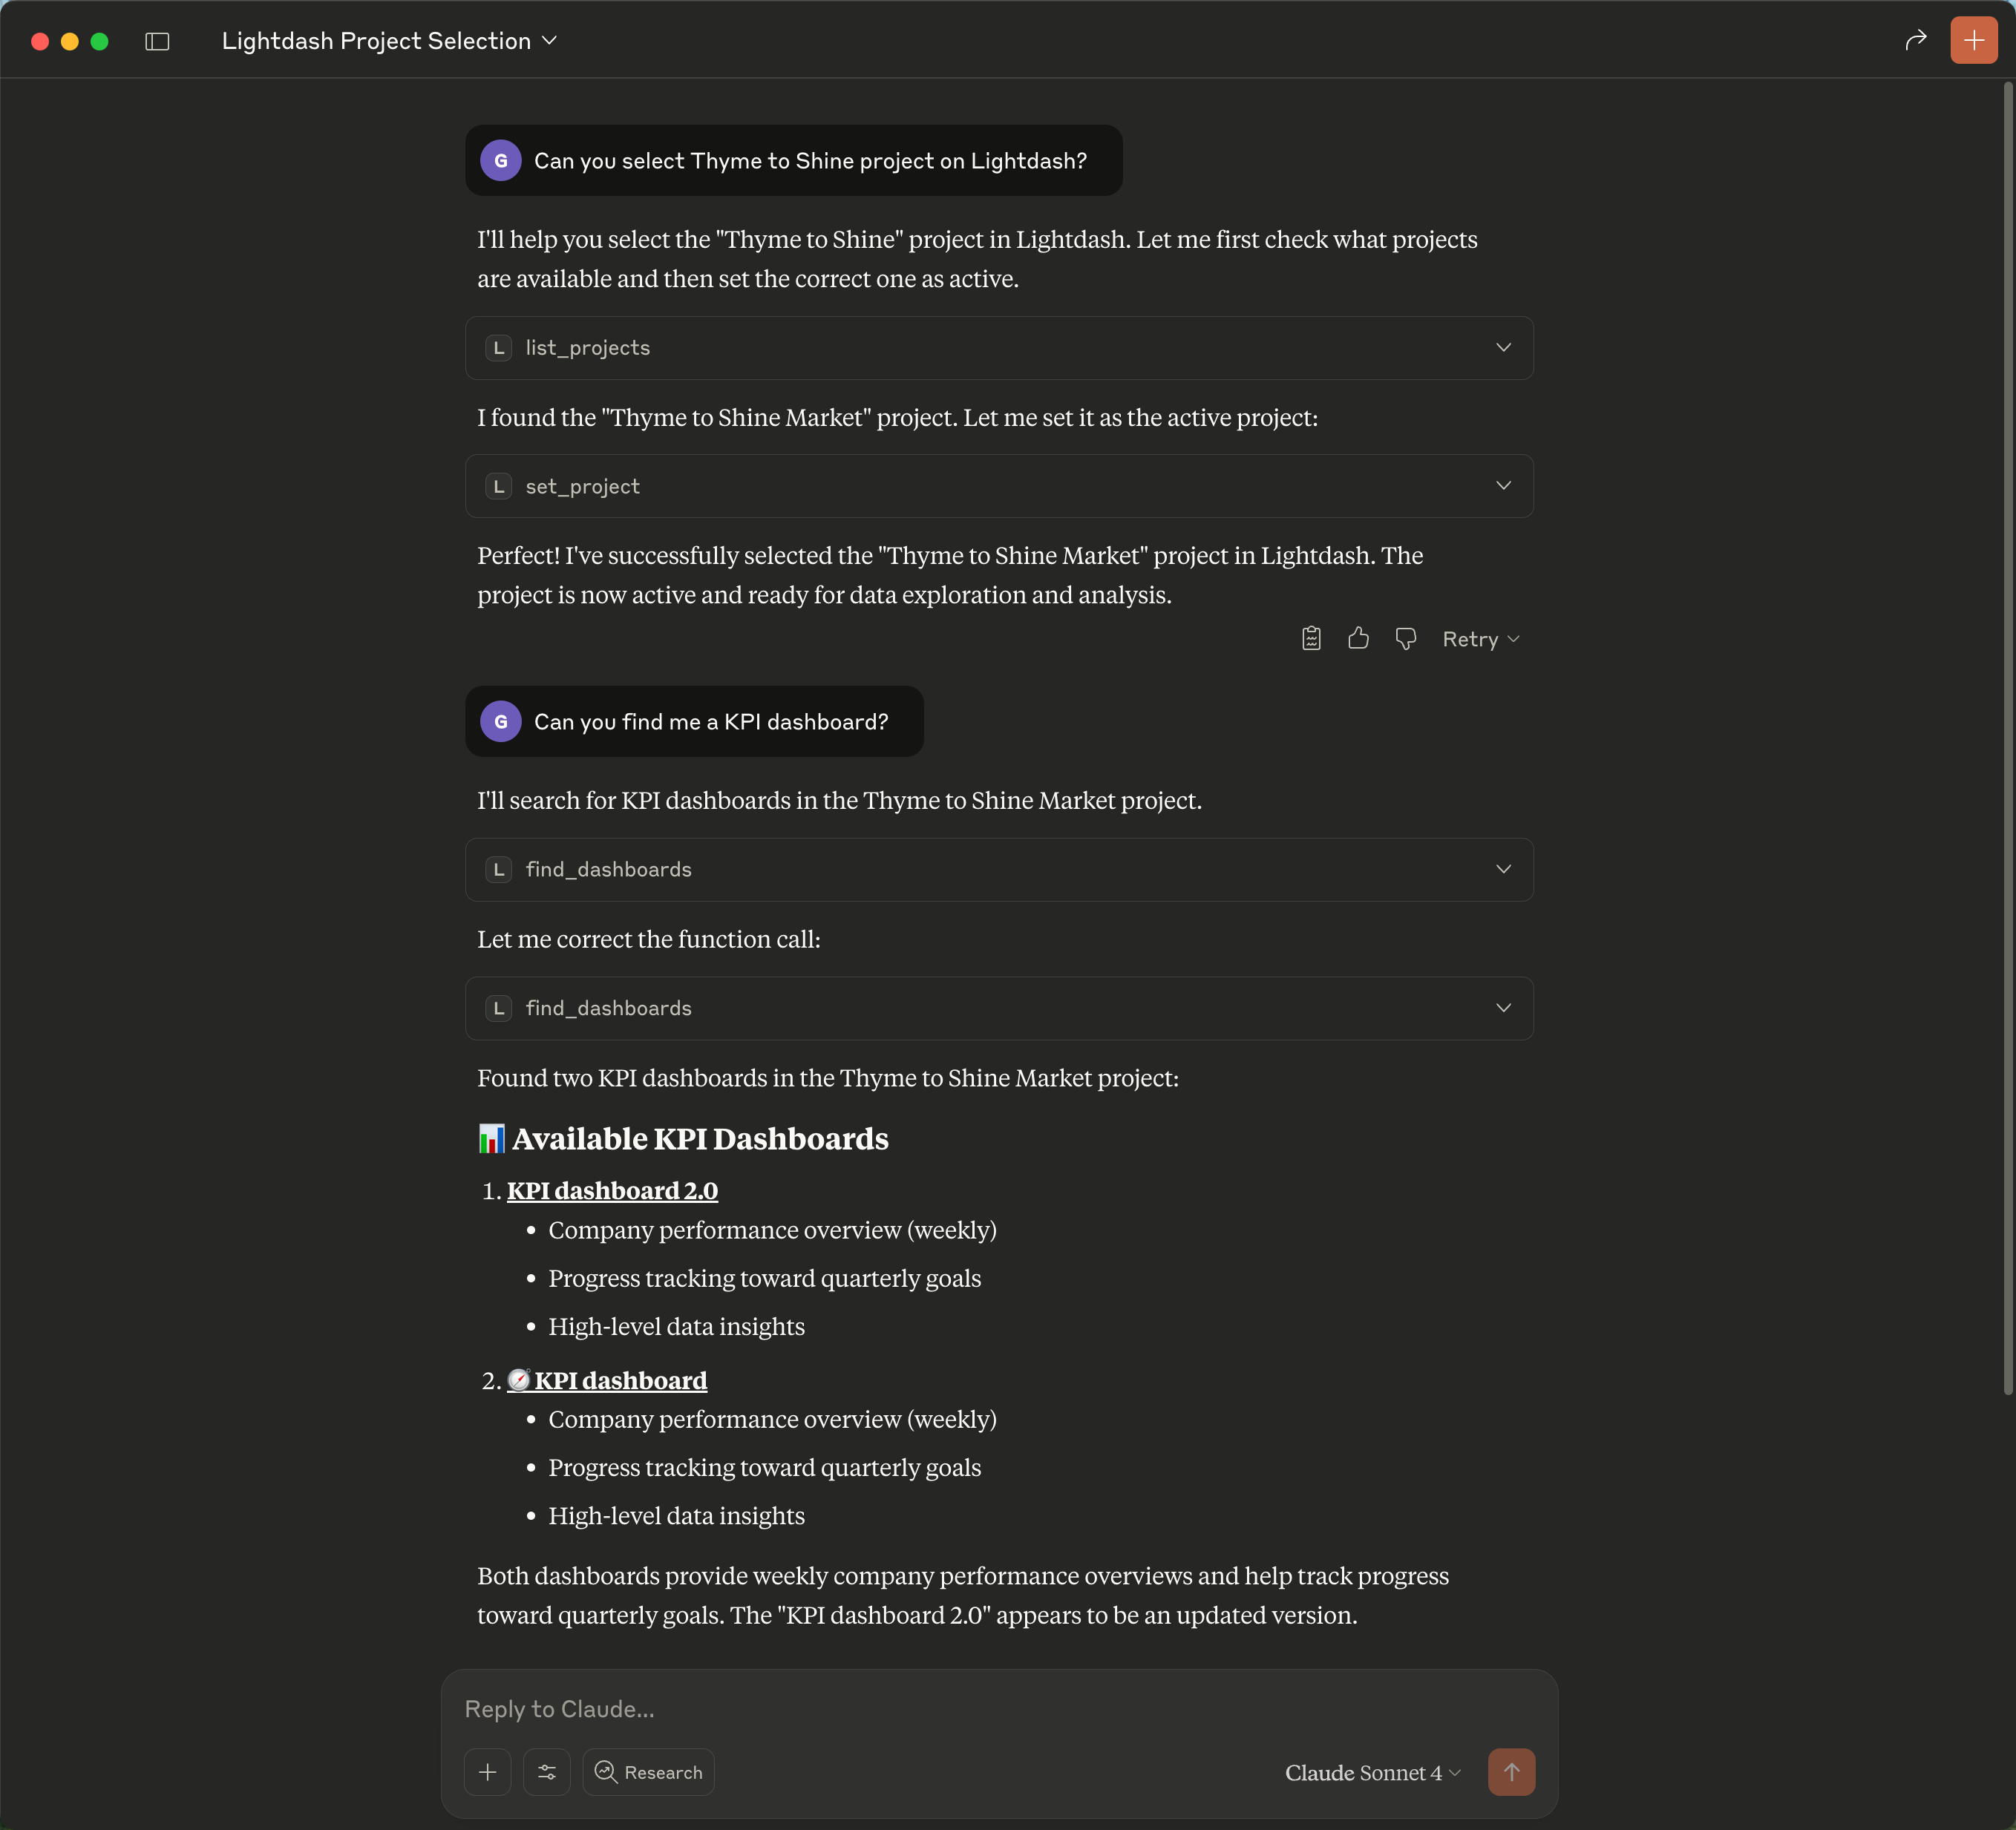
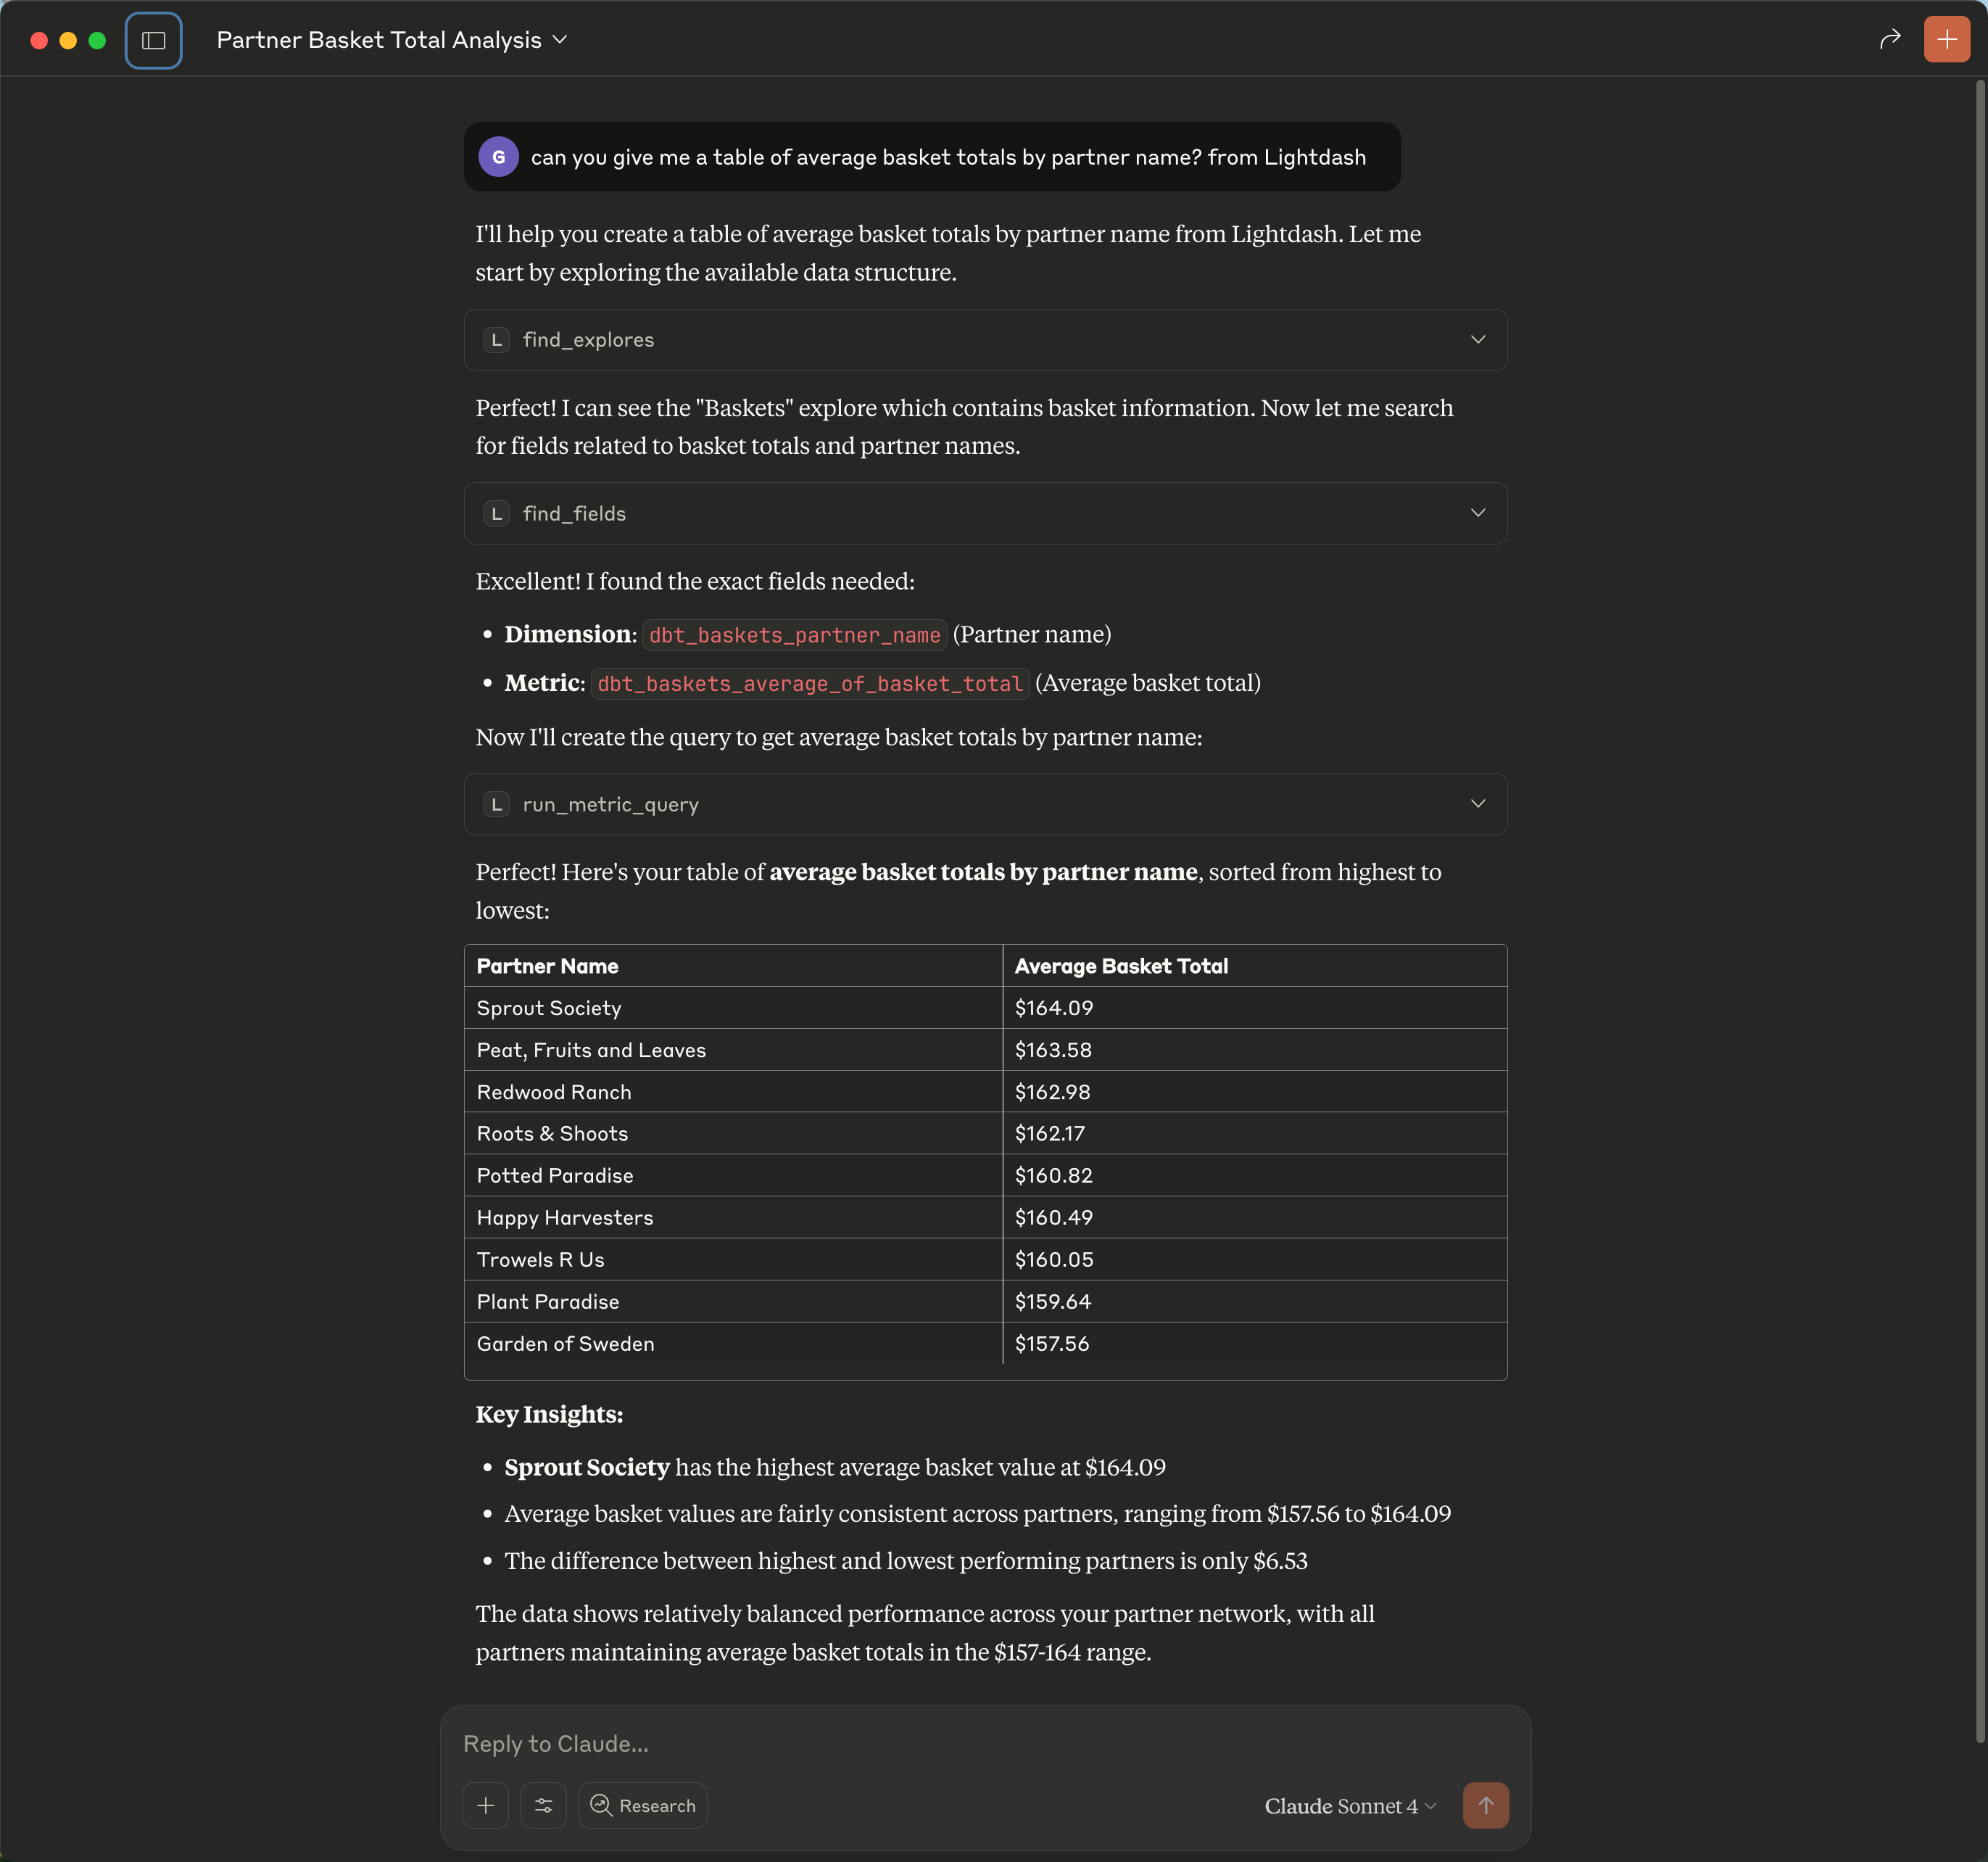
Here are some examples of how you can interact with AI assistants using MCP:
Here's a suggested template for optimizing Lightdash MCP usage. Feel free to modify these instructions based on your specific needs and use cases:
```
## Lightdash Tool Usage Best Practices
### Initial Data Discovery Pattern
1. **Start with explore discovery**: Use `find_explores` with `exploreName: null` to see all available tables
2. **Examine table descriptions** to identify the most relevant explore for your query
3. **Search for specific fields** using `find_fields` with descriptive search terms
4. **Execute queries** once you have the correct field IDs
### Common Parameter Mistakes to Avoid
- **find_explores**: Pass `null` (not boolean `true`) for exploreName to get all explores
- **find_explores**: Pass _exact explore name_ as `exploreName` if you want to zoom in on particular explore
- **find_fields**: Always use the exact `fieldId` values returned from field searches
- **Page parameters**: Use numbers (e.g., `1` by default) . NEVER use `NaN`or `"null"` (null as a string)
### Field Search Strategy
- Search for business terms (e.g., "basket total", "partner name") not technical field names
- Use multiple search queries in one call to find related fields efficiently
- Look for both dimensions (for grouping) and metrics (for aggregation)
```
For Claude Code CLI users, you can add these instructions to your project's `CLAUDE.md` file instead of configuring them in the web interface.
## What it can do
### Core capabilities
MCP provides AI assistants with powerful tools to interact with your Lightdash data:
#### System information
* **Get Lightdash version** - Check the current version of your Lightdash instance
#### Project management
* **List projects** - View all accessible projects in your organization
* **Set active project** - Switch context between different projects (required before accessing any data)
* **Get current project** - Check which project is currently active
**Important:** An active project must be set before MCP can retrieve any data. Your AI assistant will typically handle this automatically by listing available projects and asking you to select one if none is currently active.
#### Data exploration tools
* **Find explores** - Browse available data models (explores) and understand their structure
* **Find fields** - Search for specific metrics and dimensions across your data models
* **Find dashboards** - Locate existing dashboards by name or content
* **Find charts** - Search through saved charts and visualizations
### Example conversations
Here are some examples of how you can interact with AI assistants using MCP:
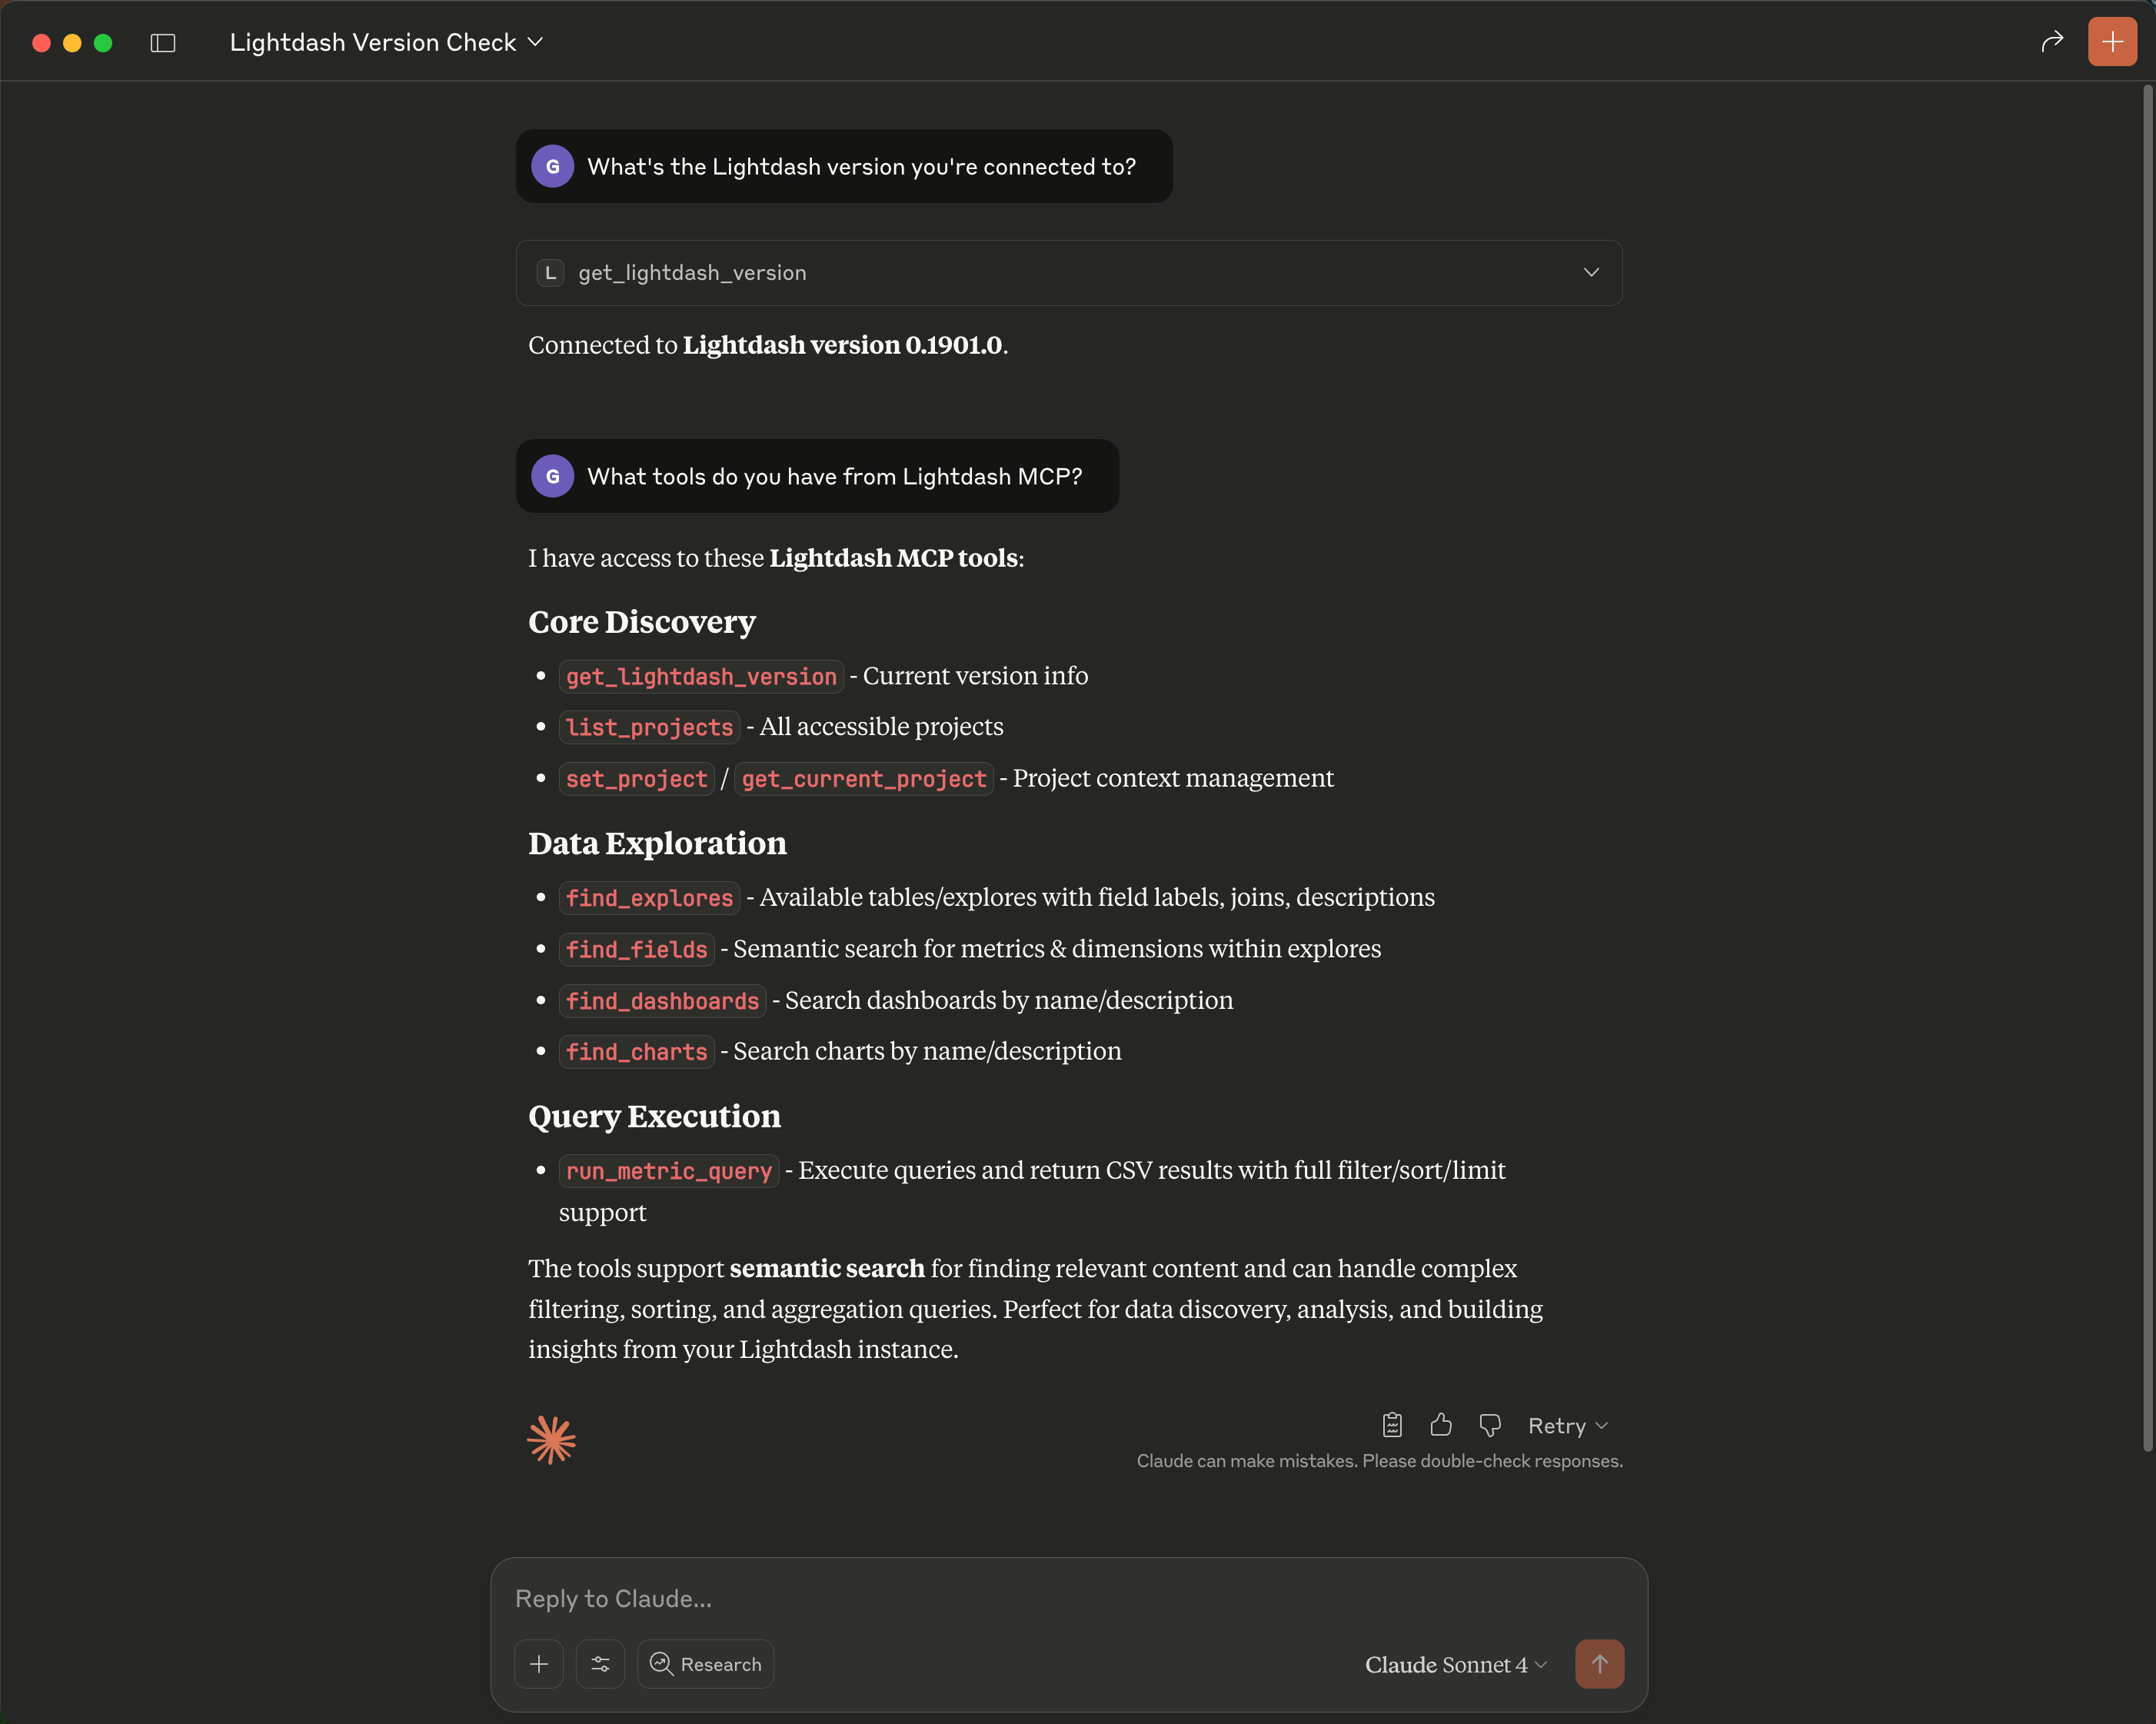
 ## Best practices
To get the most value from MCP, ensure your Lightdash data is well-organized and documented. See our [AI agents best practices guide](/guides/ai-agents#best-practices) for detailed recommendations on:
* Organizing and naming your data models
* Writing effective documentation and AI hints
* Optimizing for AI assistant performance
* Security and permissions considerations
## FAQ
**Q: Does Lightdash MCP store my data or query results?**
A: No, Lightdash MCP does not store any query results, conversation responses, or data. MCP acts as a bridge that allows AI assistants to access your Lightdash metadata and execute queries in real-time. The MCP consumer (your AI assistant) is responsible for any data storage. Depending on which AI assistant you use, data might be shared with third parties according to their privacy policies.
**Q: Can multiple team members use MCP?**
A: Yes, each team member can set up their own MCP connection with their individual Lightdash credentials. Each connection respects that user's specific permissions and access controls.
**Q: Can MCP modify my data or dashboards?**
A: No, MCP has read-only access. It can search and explore your data models but cannot make any modifications to your Lightdash configuration or underlying data.
## Best practices
To get the most value from MCP, ensure your Lightdash data is well-organized and documented. See our [AI agents best practices guide](/guides/ai-agents#best-practices) for detailed recommendations on:
* Organizing and naming your data models
* Writing effective documentation and AI hints
* Optimizing for AI assistant performance
* Security and permissions considerations
## FAQ
**Q: Does Lightdash MCP store my data or query results?**
A: No, Lightdash MCP does not store any query results, conversation responses, or data. MCP acts as a bridge that allows AI assistants to access your Lightdash metadata and execute queries in real-time. The MCP consumer (your AI assistant) is responsible for any data storage. Depending on which AI assistant you use, data might be shared with third parties according to their privacy policies.
**Q: Can multiple team members use MCP?**
A: Yes, each team member can set up their own MCP connection with their individual Lightdash credentials. Each connection respects that user's specific permissions and access controls.
**Q: Can MCP modify my data or dashboards?**
A: No, MCP has read-only access. It can search and explore your data models but cannot make any modifications to your Lightdash configuration or underlying data.