> ## Documentation Index
> Fetch the complete documentation index at: https://lightdash-docs-many-to-many.mintlify.site/llms.txt
> Use this file to discover all available pages before exploring further.
# Metrics reference
A metric is a value that describes or summarizes features from a collection of data points. For example: count of total number of user IDs, or sum of revenue.
In Lightdash, metrics are used to summarize dimensions or, sometimes, other metrics.
## Adding metrics to your project using the `meta` tag.
### 1. Using the column `meta` tag
To add a metric to Lightdash using the `meta` tag, you define it in your dbt project under the dimension name you're trying to describe/summarize.
```yaml
models:
- name: orders_model
columns:
- name: user_id # dimension your metric is aggregating
meta:
metrics:
distinct_user_ids: # name of your metric
type: count_distinct # metric type
- name: revenue # dimension your metric is aggregating
meta:
metrics:
sum_revenue: # name of your metric
type: sum # metric type
```
Once you've got the hang of what these metrics look like, read more about the [metric types you can use below.](#metric-types)
### 2. Using the model `meta` tag
Sometimes a metric references multiple columns, in these cases you can define the metric at the model level:
```yaml
models:
- name: orders_model
meta:
metrics:
revenue_per_user:
type: number
sql: ${sum_revenue} / ${distinct_user_ids}
sum_total_paid:
type: sum
sql: ${revenue} + ${taxes_paid}
```
**Non-aggregate metrics** (`number`, `boolean`, etc.) can only reference other metrics in `sql:` since they are inserted directly into the generated SQL query without being wrapped in an aggregate function.
**Aggregate metrics** (`sum`, `count_distinct`, etc.) can only reference dimensions since they are wrapped in an aggregate function before being added to the generated SQL query. Wrapping an aggreate function in another aggregate function will cause an error.
Read on to learn more about aggregate vs non-aggregate metrics!
## Metric Categories
Each metric type falls into one of these categories. The metric categories tell you whether the metric type is an aggregation and what type of fields the metric can reference:
### Aggregate metrics
Aggregate metric types perform (surprise, surprise) aggregations. Sums and averages are examples of aggregate metrics: they are measurements summarizing a collection of data points.
Aggregate metrics can *only* reference dimensions, not other metrics.
### Non-aggregate metrics
Non-aggregate metrics are metric types that, you guessed it, do *not* perform aggregations.
Numbers and booleans are examples of non-aggregate metrics. These metric types perform a calculation on a single data point, so they can only reference aggregate metrics. They *cannot* reference dimensions.
## Metric configuration
You can customize your metrics in your dbt model's YAML file. Here's an example of the properties used in defining a metric:
```yaml
models:
- name: sales_stats
meta:
joins:
- join: web_sessions
sql_on: ${web_sessions.date} = ${sales_stats.date}
group_details:
product_details:
label: Product Details
description: 'Fields that have information about the products in the basket.'
item_details:
label: Item Details
description: 'Fields that have information about the items in the basket.'
columns:
- name: revenue
description: 'Total estimated revenue in GBP based on forecasting done by the finance team.'
meta:
metrics:
total_revenue:
label: 'Total revenue GBP'
type: SUM
description: 'Total revenue in GBP'
sql: 'IF(${revenue} IS NULL, 10, ${revenue})'
groups: ['product_details', 'item_details'] # this would add the metric to a nested group: `product details` --> `item details`
hidden: false
format: '[$£]#,##0.00' # GBP rounded to two decimal points
show_underlying_values:
- revenue
- forecast_date
- web_sessions.session_id # field from joined table
filters:
- is_adjusted: true
```
Here are all of the properties you can customize:
| Property | Required | Value | Description |
| :-------------------------------------------------- | :------: | :----------------------- | :---------------------------------------------------------------------------------------------------------------------------------------------------------------------------------------------------------------------------------------------------------------------------------------------- |
| label | No | string | Custom label. This is what you'll see in Lightdash instead of the metric name. |
| [type](#metric-types) | Yes | metric type | Metrics must be one of the supported types. |
| [description](#description) | No | string | Description of the metric that appears in Lightdash. A default description is created by Lightdash if this isn't included |
| [sql](#custom-sql-in-aggregate-metrics) | No | string | Custom SQL used to define the metric. |
| hidden | No | boolean | If set to true, the metric is hidden from Lightdash. By default, this is set to false if you don't include this property. |
| [compact](#compact) | No | string | This option will compact the number value (e.g. 1,500 to 1.50K). Currently supports one of the following: \['thousands', 'millions', 'billions', 'trillions', 'kilobytes', 'megabytes', 'gigabytes', 'terabytes', 'petabytes', 'kibibytes', 'mebibytes', 'gibibytes', 'tebibytes', 'pebibytes'] |
| [format](#format) | No | string | This option will format the output value on the results table and CSV export. Supports spreadsheet-style formatting (e.g. #,##0.00). Use [this website](https://customformats.com/) to help build your custom format. |
| [groups](#groups) | No | string or string\[] | If you set this property, the metric will be grouped in the sidebar with other metrics with the same group label. |
| [urls](/references/dimensions#urls) | No | array | Adding urls to a metric allows your users to click metric values in the UI and take actions, like opening an external tool with a url, or open at a website. You can use liquid templates to customise the link based on the value of the dimension. |
| [show\_underlying\_values](#show-underlying-values) | No | Array of dimension names | You can limit which dimensions are shown for a field when a user clicks View underlying data. The list must only include dimension names from the base model or from any joined models. |
| [filters](#filters) | No | array | You can add filter logic to limit the values included in the metric calculation. You can add many filters. See which filter types are supported [here](#filters). |
## Metric types
| Type | Category | Description |
| :----------------------------------- | :------------ | :-------------------------------------------------------- |
| [percentile](#percentile) | Aggregate | Generates a percentile of values within a column |
| [median](#median) | Aggregate | Generates the 50th percentile of values within a column |
| [average](#average) | Aggregate | Generates an average (mean) of values within a column |
| [boolean](#boolean) | Non-aggregate | For fields that will show if something is true or false |
| [count](#count) | Aggregate | Counts the total number of values in the dimension |
| [count\_distinct](#count%5Fdistinct) | Aggregate | Counts the total unique number of values in the dimension |
| [date](#date) | Non-aggregate | For adding calculations to metrics that return dates. |
| [max](#max) | Aggregate | Generates the maximum value within a numeric column |
| [min](#min) | Aggregate | Generates the minimum value within a numeric column |
| [number](#number) | Non-aggregate | For adding calculations to metrics that return numbers. |
| [string](#string) | Non-aggregate | For metrics that contain letters or special characters |
| [sum](#sum) | Aggregate | Generates a sum of values within a column |
### percentile
Takes the percentile of the values in the given field. Like SQL's `PERCENTILE_CONT` function.
The `percentile` metric can be used on any numeric dimension or, [for custom SQL](#using-custom-sql-in-aggregate-metrics), any valid SQL expression that gives a numeric table column.
For example, this creates a metric `median_price` by taking the 50% percentile of the `item_price` dimension:
```yaml
columns:
- name: item_price
meta:
metrics:
median_price:
type: percentile
percentile: 50
```
### median
Takes the 50th percentile of the values in the given field. Like SQL's `PERCENTILE_CONT(0.5)` function.
The `median` metric can be used on any numeric dimension or, [for custom SQL](#using-custom-SQL-in-aggregate-metrics), any valid SQL expression that gives a numeric table column.
For example, this creates a metric `median_price` by taking the 50% percentile of the `item_price` dimension:
```yaml
columns:
- name: item_price
meta:
metrics:
median_price:
type: median
```
### average
Takes the average (mean) of the values in the given field. Like SQL's `AVG` function.
The `average` metric can be used on any numeric dimension or, [for custom SQL](#using-custom-SQL-in-aggregate-metrics), any valid SQL expression that gives a numeric table column.
For example, this creates a metric `avg_price` by taking the average of the `item_price` dimension:
```yaml
columns:
- name: item_price
meta:
metrics:
avg_price:
type: average
```
### boolean
Tells you whether something is True or False.
The `boolean` metric can be used on any valid SQL expression that gives you a `TRUE` or `FALSE` value. It can only be used on aggregations, which means either aggregate metrics *or* [custom SQL that references other metrics](#using-custom-sql-in-non-aggregate-metrics). You cannot build a `boolean` metric by referencing other unaggregated dimensions from your model.
`boolean` metrics don't do any aggregations; they just reference other aggregations.
For example, the `avg_price` metric below is an average of all of the `item_price` values in our product table. A second metric called `is_avg_price_above_20` is a `boolean` type metric. The `is_avg_price_above_20` metric has a custom SQL expression that tells us whether the `avg_price` value is greater than 20.
```yaml
columns:
- name: item_price
meta:
metrics:
avg_price:
type: average
is_avg_price_above_20:
type: boolean
sql: 'IF(${avg_price} > 20, TRUE, FALSE)'
```
### count
Does a table count, like SQL’s `COUNT` function.
The `count` metric can be used on any dimension or, [for custom SQL](#using-custom-SQL-in-aggregate-metrics), any valid SQL expression that gives a set of values.
For example, this creates a metric `number_of_users` by counting the number of `user_id` values in the table:
```yaml
columns:
- name: user_id
meta:
metrics:
number_of_users:
type: count
```
### count\_distinct
Counts the number of distinct values in a given field. It's like SQL’s `COUNT DISTINCT` function.
The `count_distinct` metric can be used on any dimension or, [for custom SQL](#using-custom-SQL-in-aggregate-metrics), any valid SQL expression that gives a set of values.
For example, this creates a metric `number_of_unique_users` by counting the number of unique `user_id` values in the table:
```yaml
columns:
- name: user_id
meta:
metrics:
number_of_unique_users:
type: count_distinct
```
### date
Gives you a date value from an expression.
The `date` metric can be used on any valid SQL expression that gives you a date value. It can only be used on aggregations, which means either aggregate metrics *or* [custom SQL that references other metrics](#using-custom-sql-in-non-aggregate-metrics). You cannot build a `date` metric by referencing other unaggregated dimensions from your model.
**`Creating a max or min date metric with type: date`**
If you want to create a metric of a maximum or minimum date, you can't use `type: max` or of `type: min` metrics because these are only compatible with numeric type fields. Instead, you can calculate a maximum or minimum date by defining a metric of `type: date` and using some custom sql, like this:
```yaml
- name: created_at_date
meta:
dimension:
type: date
metrics:
max_created_at_date:
type: date
sql: MAX(${TABLE}.created_at_date)
```
### max
Max gives you the largest value in a given numeric field. It's like SQL’s `MAX` function.
The `max` metric can be used on any numeric dimension or, [for custom SQL](#using-custom-SQL-in-aggregate-metrics), any valid SQL expression that gives a numeric value.
Because `type: max` metrics only work with numerical fields, you can't use them to find a maximum date. Instead, you can use the `MAX()` function in the `sql` parameter of a metric of `type: date` to get a maximum date (you can see an [example of this in the date section](#date).
For example, this creates a metric `max_delivery_cost` by looking at the `delivery_cost` dimension and taking the largest value it finds:
```yaml
columns:
- name: delivery_cost
meta:
metrics:
max_delivery_cost:
type: max
```
### min
Min gives you the smallest value in a given numeric field. It's like SQL’s `MIN` function.
The `min` metric can be used on any numeric dimension or, [for custom SQL](#using-custom-SQL-in-aggregate-metrics), any valid SQL expression that gives a numeric value.
Because `type: min` metrics only work with numerical fields, you can't use them to find a minimum date. Instead, you can use the `MIN()` function in the `sql` parameter of a metric of `type: date` to get a minimum date (you can see an [example of this in the date section](#date).
For example, this creates a metric `min_delivery_cost` by looking at the `delivery_cost` dimension and taking the smallest value it finds:
```yaml
columns:
- name: delivery_cost
meta:
metrics:
min_delivery_cost:
type: min
```
### number
Used with numbers or integers. A `number` metric doesn't perform any aggregation but can be used to perform simple transformations on other metrics.
The `number` metric can be used on any valid SQL expression that gives you a numeric or integer value. It can only be used on aggregations, which means either aggregate metrics *or* [custom SQL that references other metrics](#using-custom-sql-in-non-aggregate-metrics). You cannot build a `number` metric by referencing other unaggregated dimensions from your model.
For example, this creates a metric called `total_gross_profit_margin_percentage` based on the `total_sale_price` and `total_gross_profit_margin` aggregate metrics:
```yaml
columns:
- name: sale_price
meta:
metrics:
total_sale_price:
type: sum
- name: gross_profit_margin
meta:
metrics:
total_gross_profit_margin:
type: sum
total_gross_profit_margin_percentage:
type: number
sql: '(${total_gross_profit_margin}/ NULLIF(${total_sale_price},0))'
```
The example above also uses the NULLIF() SQL function to avoid division-by-zero errors.
### sum
Adds up the values in a given field. Like SQL’s `SUM` function.
The `sum` metric can be used on any numeric dimension or, [for custom SQL](#using-custom-SQL-in-aggregate-metrics), any valid SQL expression that gives a numeric table column.
For example, this creates a metric `total_revenue` by adding up the values in the `revenue` dimension:
```yaml
columns:
- name: revenue
meta:
metrics:
total_revenue:
type: sum
```
### string
Used with fields that include letters or special characters.
The `string` metric can be used on any valid SQL expression that gives you a string value. It can only be used on aggregations, which means either aggregate metrics *or* [custom SQL that references other metrics](#using-custom-sql-in-non-aggregate-metrics). You cannot build a `string` metric by referencing other unaggregated dimensions from your model.
`string` metrics are rarely used because most SQL aggregate functions don't return strings. One common exception is MySQL’s `GROUP_CONCAT` function.
For example, this creates a metric `product_name_group` by combining the unique values of a dimension called `product_name`:
```yaml
columns:
- name: product_name
meta:
metrics:
product_name_group:
type: string
sql: 'GROUP_CONCAT(${TABLE}.product_name)'
```
## Description
We add default descriptions to all of the metrics you include in your model. But, you can override these using the description parameter when you define your metric.
```yaml
metrics:
num_user_ids:
type: count
description: 'Total number of user IDs. NOTE: this is NOT counting unique user IDs'
```
## Format
You can use the `format` parameter to have your metrics show in a particular format in Lightdash. Lightdash supports spreadsheet-style format expressions for all metric types.
To help you build your format expression, we recommend using [https://customformats.com/](https://customformats.com/).
```yaml
metrics:
total_us_revenue:
type: sum
description: 'Total revenue in USD, with two decimal places, compacted to thousands'
format: '$#,##0.00," K"' # 505,430 will appear as '$505.43 K'
percent_of_total_global_revenue:
type: number
description: 'Percent of total global revenue coming from US revenue.'
sql: ${total_us_revenue} / ${total_global_revenue}
format: '0.00%' # 0.67895243 will appear as '67.89%
```
### Example format expressions
| Description | Format Expression | Raw Value | Formatted Output |
| :--------------------------------------------- | :-------------------- | :------------------- | :-------------------- |
| **Adds "km" suffix to the value** | `#,##0.00" km"` | 100000.00 | 100,000.00 km |
| | | 15000.25 | 15,000.25 km |
| | | 500 | 500.00 km |
| **Format date with 12-hour clock** | `m/d/yyyy h:mm AM/PM` | 2023-09-05T15:45:00Z | 9/5/2023 3:45 PM |
| | | 2024-01-20T08:30:00Z | 1/20/2024 8:30 AM |
| **Display the full name of the day** | `dddd` | 2023-09-05T15:45:00Z | Tuesday |
| | | 2024-01-20T08:30:00Z | Saturday |
| **Format positive, negative, and zero values** | `"⬆️ "0;"⬇️ "0;0` | -500 | ⬇️ 500 |
| | | 200 | ⬆️ 200 |
| | | 0 | 0 |
| **Text formatting** | `"Delivered in "@` | 2 weeks | Delivered in 2 weeks |
| | | 18 hours | Delivered in 18 hours |
| **Percentage formatting** | `#,##0.00%` | 0.6758 | 67.58% |
| | | 0.1 | 10.00% |
| | | 0.002 | 0.20% |
| **No formatting** | `0` | 12345232 | 12345232 |
| | | 56.7856 | 57 |
| **Currency formatting** | `[$]#,##0.00` | 15430.75436 | \$15,430.75 |
| | | 15430.75436 | \$15,430.75 |
| **Compact currency in thousands** | `[$]#,##0,"K"` | 15430.75436 | \$15K |
| | | 15430.75436 | \$15.43K |
| **Compact currency in millions** | `[$]#,##0.00,,"M"` | 13334567 | \$13.33M |
| | | 120000000 | \$120.00M |
Spreadsheet-style format expressions are the recommended way of adding formatting to your metrics in Lightdash. There are legacy formatting options, listed below, which are less flexible than the spreadsheet-style formatting.
If you use both legacy and spreadsheet-style formatting options for a single metric, Lightdash will ignore the legacy `format` and `round` options and only apply the spreadsheet-style formatting expression.
#### Format (legacy)
```yaml
models:
- name: sales_stats
columns:
- name: revenue
description: 'Total estimated revenue in GBP based on forecasting done by the finance team.'
meta:
metrics:
total_revenue:
label: 'Total revenue GBP'
type: SUM
format: 'gbp'
```
These are the options:
| Option | Equivalent format expression | Description | Raw value | Displayed value |
| :------ | :--------------------------- | :---------------------------------------------------------------------------------- | :-------- | :-------------- |
| km | '#,##0.00" km"' | Adds the suffix `km` to your value | 10 | 10 km |
| mi | '#,##0.00" mi"' | Adds the suffix `mile` to your value | 10 | 10 mi |
| usd | '\[\$]#,##0.00' | Adds the `$` symbol to your number value | 10 | \$10.00 |
| gbp | '\[\$£]#,##0.00' | Adds the `£` symbol to your number value | 10 | £10.00 |
| eur | '\[\$€]#,##0.00' | Adds the `€` symbol to your number value | 10 | €10.00 |
| jpy | '\[\$¥]#,##0.00' | Adds the `¥` symbol to your number value | 10 | ¥10 |
| percent | '#,##0.00%' | Adds the `%` symbol and multiplies your value by 100 | 0.1 | %10 |
| id | '0' | Removes commas and spaces from number or string types so that they appear like IDs. | 12389572 | 12389572 |
#### Round (legacy)
You can round values to appear with a certain number of decimal points.
```yaml
models:
- name: sales
columns:
- name: revenue
meta:
metrics:
total_revenue:
type: sum
round: 0 # equivalent format expression: '#,##0.0'
```
## Compact
You can compact values in your YAML. For example, if I wanted all of my revenue values to be shown in thousands (e.g. `1,500` appears as `1.50K`), then I would write something like this in my .yml:
```yaml
models:
- name: sales
columns:
- name: revenue
meta:
dimension:
compact: thousands # You can also use 'K'
```
| Value | Alias | Equivalent format expression | Example output |
| :-------- | :------------------- | :------------------------------------ | :------------- |
| thousands | "K" and "thousand" | '#,##0," K"' or '#,##0.00," K"' | 1K |
| millions | "M" and "million" | '#,##0,," M"' or '#,##0.00,," M"' | 1M |
| billions | "B" and "billion" | '#,##0,,," B"' or '#,##0.00,,," B"' | 1B |
| trillions | "T" and "trillion" | '#,##0,,,," T"' or '#,##0.00,,,," T"' | 1T |
| kilobytes | "KB" and "kilobyte" | | 1KB |
| megabytes | "MB" and "megabyte" | | 1MB |
| gigabytes | "GB" and "gigabyte" | | 1GB |
| terabytes | "TB" and "terabyte" | | 1TB |
| petabytes | "PB" and "petabyte" | | 1PB |
| kibibytes | "KiB" and "kibibyte" | | 1KiB |
| mebibytes | "MiB" and "mebibyte" | | 1MiB |
| gibibytes | "GiB" and "gibibyte" | | 1GiB |
| tebibytes | "TiB" and "tebibyte" | | 1TiB |
| pebibytes | "PiB" and "pebibyte" | | 1PiB |
## Custom SQL in aggregate metrics
You can include custom SQL in your metric definition to build more advanced metrics using the sql parameter. Inside the sql parameter, you can reference any other dimension from the given model and any joined models. You **can’t reference other metrics.**
You can reference dimensions from the same model like this: `sql: "${dimension_in_this_model}"`
Or from joined models like this: `sql: "${other_model.dimension_in_other_model}"`
```yaml
metrics:
num_unique_7d_web_active_user_ids:
type: count_distinct # metric type
sql: 'IF(${is_7d_web_active}, ${user_id}, NULL)'
num_unique_paid_user_ids:
type: count_distinct
sql: 'IF(${subscriptions.is_active}, ${user_id}, NULL)'
```
## Using custom SQL in non-aggregate metrics
In non-aggregate metrics, you can reference any other metric from the given model and any joined models. You **can’t reference other dimensions.**
You can reference metrics from the same model like this: `sql: "${metric_in_this_model}"`Or from joined models like this: `sql: "${other_model.metric_in_other_model}"`
```yaml
metrics:
num_unique_users:
type: count_distinct
is_num_unique_users_above_100:
type: boolean
sql: 'IF(${num_unique_users} > 100, TRUE, FALSE)'
percentage_user_growth_daily:
type: number
sql: '(${num_unique_users} - ${growth_model.num_unique_users_lag_1d}) / NULLIF(${growth_model.num_unique_users_lag_1d}, 0)'
```
## Show underlying values
By default, we show all of the dimensions from the Table when you click `View underlying data`. If you have fields from a joined table included in your results table, then we'll also show you all of the fields from the joined Table.
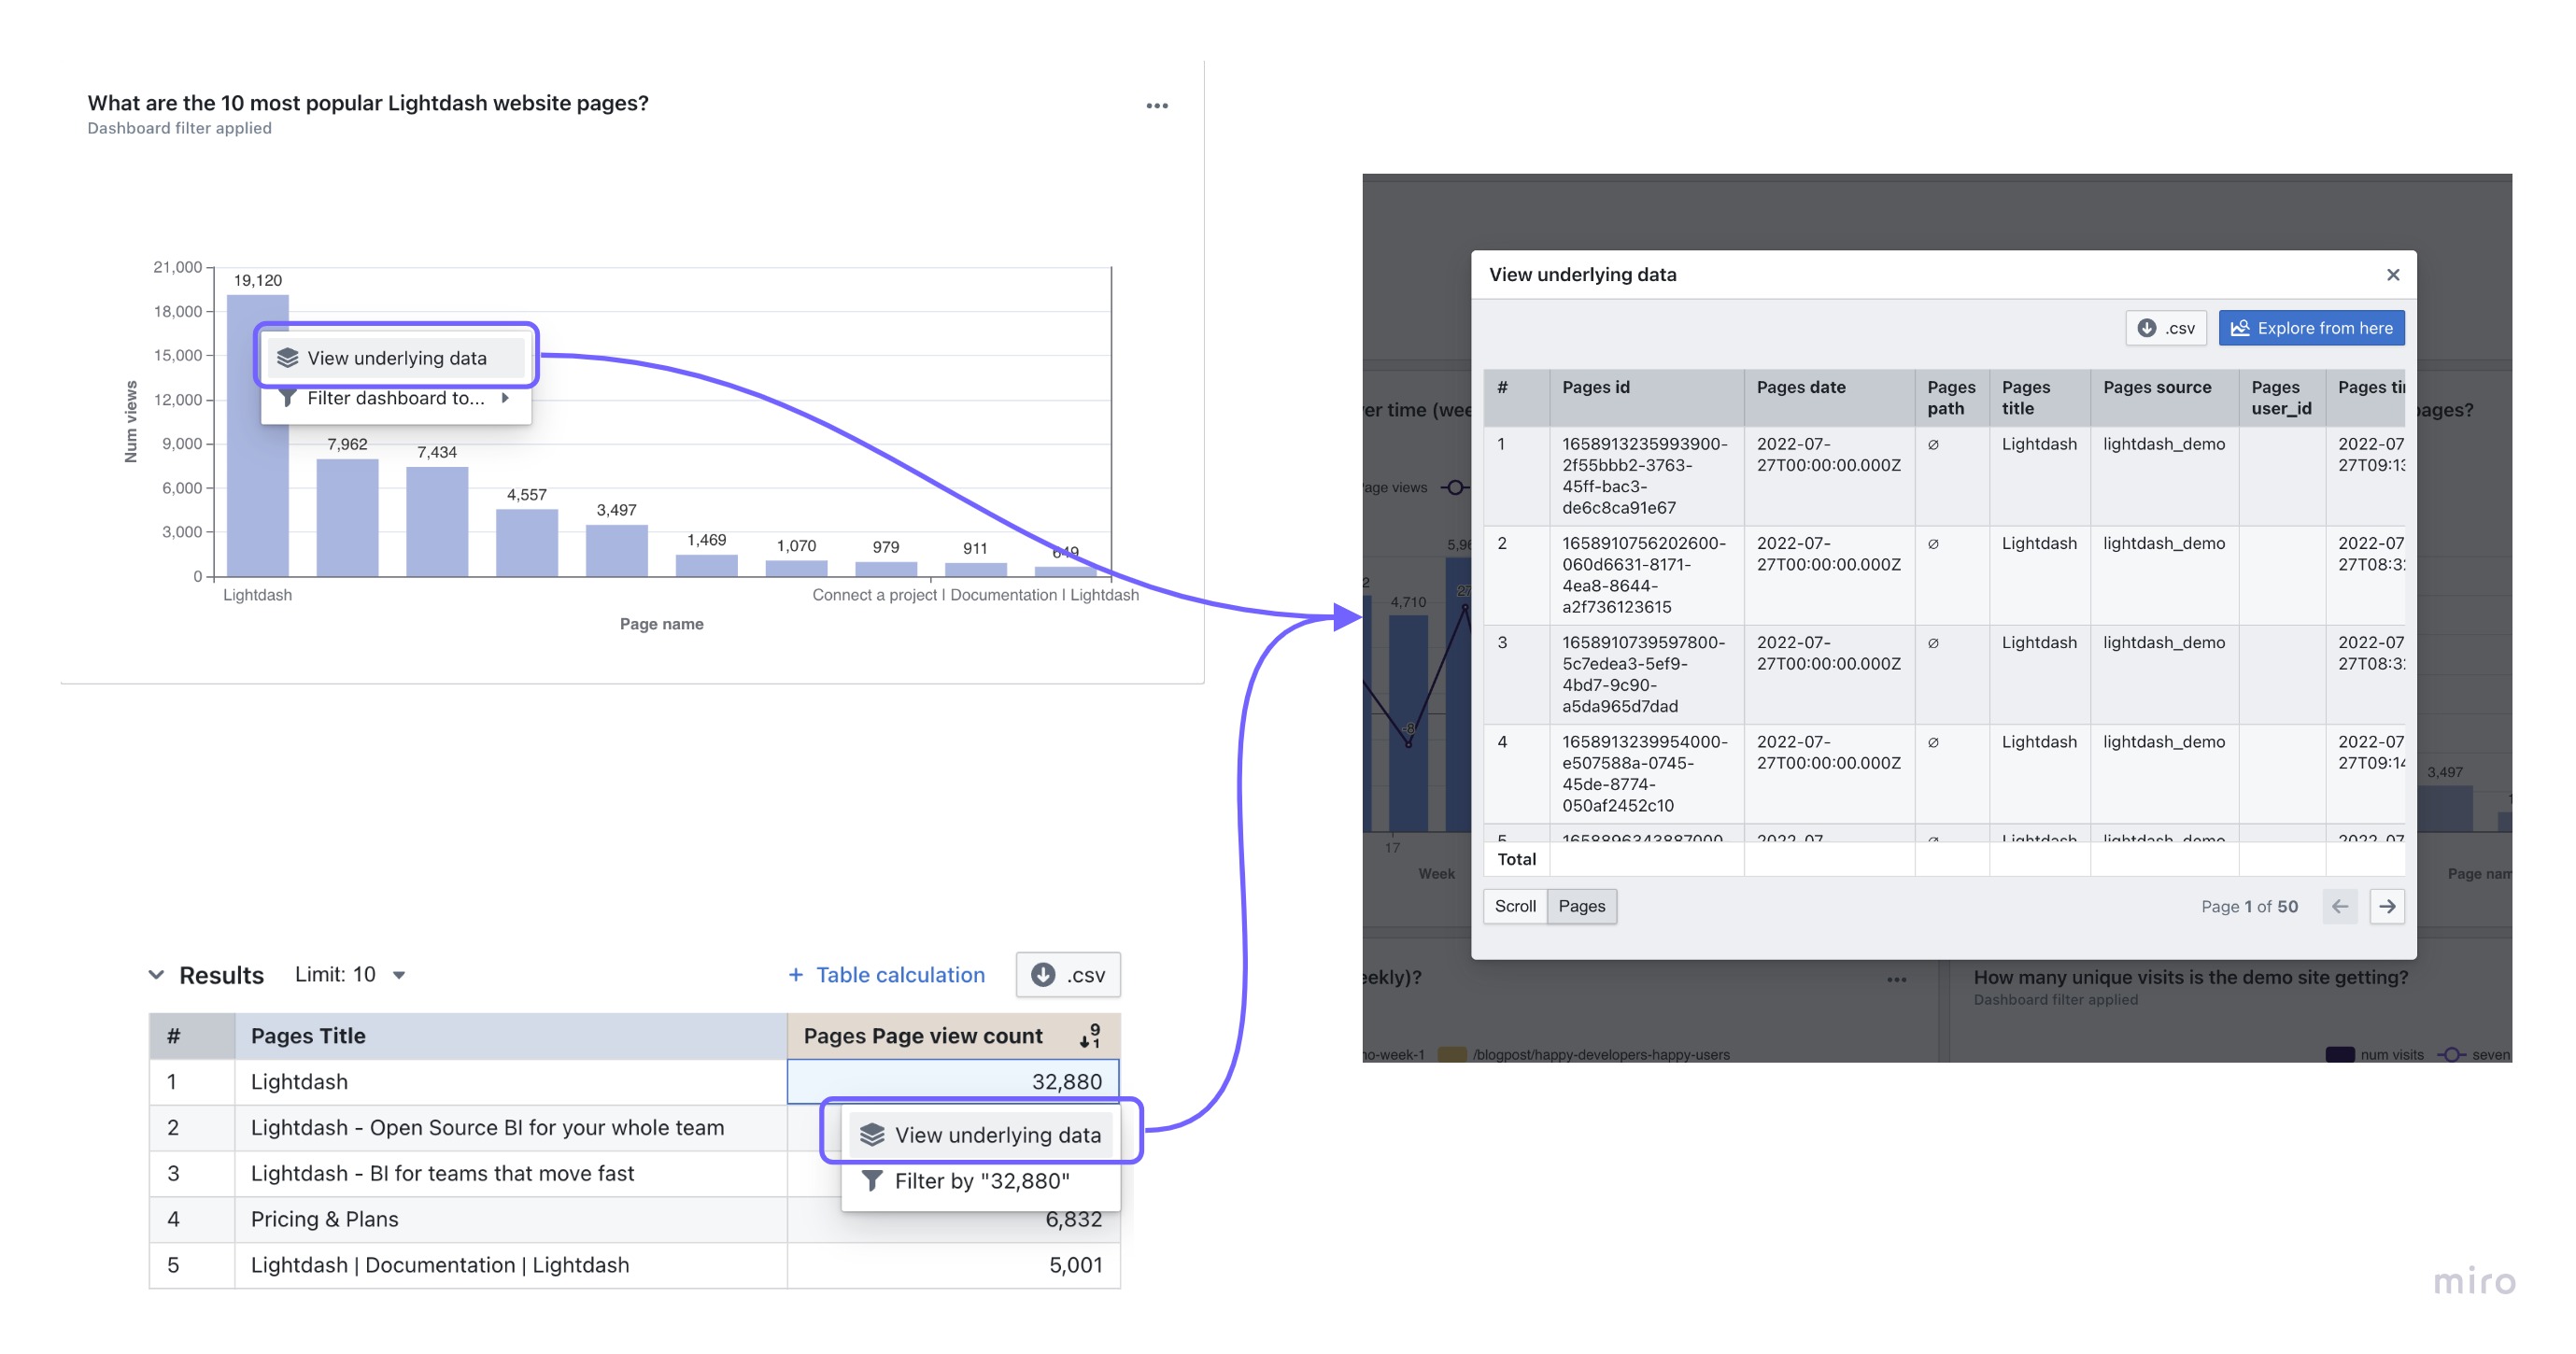
You can limit which dimensions are shown for a field when a user clicks `View underlying data` by adding the list of dimensions to your `.yml` files:
```yaml
models:
- name: sales_stats
meta:
joins:
- join: web_sessions
sql_on: ${web_sessions.date} = ${sales_stats.date}
columns:
- name: user_id
description: 'Unique ID for users.'
meta:
dimension:
type: string
metrics:
count_users:
type: count_distinct
show_underlying_values:
- revenue_gbp_total_est
- actual_date
- web_sessions.session_id # field from joined table
```
The list of fields must be made of dimension names (no metrics) from the base table or from any joined tables. To reference a field from a joined table, you just need to prefix the dimension name with the joined table name, like this: `my_joined_table_name.my_dimension`.
The order that the fields are listed in `show_underlying_values` is the order that they'll appear in on the `view underlying data` table.
## Groups
You can group your dimensions and metrics in the sidebar using the `groups` parameter.
To do this, you need to set up `group_details` in the model's configuration. Then, you can use these groups to organize metrics and dimensions. You can create nested groups up to 2 levels.
```yaml
models:
- name: baskets
meta:
group_details:
product_details:
label: Product Details
description: 'Fields that have information about the products in the basket.'
item_details:
label: Item Details
description: 'Fields that have information about the items in the basket.'
columns:
- name: basket_item_id
description: 'ID for the product item within the basket.'
meta:
dimension:
groups: ['product_details', 'item_details'] # this would add the dimension to a nested group: `product details` --> `item details`
metrics:
count_total_basket_items:
type: count_distinct
groups: ['product_details', 'item_details'] # this would add the metric to a nested group: `product details` --> `item details`
- name: product_name
description: 'Full name of the product.'
meta:
dimension:
label: 'Product name'
groups: ['product_details'] # this would add the dimension under the group label: `product_details`
metrics:
count_total_product_types:
type: count_distinct
groups: ['product_details'] # this would add the metric under the group label: `product_details`
```
## Filters
Filters are applied to metrics any time that metric is used in Lightdash. Filters can only be used with [aggregate metric types](#metric-categories).
For example, we could add a filter to our users count to make sure it didn't include user IDs with closed accounts, like this:
```yaml
models:
- name: sales_stats
columns:
- name: user_id
description: 'Unique ID for users.'
meta:
dimension:
type: string
metrics:
count_users:
type: count_distinct
filters:
- is_closed_account: false
```
These filters do not appear in the `Filters` tab in the Explore view, instead, they are applied automatically in the SQL query that fetches your results. That means filters added using the `filter` parameter can't be removed in the UI and won't be visible to users unless they look at the SQL query.
### Available filter types
| Type | Example (in English) | Example (as code) |
| :---------------------------- | :--------------------------------------------- | :-------------------------- |
| is | User name is equal to katie | user\_name: "katie" |
| is not | User name is not equal to katie | user\_name: "!katie" |
| contains | User name contains katie | user\_name: "%katie%" |
| does not contain | User name does not contain katie | user\_name: "!%katie%" |
| starts with | User name starts with katie | user\_name: "katie%" |
| ends with | User name ends with katie | user\_name: "%katie" |
| is greater than (number) | Number of orders is greater than 4 | num\_orders: "> 4" |
| in the past (date) (interval) | Date is before x (days / months / years) | date: "inThePast 14 months" |
| in the next (date) (interval) | Date is after x (days / months / years) | date: "inTheNext 14 days" |
| is greater than or equal to | Number of orders is greater than or equal to 4 | num\_orders: ">= 4" |
| is less than | Number of orders is less than 4 | num\_orders: "\< 4" |
| is less than or equal to | Number of orders is less than or equal to 4 | num\_orders: "\<= 4" |
| is null | Status is NULL | status: "null" |
| is not null | Status is not NULL | status: "!null" |
| is \[boolean] | Is complete is true | is\_complete: "true" |
| is not \[boolean] | Is complete is false or null | is\_complete: "!true" |
### Date filters
For date filtering, use `inThePast` or `inTheNext` followed by a number and time unit (days, months, or years). These keywords are case sensitive and must be written exactly as shown.
```yaml
filters:
- created_at: 'inThePast 30 days'
```
### Special characters in filters
To use special characters such as `%!_>` in your filter value you can either put the value in quotes, or escape special characters with a backslash `\`. For example, if you wanted to filter for subscription status of `is_subscribed` you can write the metric in one of these ways:
```yaml
filters:
- subscription_status: 'is_subscribed'
```
```yaml
filters:
- subscription_status: is\_subscribed
```
### Filtering using a list of values
To filter a field using a list of values you can supply them as an array for that field. For example, if you wanted to filter for orders with order status `completed` or `shipped` you should write the metric like:
```yaml
columns:
- name: order_id
meta:
metrics:
completed_or_shipped_order_count:
type: count_distinct
filters:
- order_status:
- completed
- shipped
```
### Filters are joined using `AND`
For example:
```yaml
filters:
- is_closed_account: false
- is_7d_active: true
```
Would give you logic like `is_closed_account = TRUE AND is_7d_active = FALSE`.
### Adding filters from joined models
To filter using a field from a joined model, just use the syntax `model_name.field`, like this:
```yaml
models:
- name: sales_stats
meta:
joins:
- join: web_sessions
sql_on: ${web_sessions.date} = ${sales_stats.date}
columns:
- name: user_id
description: 'Unique ID for users.'
meta:
dimension:
type: string
metrics:
count_users:
type: count_distinct
filters:
- is_closed_account: false
- web_sessions.is_bot_user: false
```
### Metric filters cannot be used with non-aggregate metrics
You can't use filters with non-aggregate metric types. Instead, if your non-aggregate metrics are referencing aggregate metric types, you need to apply metric filters to the aggregate metrics.
Here's an example: imagine you wanted to calculate the average cost per item that had the status `shipped`. You would need to do something like this in your .yml:
```yaml
models:
- name: orders
meta:
metrics:
average_cost_per_item_shipped:
type: number
sql: ${total_cost_of_shipped} / ${count_unique_items_shipped}
columns:
- name: item_id
description: 'Unique ID for items ordered.'
meta:
dimension:
type: string
metrics:
count_unique_items:
type: count_distinct
count_unique_items_shipped:
type: count_distinct
filters:
- status: 'shipped'
- name: item_cost
description: 'Cost for each item ordered.'
meta:
dimension:
type: number
metrics:
total_cost:
type: sum
total_cost_of_shipped:
type: sum
filters:
- status: 'shipped'
```