> ## Documentation Index
> Fetch the complete documentation index at: https://lightdash-docs-many-to-many.mintlify.site/llms.txt
> Use this file to discover all available pages before exploring further.
# User attributes
> User attributes provide a way to customise Lightdash charts, dashboards, and other behaviour depending on the user that is logged in. For example, you could only show your sales team members data that are relevant to their region.
User attributes are defined for your whole Organization and can only be a text value (not a date or number). Some examples of user attributes are:
* Sales region
* Department
* Can view PII
* Can view financial data
To start user attributes you need to follow 2 steps:
1. Define the user attribute, users can only have user attributes that are explicitly created by admins
2. Set the user attribute value per user.
User attributes can only be managed by admins.
## Managing user attributes
### Creating user attributes
User attributes can be created by navigating to **Organization Settings** > **User Attributes** and clicking on the**Add attribute** button. This will create a new user attribute but it will not be assigned to any user.
### Assigning user attributes to users and groups
User attributes can be assigned to users or [groups](/references/groups) by navigating to **Organization Settings** > **User Attributes** and clicking on the user attribute you'd like to assign. Select a user by email address, or a group by group name and set their value.
### Setting a default value for your user attribute
You can add a default attribute that will be applied to all users who don't have their own value defined in this user attribute.
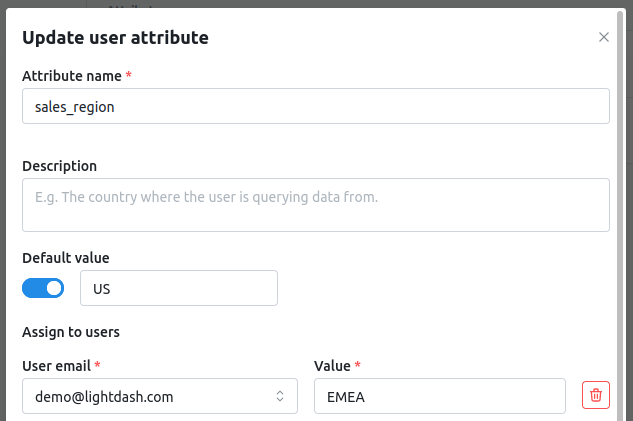
If a user has an attribute defined, we will ignore the default for that user.
## Using user attributes in Lightdash
There are several places in Lightdash where you can customise behaviour based on user attributes.
When referencing user attributes in SQL you can use the following [SQL variables](/references/sql-variables):
* `${lightdash.attributes.my_attr_1}` - a user attribute called `my_attr_1`
* (optional) `ld` as an alias for `lightdash`
* (optional) `attribute` or `attr` as an alias for `attributes`
* `${lightdash.user.}` - reference an `intrinsic_attribute` of the current Lightdash user
* (optional) `ld` as an alias for `lightdash`
* available intrinsic user attributes:
* `email`
**The user email attribute is only available when the email is verified.**
This is a security measure to prevent users from creating/updating an account with any email they don't own and gain access to data they shouldn't see.
If the user email is not verified you will get the following error:
```yaml
models:
- name: example
meta:
sql_filter: ${lightdash.user.email} = 'example@lightdash.com'
```
If you are self hosting you can enable [SMTP](/self-host/customize-deployment/configure-smtp-for-lightdash-email-notifications) or [SSO](/self-host/customize-deployment/use-sso-login-for-self-hosted-lightdash) authentication to allow users to verify their email address.
### Row filtering with `sql_filter`
You can use user attributes to filter the rows returned by a query. This is useful if you want to restrict the data based on the user's attributes. To reference a user attribute in your sql, use the special lightdash reference`${lightdash.attributes. }`. You should use the `IN` operator since the attribute might have multiple values.
For example, if you have a user attribute called `sales_region` you can use it in your sql like this:
```yaml
models:
- name: my_model
meta:
sql_filter: ${TABLE}.sales_region IN (${lightdash.attributes.sales_region})
```
### Column filtering with `required_attributes`
You can use `user attributes` to limit some dimensions to some users.
Users without access to this dimension will not see it, as well as the **metrics derived from it**. .
In the example below, only users with `is_admin` attribute `true` can use the `salary` dimension on `user` table.
```yaml
columns:
- name:
description: User name
- salary:
description: User salary
meta:
dimension:
required_attributes:
is_admin: "true"
```
If a user without access to this dimension runs a query that contains this dimension, they will get a `Forbidden` error. Also, if the user runs a query that contains a metric derived from this dimension, they won't see the metric on the explore page and won't be able to query from it.
You can add multiple attributes for a single dimension. There are two ways to do this:
1. **Multiple attributes joined with `AND`.** In the example below, only users with `is_admin: "true" AND team_name: "HR"` have access to the `salary` dimension in Lightdash.
```yaml
columns:
- name: user
description: User name
- name: salary
description: User salary
meta:
dimension:
required_attributes:
is_admin: 'true'
team_name: 'HR'
```
2. **Multiple attribute values joined with `OR`.** In the example below, users with `team_name = 'HR' OR team_name = 'C-Suite'` have access to the `salary` dimension in Lightdash.
```yaml
columns:
- name: user
description: User name
- name: salary
description: User salary
meta:
dimension:
required_attributes:
team_name: ['HR', 'C-Suite']
```
Column filtering using `required_attributes` does not take into account intrinsic attributes of a user - `email`.
### Table filtering with `required_attributes`
You can use `user attributes` to limit some tables to some users.
In the example below, only users with `is_admin` attribute `true` can use the `payments` table. Users without access to this table will not see it on the `tables page` or the `explore page` when joined to other tables.
```yaml
models:
- name: payments
meta:
required_attributes:
is_admin: "true"
```
Similar to [columns filtering](#column-filtering-with-required%5Fattributes), you can add multiple attributes for a single table.
Table filtering using `required_attributes` does not take into account intrinsic attributes of a user - `email`.
### Filtering joins with `sql_on`
If you're joining a table, you can also customise the rows that are returned
You can use user attributes to filter the rows returned by a join. This is useful if you want to restrict the data returned from the joined table. To reference a user attribute in your sql, use the special lightdash reference`${ lightdash.attributes. }`. For example, if you have a user attribute called `sales_region` you can use it in your sql like this:
```yaml
models:
- name: base
meta:
joins:
- join: joined
sql_on: >
${base}.id = ${joined}.id
AND ${joined}.sales_region = ${lightdash.attributes.sales_region}
```
## Current limitations
Lightdash dimensions and custom metrics are protected by this feature, however, it is possible to write custom SQL to bypass this filter, for example:
* Developers and admins running SQL queries on SQL runner.
* Custom SQL or subqueries on `table calculations`
Scheduler deliveries will run against the user who created the scheduled delivery, be careful when sharing required attributes with other users.
## Demo: filtering a chart based on user attributes
The following video gives you a full demo for how to use user attributes to filter chart results.
## How user and group attribute values interact
Users can be assigned attributes, but you can also assign groups attributes. So, if a user is assigned an attribute value, but they're also part of a group that's been assigned a value for the same attribute, what happens?
### Column filtering
If the required attributes match ***any*** of the user's group or user attribute values, then the user has access to the column.
For example, if a user is part of a group with the attribute value `kiwi`, another group with the attribute value `orange`, and they've also been assigned as a user to the attribute value `coconut`.
```yaml
columns:
- name: tropical_fruits_column
meta:
dimension:
required_attributes:
fruits: 'coconut'
```
In this example, the `tropical_fruits_column` will be visible to them because `coconut` is listed in their attribute values `['kiwi','orange', 'coconut']`.
### Row filtering
The template reference will be replaced by an array of the user's group or user attribute values.
Let's walk through an example:
```yaml
models:
- name: my_model
meta:
sql_filter: ${TABLE}.fruit IN (${lightdash.attributes.fruit})
```
In this example, the `${lightdash.attributes.fruit}` will be replaced with `'kiwi','orange','coconut'`. The final SQL will be `my_model.fruit IN ('kiwi','orange','coconut)`
 ```yaml
models:
- name: example
meta:
sql_filter: ${lightdash.user.email} = 'example@lightdash.com'
```
If you are self hosting you can enable [SMTP](/self-host/customize-deployment/configure-smtp-for-lightdash-email-notifications) or [SSO](/self-host/customize-deployment/use-sso-login-for-self-hosted-lightdash) authentication to allow users to verify their email address.
```yaml
models:
- name: example
meta:
sql_filter: ${lightdash.user.email} = 'example@lightdash.com'
```
If you are self hosting you can enable [SMTP](/self-host/customize-deployment/configure-smtp-for-lightdash-email-notifications) or [SSO](/self-host/customize-deployment/use-sso-login-for-self-hosted-lightdash) authentication to allow users to verify their email address.