> ## Documentation Index
> Fetch the complete documentation index at: https://lightdash-docs-many-to-many.mintlify.site/llms.txt
> Use this file to discover all available pages before exploring further.
# Configure a Slack integration for self-hosted Lightdash
In this guide we will show you how you can enable [the Slack integration](/references/slack-integration) on your on self-hosted Lightdash server.
### Create a new Slack app on your organization
First we will have to create a Slack APP [https://api.slack.com/apps?new\_app=1](https://api.slack.com/apps?new%5Fapp=1)
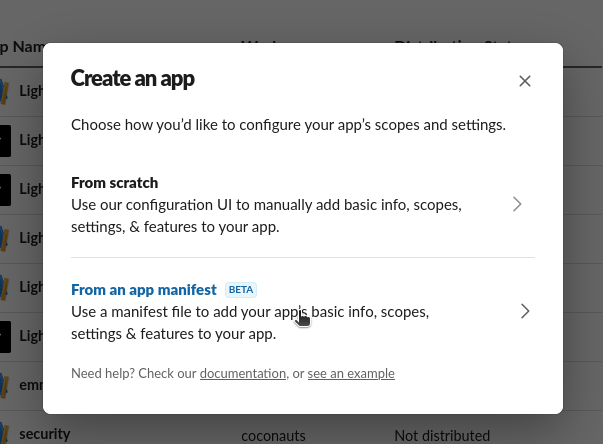
You can select `From an app manifest` to make it easier.
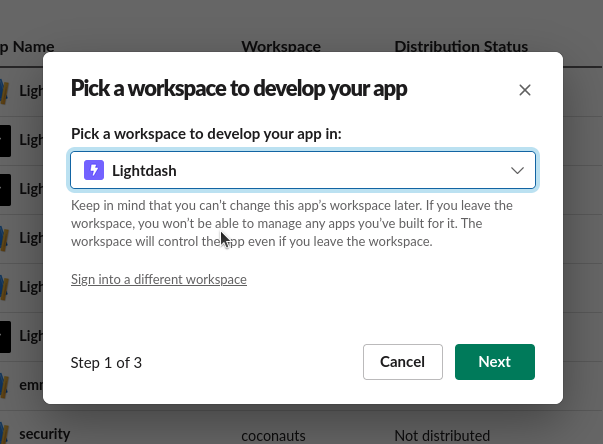
 Then select the workspace you want to enable this into. Later you can `enable distribution` if you want to use a different Slack workspace.
 Then copy this manifest to allow URL unfurls in your app. **Make sure you update `your-lightdash-deployment-url.com` in the manifest below** (for example, `app.lightdash.cloud`).
```json
display_information:
name: Lightdash
description: Share Lightdash URLs on your Slack
background_color: '#7262ff'
features:
bot_user:
display_name: Lightdash
always_online: false
unfurl_domains:
- your-lightdash-deployment-url.com
oauth_config:
redirect_urls:
- https://your-lightdash-deployment-url.com/api/v1/slack/oauth_redirect
scopes:
bot:
- app_mentions:read
- channels:join
- channels:read
- chat:write
- chat:write.customize
- files:read
- files:write
- groups:read
- links:read
- links:write
- users:read
- im:write
settings:
event_subscriptions:
request_url: https://your-lightdash-deployment-url.com/slack/events
bot_events:
- app_mention
- link_shared
interactivity:
is_enabled: true
request_url: https://your-lightdash-deployment-url.com/slack/events
org_deploy_enabled: false
socket_mode_enabled: false
token_rotation_enabled: false
```
Finally, click on `create`
### Copying credentials
Now copy the following credentials from your new app.
From `Basic Information`
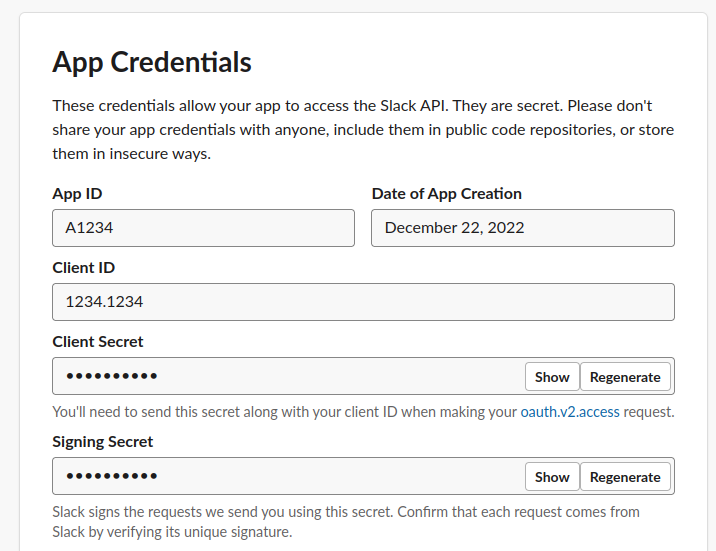
* Client ID
* Client secret (show and copy)
* Signing secret (show and copy)
### Adding credentials to your local environment
Now you need to add the following environment variables to your Lightdash server using the credentials we previously copied
* `SLACK_CLIENT_ID`: Client ID (make sure it is between quotes, so it is a string, not a number)
* `SLACK_CLIENT_SECRET`: Client secret
* `SLACK_SIGNING_SECRET`: Signing secret
* `SLACK_STATE_SECRET`: This can be any string
Restart your Lightdash service, now you should be able to use [the Slack integration](/references/slack-integration) on your self-hosted Lightdash.
Then copy this manifest to allow URL unfurls in your app. **Make sure you update `your-lightdash-deployment-url.com` in the manifest below** (for example, `app.lightdash.cloud`).
```json
display_information:
name: Lightdash
description: Share Lightdash URLs on your Slack
background_color: '#7262ff'
features:
bot_user:
display_name: Lightdash
always_online: false
unfurl_domains:
- your-lightdash-deployment-url.com
oauth_config:
redirect_urls:
- https://your-lightdash-deployment-url.com/api/v1/slack/oauth_redirect
scopes:
bot:
- app_mentions:read
- channels:join
- channels:read
- chat:write
- chat:write.customize
- files:read
- files:write
- groups:read
- links:read
- links:write
- users:read
- im:write
settings:
event_subscriptions:
request_url: https://your-lightdash-deployment-url.com/slack/events
bot_events:
- app_mention
- link_shared
interactivity:
is_enabled: true
request_url: https://your-lightdash-deployment-url.com/slack/events
org_deploy_enabled: false
socket_mode_enabled: false
token_rotation_enabled: false
```
Finally, click on `create`
### Copying credentials
Now copy the following credentials from your new app.
From `Basic Information`

* Client ID
* Client secret (show and copy)
* Signing secret (show and copy)
### Adding credentials to your local environment
Now you need to add the following environment variables to your Lightdash server using the credentials we previously copied
* `SLACK_CLIENT_ID`: Client ID (make sure it is between quotes, so it is a string, not a number)
* `SLACK_CLIENT_SECRET`: Client secret
* `SLACK_SIGNING_SECRET`: Signing secret
* `SLACK_STATE_SECRET`: This can be any string
Restart your Lightdash service, now you should be able to use [the Slack integration](/references/slack-integration) on your self-hosted Lightdash.