Set up CORS
To make the React SDK work, you need to update your “Cross-Origin Resource Sharing” (CORS) policy. This is done using environment variables. For Lightdash Cloud customers, you’ll need to contact the Lightdash team to update these for you.Why this is needed?Enabling CORS (Cross-Origin Resource Sharing) is necessary because browsers enforce security policies that prevent web applications from making requests to a different domain than the one that served the app (known as the Same-Origin Policy).Since the Lightdash React SDK interacts with an Lightdash API, you need to configure CORS on your Lightdash instance to allow your frontend application to communicate with the Lightdash server without being blocked by the browser.
Installing the Lightdash SDK
In your frontend project, use your preferred package manager to install the SDK.At the moment, we support React 18 and 19, so make sure your frontend is using React 18 or later.
For Next.js, version 15 or later is required.
Using the Lightdash SDK
In your frontend project, import and use theLightdash.Dashboard component in your desired location to mount the Lightdash dashboard.
Generating an embed token
Development
When developing you can quickly and easily generate tokens through the Lightdash UI. Since this requires manual steps we don’t recommend you do this in production.Production
To run the Lightdash SDK in production you need:- A frontend to embed the Lightdash dashboard.
- A backend (or other privileged environment) where you can safely generate embedding tokens. This component will be able to generate access to any content, so this shouldn’t be accessible to your end users.
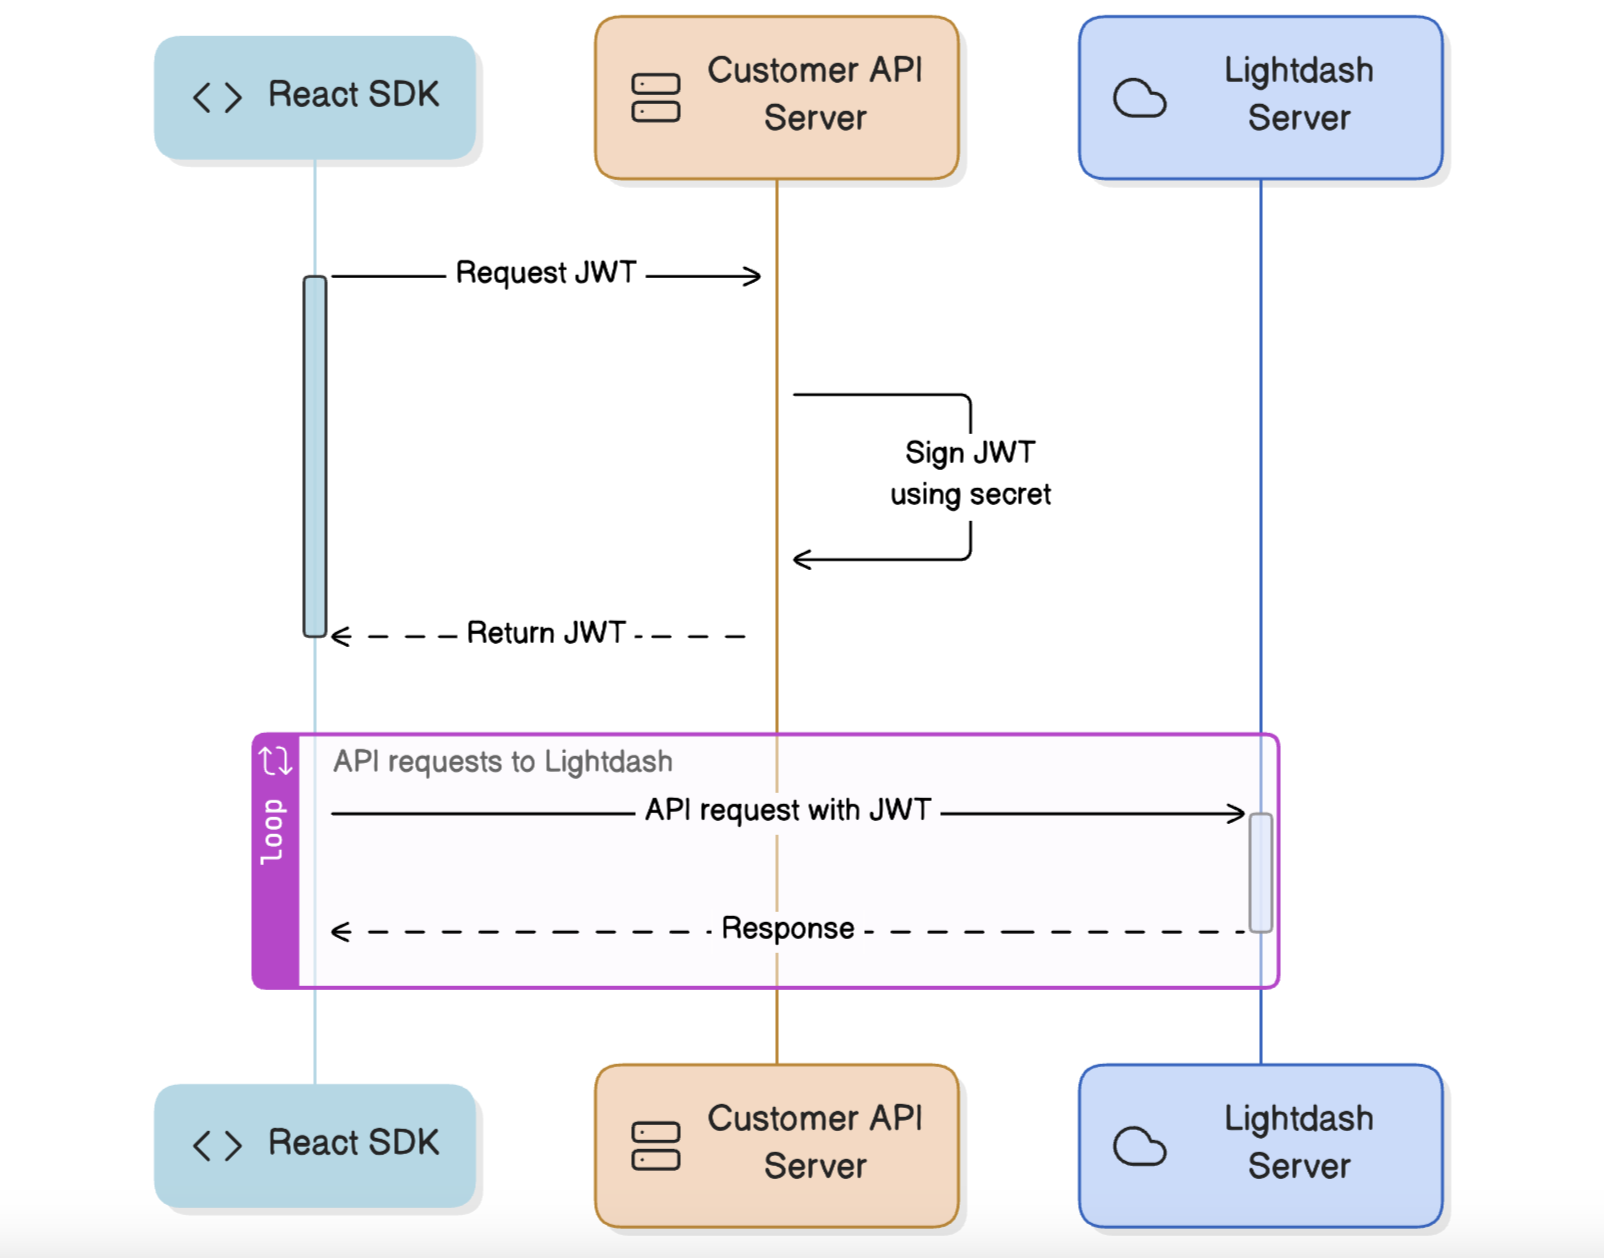 To generate a signed JWT token, you need to use your embed secret, which is located in Settings → Embed in Lightdash. There, you can generate or regenerate the secret. This secret is used to sign JWT tokens, allowing secure use of the SDK.
You can use the form to configure which Dashboard you want to show in the SDK, enable specific features, and set up User Attributes for advanced security controls. For more details on User Attributes, check out the guide here.
After you configure the form you should end up with the snippet which looks like this:
To generate a signed JWT token, you need to use your embed secret, which is located in Settings → Embed in Lightdash. There, you can generate or regenerate the secret. This secret is used to sign JWT tokens, allowing secure use of the SDK.
You can use the form to configure which Dashboard you want to show in the SDK, enable specific features, and set up User Attributes for advanced security controls. For more details on User Attributes, check out the guide here.
After you configure the form you should end up with the snippet which looks like this:
The Lightdash SDK works the same way as our embedding feature, which embeds the Lightdash dashboard as an “iframe”. We recommend reading the documentation on Embedding, which provides a detailed explanation of how token generation works and how to securely use Lightdash content using the SDK.
Applying styles
It’s possible to override some styles within the<Lightdash.Dashbaord/> component to match the surrounding page better. Some styles will cascade, but some charts and components set things like font-family explicitly, so it is necessary to pass them to the component. Supported style overrides are:
fontFamily- which will set all fonts within the dashboard to the specified font family. Note that only font family will be updated; font sizes and other properties will be preserved.backgroundColor- sets the background for the dashboard (not the tiles). This can be set to any color ortransparent.
styles object passed to the dashboard. For example:
Filtering data
Filters can be passed to the<Lightdash.Dashbaord/> to filter dimensions by values. Filters are passed as an array to the dashboard like this:
field- the name of the dimension to filter bymodel- the model the dimension is a part ofoperator- the fitler operator, specified with theFilterOperatorenumvalue- the value or values to fitler against. Some opperators, such asIN_BETWEENexpect an array, others take only a value
Available fields
Note that only field that are available for filtering will be filterable. These are specified in the token passed to the SDK. To generate such a token, see the Lightdash embed configuration.Localization
The Lightdash SDK supports multilingual translation using standard i18n translation objects. To display a translated Lightdash dashboard, an app simply needs to pass a correctly formatted translation object to the SDK. We recommend using the following tools (or similar) to create and manage translations efficiently:- Translation maps – The Lightdash CLI can generate translation maps when downloading content as code. These maps include keys and original text for all translatable strings in a dashboard, making them easy to use with translation tools like Locize or for manual translation. See below for details.
- Runtime translation management– In apps using the SDK, we recommend using a translation library like
i18nextto handle translation parameters and generate translation objects dynamically. See below for an example. - Translation production tools – Tools like Locize help translators manage translations efficiently during production. Locize, for instance, can process translation objects from the Lightdash CLI translation maps and generate the dictionaries required by the SDK. These dictionaries can be included statically in the app or fetched dynamically from Locize servers. See the demo video below for an overview.
Video overview of Localization
Translation maps
The Lightdash CLI can produce translation maps, which specify translatable strings in a structured object which can be translated in a Lightdash dashboard. To include translation maps when downloading content with the Lightdash CLI, add the--language-map flag:
<file name>.language.map.yml file containing a nested object and its existing translatable strings. Here’s a simple dashboard language map:
Runtime translation
At runtime, if a translation object is passed to the Lightdash SDKcontentOverrides prop, the specified translations will be made. We suggest using i18Next to load translations, specify a language and produce the translation object (with getResoruceBundle):
i18Next can be set up to fetch translations, but it can be set up to fetch translations directly from Locize or another language server.